We have long wrapped our framed buildings with a “layer”. What we called it and what we make it out of has changed over time. And now the vapor permeance of it needs to be re-thought. How low can you go1? How high can you go? Does it matter? Where does it matter? Vapor transmission at the exterior of a wall assembly is not always straightforward. We have to worry about how much can get out as well as how much can get in. And things change as thermal resistance goes up and air leakage goes down.
You can go pretty low permeance wise with a wall that has a pretty low thermal resistance in most climates but you can’t go low with a wall that has a really high thermal resistance in a cold climate. And everything seems to work better with a vented air space between the sheathing and its water control layer and the cladding. Back venting a cladding turns out to be a big deal when you are dealing with permeance in high performance walls. In fact back venting cladding turns out to be a really good idea for all wall assemblies in all climates regardless of thermal resistance. We were here before (see BSI-038: Mind the Gap, Eh? and BSI-057: Hockey Pucks & Hydrostatic Pressure).
So now that I have said everything that needs to be said let’s get into the weeds. First of all water vapor goes both ways.2 It goes from the inside out and the outside in. And the only driver is vapor pressure. Except when it is not. Huh? Water vapor via the mechanism of vapor diffusion will move from a higher vapor pressure to a lower vapor pressure courtesy of the Second Law of Thermodynamics. End of story. Except airflow tends to complicate things.
Air can carry water vapor when the air moves from a higher air pressure to a lower air pressure also courtesy of the Second Law of Thermodynamics. It can get ugly when diffusion is moving water vapor in one direction due to a vapor pressure gradient and air is moving water vapor in the opposite direction due to an opposite air pressure gradient. In most climates where people like to live–excluding places where they can play hockey outside–the way to deal with this is to not have a vapor “barrier” anywhere in a wall assembly and control the air flow by getting rid of big holes. Some folks even try to control the air pressure gradient – usually with little or no success. But in a poorly insulated wall that is vapor open on both sides with no big holes it works even when you ignore the air pressure gradient. The caveat is the space inside is not humidified during the winter. So we can forget about this approach with museums, art galleries, hospitals and grow-ops3.
I am going to describe a bunch of walls that have historically performed well in various climate zones and talk about their permeance. They are a bear to model. The way to do the modeling is you take a wall that you know works and fiddle with the model until the model also agrees that the wall works.4
So let’s go with an easy wall first. Plywood on the outside. Gypsum board on the inside. Air permeable insulation in the cavity–either fiberglass or cellulose. The cavity is between 3½ and 5½ inches thick. So we are talking cavity insulation between R-13 and R-20 more or less. Latex paint on the interior gypsum board. The painted gypsum board has a combined permeance typically around 10 perms. On the outside of the plywood sheathing we are going to install a housewrap or building wrap or water resistive barrier (wrb) or whatever we are calling it these days. For the rest of this column we are going to call this “The Layer”. And outboard of “The Layer” on this particular wall we will go with vinyl siding. See Figure 1.
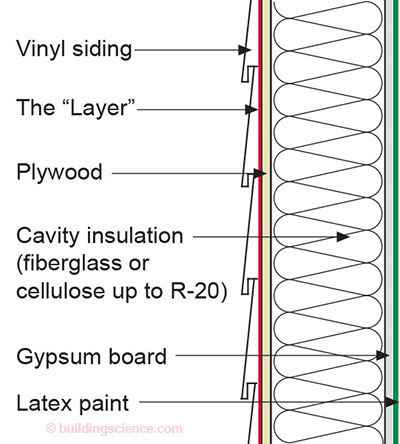
Figure 1: Easy Wall—Plywood on the outside. Gypsum board on the inside. Air permeable insulation in the cavity. Latex paint on the interior gypsum board. The painted gypsum board has a combined permeance typically around 10 perms. On the outside of the plywood sheathing is a housewrap or building wrap or water resistive barrier (wrb)—“The Layer”. And outboard of “The Layer” vinyl siding.

Figure 2: Vapor Permeance of WRB’s—Notice how the vapor permeance of “asphalt impregnated felt” or “asphalt saturated felt” or “asphalt saturated kraft paper” increases with relative humidity. Pretty awesome. In this case “The Layer” goes from a low of 5 perms to a high of 100 perms.
It is key to note that “The Layer” is over plywood and it turns out that plywood has a similar property. Plywood permeance also increases with relative humidity (Figure 3).
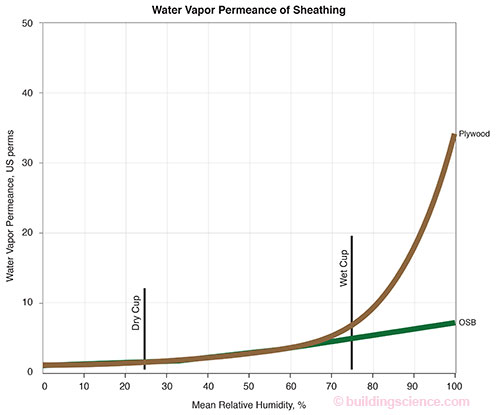
Figure 3: Permeance of Plywood and OSB—Plywood permeance increases with relative humidity. OSB, not so much.
Not done yet. The cladding is vinyl siding. Vinyl siding is not airtight. Vinyl siding is not a reservoir cladding–it does not absorb moisture like brick or stucco or wood or fibercement. Vinyl siding by virtue of its profile has an air gap behind it. Vinyl siding is a “back vented” cladding.5
And still not done yet. The interior moisture load is a big deal and until very recently it tended to be pretty low in the winter and high in the summer. A good representation is a sinusoid with upper and lower peaks in July and January (Figure 4). In most houses and office buildings in the old days – think of the time of the Fat Man and Elvis and Chubby - the colder the climate the lower the interior relative humidity in the winter because the temperature difference drove air change via the stack effect. And air change provided dilution of interior moisture. Most houses and most buildings in cold climates spent their coldest months between 10 and 20 percent relative humidity. Not a comfortable place and being an innovative bunch we invented humidifiers and tried to push things into the 20 percent range. Tough to do in a leaky house or building–especially one with single pane glass.
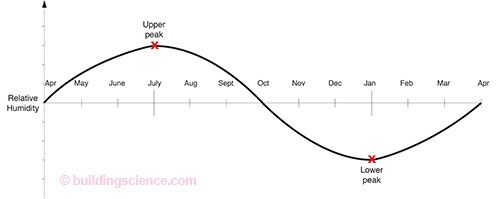
Figure 4: Interior Moisture Load—Until very recently it tended to be pretty low in the winter and high in the summer. A good representation is a sinusoid with upper and lower peaks in July and January. In most houses and office buildings in the old days – the colder the climate the lower the interior relative humidity in the winter because the temperature difference drove air change via the stack effect. And air change provided dilution of interior moisture. Most houses and most buildings in cold climates spent their coldest months between 10 and 20 percent relative humidity. Not a comfortable place and being an innovative bunch we invented humidifiers and tried to push things into the 20 percent range.
So what did we learn from these walls? They worked very well. The lower limit for “The Layer” was pegged at 5 perms. The model codes did that for us based on what we were using at the time. It turns out to be a pretty reasonable number. And it remains in the codes today. What about the upper limit? There really isn’t one. I have seen products that are 100 perms and higher. But understand what is really going on in the assembly described in Figure 1. The plywood sheathing is the “throttle” for the vapor drive—it varies between 1 perm and 30 perms. And we have a back ventilated cladding. And we have low interior moisture levels. Check out Figure 2 again. Note the low perm and high perm wrb’s. They all work for Figure 1. Everything works for Figure 1. And in all climates—from Key West to St. Johns.
Start changing a few things and the limits for “The Layer” change.
Let’s mess up the easy wall. Change the plywood to OSB and we get Figure 5. Looks a lot like Figure 1. But it is not at all like Figure 1. Look at Figure 3 again. The OSB is a very different “throttle” than plywood. The OSB only varies between 1 perm and 7 perms. This is a huge, huge difference. Now lets also change the interior moisture load. Still leave it as a sinusoid. But now have the lower peak at 40 percent6 and the upper peak at 60 percent and drop the assembly into Chicago (Climate Zone 5). This is a range we are now beginning to see with “code built” homes and humidified office buildings. We are building things without big holes and we are now able to control the interior environment.
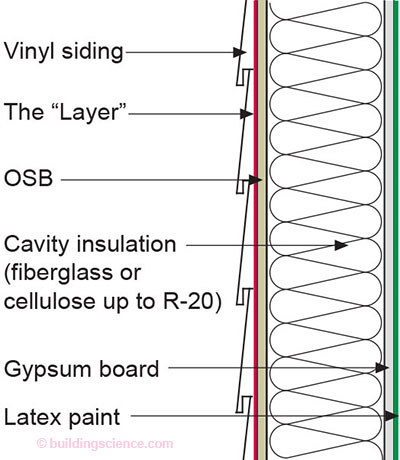
Figure 5: Not So Easy Wall—Change the plywood to OSB in Figure 1 and we get Figure 5. Looks a lot like Figure 1. But it is not at all like Figure 1. Look at Figure 3 again. The OSB is a very different “throttle” than plywood. The OSB only varies between 1 perm and 7 perms. This is a huge, huge difference.
“The Layer” is going to have to be a lot higher than 5 perms for things to work in Climate Zone 5 with the changes noted. And don’t forget that the cladding has to stay back ventilated. How much higher than 5 perms? Depends on the air leakage of the assembly and the amount of cavity insulation in the assembly. My experience tells me we are talking at least 15 perms for an R-13 wall. You go with R-20 and you might need to be as high as 20 perms.7 Note that another reason for this high permeance is that if rainwater gets between “The Layer” and the OSB such as at penetration like nails the high permeance allows this wall to evaporate into the space easily. This becomes more and more important as the thermal resistance goes up.
What if I go with one of these R-50 double wall assemblies that are filled with fiberglass or cellulose (Figure 6) in Climate Zone 5? Oh boy! Can’t do it with OSB sheathing on the exterior for sure. Might be able to do it with plywood sheathing. Better off with gypsum sheathing. And you are for sure having to have a ventilated cladding. A seriously ventilated cladding–on furring strips. And you better control your interior relative humidity. Limit it to no higher than 35 percent in cold climates during the coldest 3 months. And “The Layer”? I am saying go with 50 perms or higher.
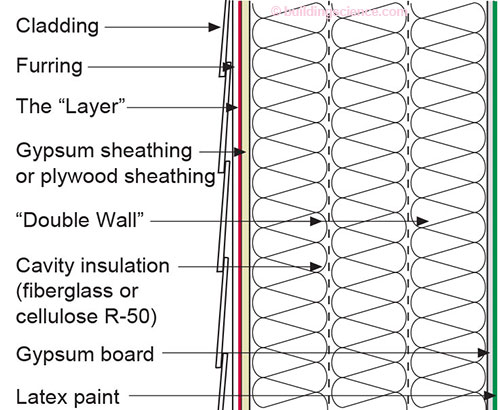
Figure 6: One of These R-50 Double Wall Assemblies—Completely filled with fiberglass or cellulose. Can’t do it with OSB sheathing on the exterior for sure. Might be able to do it with plywood sheathing. Better off with gypsum sheathing. And you are for sure having to have a ventilated cladding. A seriously ventilated cladding – on furring strips. And you better control your interior relative humidity. Limit it to no higher than 35 percent in cold climates during the coldest 3 months. And “The Layer”? I am saying go with 50 perms or higher.
I am not that happy with Figure 6. I would never build it that way. I think you need to “goose it” and have a mid assembly vapor drive “throttle” (Figure 7). I recommend plywood or OSB. This layer can also be a fabulous air barrier. If we do this we don’t have to go to the gypsum sheathing on the exterior. Plywood works for sure. OSB might even work. Not sure about that. The interior relative humidities could drift up higher without much risk. And “The Layer”? Probably could be as low as 20 perms. Note we are talking about Climate Zone 5. Move the building assembly south to Climate Zone 4 or 3 and everything gets easier. The corollary is also true. Move the building assembly north to Climate Zone 6 or 7 and everything gets more difficult.
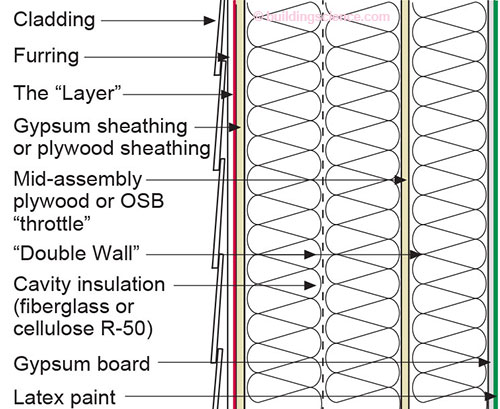
Figure 7: Add a “Throttle” —I think you need to “goose” Figure 6 and have a mid assembly vapor drive “throttle”. I recommend plywood or OSB. This layer can also be a fabulous air barrier. If we do this we don’t have to go to the gypsum sheathing on the exterior. Plywood works for sure. OSB might even work. Not sure about that. The interior relative humidities could drift up higher without much risk. And “The Layer”? Probably could be as low as 20 perms.
Remember way back when in this chat I mentioned that water vapor goes both ways? Up to now we have only been looking at vapor drive from the interior to the exterior. Inward vapor drive is an issue when we have a reservoir cladding. Of particular concern are brick veneers and stucco renderings.
The absolute best way to deal with reservoir claddings is to first back ventilate and drain them and second, if possible, reduce their water absorption. Third, is throttle the inward drive if necessary. Fourth, make sure if vapor gets past the exterior sheathing that it can get all the way through the wall into the interior air where the air conditioning system or air change can deal with it.
So lets look at a brick veneer with a 1-inch vented air space over “The Layer”. Now let’s have “The Layer” over either plywood or OSB sheathing. The cavity insulation is fiberglass or cellulose and the interior lining is latex painted gypsum board (Figure 8). What makes this work is the “throttle” effect of either the plywood or OSB. Any and all wrb’s will work as “The Layer”. The permeance can be as low as 5 perms and as high as you can get. Note, never, ever have something like vinyl wall coverings on the interior of an assembly such as this if you are ever air conditioning the space.
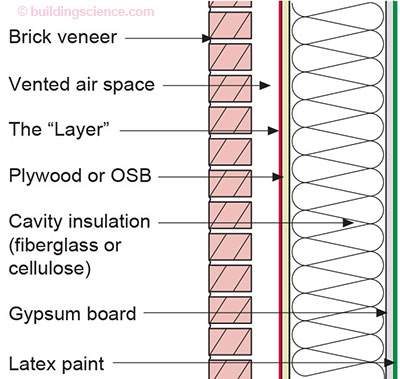
Figure 8: Reservoir Claddings—The absolute best way to deal with reservoir claddings is to first back ventilate them and second, if possible, reduce their water absorption. Third, is throttle the inward drive if necessary. Fourth, make sure if vapor gets past the exterior sheathing that it can get all the way through the wall into the interior air where the air conditioning system or air change can deal with it. What makes this wall work is the “throttle” effect of either the plywood or OSB. Any and all wrb’s will work as “The Layer”. The permeance can be as low as 5 perms and as high as you can get. Note, never, ever have something like vinyl wall coverings on the interior of an assembly such as this if you are ever air conditioning the space.
Change the brick veneer to stucco. Now you need to install the stucco over a drainage mat. The drainage mat provides some ventilation. And again, any and all wrb’s work as “The Layer”.
Things change when you change the plywood or OSB sheathing for gypsum sheathing. You no longer have a “throttle”. Low perm works well here to reduce the inward drive - 5 to 10 perms. How high can I go? What is the upper limit? Probably not much higher than 20 perms and you absolutely have to paint stucco to reduce its water absorption if you use stucco. And brick? No mortar droppings and vent openings top and bottom of the brick veneer.
Now what about air flow? I am going to get hate mail for this. But here goes. Most airflow through an assembly used to dry the assembly because we had low interior moisture loads. Not any more. This is no longer the case in really cold climates like Canada. Note that Chicago is not cold. Winnipeg is cold. Boston is not cold. Ottawa is cold. These are relative comments. In Canada we went on a half-century tear on airtightness for durability reasons. And in Canada it made sense. Air leakage from the interior wet our walls. However, everywhere else air leakage from either the interior or exterior tended to provide more drying than wetting. The air leakage does not help from an energy efficiency perspective. No argument there.
So work with me on this. We are getting very airtight with our wall assemblies. And that is very, very good from a thermal performance perspective. But we no longer get the drying benefits of air leakage. This is becoming a real problem with very highly insulated wall assemblies. The only way we can dry our walls is by vapor diffusion. And we do not have a lot of energy flow available for drying as we have much higher levels of thermal insulation. We can enhance the vapor diffusion by back ventilating our cladding. A decade ago the permeance of the sheathing and “The Layer” did not matter much. Now it does. And it matters where you are and what your interior conditions are. High levels of thermal insulation coupled with high levels of wall airtightness and building airtightness have made life more difficult for us.
We of course could go for continuous insulation on the exterior and not care about any of this. But apparently the perfect wall (see BSI-001: The Perfect Wall) is not so perfect for everyone. Sheathings such as plywood, OSB and gypsum with “The Layer” are going to be around a long time. It is not easy to put the insulation on the exterior. Ain’t that a shame?
Footnotes
- The phrase “How low can you go” came from Chubby Checker and his recording of Limbo Rock. Limbo originated in Trinidad and is the unofficial dance of the island. Chubby Checker whose real name is Ernest Evans got his stage name from a play on the name of Fats Domino. He grew up in Philly and his main claim to fame is the hit record “The Twist” and getting adults onto the dance floor. Not sure how good an idea it was to get adults onto the dance floor doing “The Twist”. Fats Domino is a New Orleans boy famous for “Ain’t That A Shame” released the year I was born. Fats Domino – “the Fat Man” - has more rock hit records than anyone except Elvis.
- You have no idea how hard it was to restrain myself with this comment.
- You non-Canadians should look this up. Especially those of you residing in Colorado or Washington State.
- Then why model? Exactly. I can’t get folks to stop modeling…even though it is dumb most of the time…so my current approach is to try to help them limit the damage they are doing. We will go into this in way more detail some other time. So what are the limits to the permeance of “The Layer”? Pretty easy question. The answer can get complicated. Here goes. We know that when “The Layer” was “tar paper” things worked pretty much everywhere. Geeks hate the words “tar paper”. They like to use the words “asphalt impregnated felt” or “asphalt saturated felt” or “asphalt saturated kraft paper”. Whatever. Check out Figure 2. Notice how the vapor permeance increases with relative humidity. Pretty awesome. In this case “The Layer” goes from a low of 5 perms to a high of 100 perms. We were also here before (see BSI-029: Stucco Woes—The Perfect Storm).
- Insulated vinyl siding does not count as a ventilated cladding unless it is installed over an air gap which tends to kill the insulation value of insulated vinyl siding.
- If it was me I would limit the interior relative humidity to 30 percent in cold climates. That is well into the comfort range and reduces the risk to wall assemblies. I am not getting much traction with that number. Too much miss information regarding the health benefits of higher relative humidities. There are no health benefits that I am aware of. Drives me crazy.
- Where do these perm values come from? They reflect my observations of the performance of the actual products that are being used. There is a lot of experience with 50 perm and 20 perm building wrap - house wrap because folks make 50 perm and 20 perm building wrap – house wrap along with a lot of experience with 15 perm and 5 perm building wrap – house wrap because folks make 15 perm and 5 perm building wrap – house wrap. More recently we are seeing building wrap – house wrap with permeances greater than 100 perms.