The American Foursquare, a Sears, Roebuck & Co. kit home, was a staple of small American towns between 1908 and 1940. More than 100,000 of them were built in America. Homes built prior to 1980 make up 80% of the housing stock in the United States, and are responsible for a majority of the residential energy use in the country. All of the renovations used systems engineering principles to ensure good indoor air quality and longterm durability while providing deep energy reductions.
This posting is permission of ASHRAE. Additional reproduction, distribution, or transmission in either print or digital form is not permitted without ASHRAE's prior written permission.
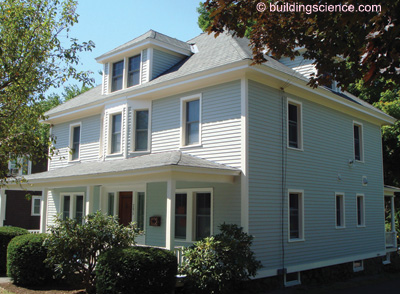
Photograph 1: Exterior of completed project
Sears offered 15 styles of Foursquare kits, which were available through the mail-order Modern Homes program. These homes arrived via boxcar, making them particularly common in neighborhoods near rail lines. The design is simple to understand and elegant in its efficient enclosure of space. Most of these designs are nearly perfect squares, with a footprint ranging from 28 ft. to 34 ft. and are two stories in height. They are typically crowned with a pyramid-shaped roof detailed with dormers.
The window-to-wall ratio is typically sparse, yet each room in the house has at least two windows on at least two sides of the house. This concept means that quality daylight is available in every room during most daylight hours. The windows’ location on different sides of each room also promotes natural ventilation.
This 1915 house never had any system upgrades, and still had its original wiring, plumbing and oilfired boiler. But it had beautiful plaster, interior wood trim and maple flooring that was in good shape and ready for another 100 years.
While the original house enclosed 3,600 ft2, only 2,000 ft2 were intentionally conditioned. The nonconditioned space included 1,000 ft2 in the basement and an additional 600 ft2 in the vented attic. We replaced the bathroom and kitchen, which were in bad shape. One of the second-floor bedrooms was changed into a bathroom and laundry room in anticipation of future occupants.
Another full bath was added in the now-conditioned attic. In the end, what was a four-bedroom, 1.5-bath house became a four-bedroom, 3.5-bath house with a fully conditioned basement to be used as an exercise and family room. Long-range plans called for four to five occupants.
Energy Reduction Strategies
All of the renovations used systems engineering principles to ensure good indoor air quality and longterm durability while providing deep energy reductions. Extensive information on these topics can be found on our company’s Web site (www.buildingscience.com).
drainage plane (water-repellent materials designed to drain water—e.g., housewrap, building paper or taped facing on sheathing);
air barrier (airtight continuous enclosure around conditioned space);
thermal barrier/insulation (layer that controls heat flow by conduction between interior and exterior).
vapor control (materials designed to control the movement of water by vapor diffusion, to prevent accumulation that can result in damage to the building);
combustion safety (fossil fuel burning appliances using sealed combustion technology);
air change (provision for dilution of interior air with outside air);
pollutant removal at source (bath and kitchen exhaust fans).
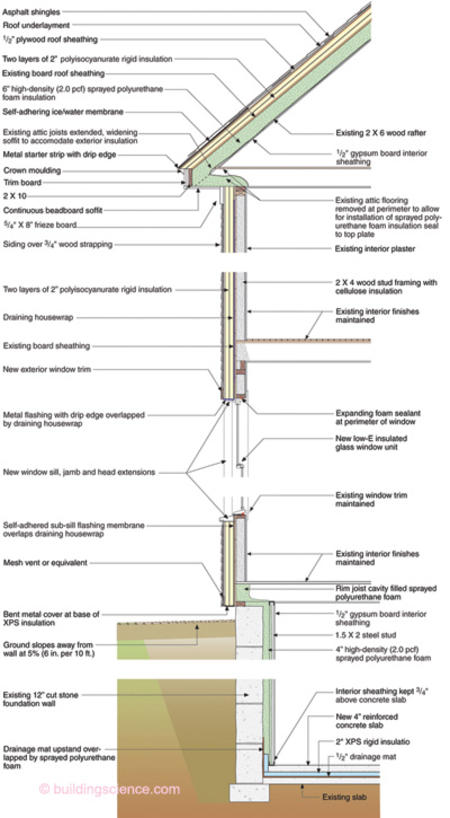
Figure 1: Building at a Glance
| Project Name | Concord Retrofit House | Building Team | ||
| Location | Concord, MA | Owner/Architect/Systems Design | Betsy Pettit, FAIA, principal, Building Science Corporation | |
| Size | 3,600 ft2 | Building Science Consultant | Joseph Lstiburek, Fellow ASHRAE, principal, Building Science Corporation | |
| Construction Started | 2006 | Energy Modeling and Performance Testing | Kohta Ueno, associate, Building Science Corporation | |
| Construction Completed | 2007 | Contractors | The Synergy Companies, Owners Gary Bergeron and David Joyce | |
| Building Use | Residential | HVAC Contractor | Fin's Tin, Jim Finegan | |
Total Renovation Cost | $300,000 | Photos | Betsy Pettit |
Window Replacement
To increase comfort during the renovation, windows were replaced first. The interior sash stops and sashes were removed. The whole opening was wrapped with peel-and-stick membrane, leaving enough around the exterior to connect the new drainage plane. A new vinyl-clad wood-framed window was installed from the exterior into the pocket that was formed by wrapping the opening with membrane, so that no interior trim had to be changed. The sills were extended and exterior trim was wrapped back to the plane of the window. The exterior siding was butted to the trim.
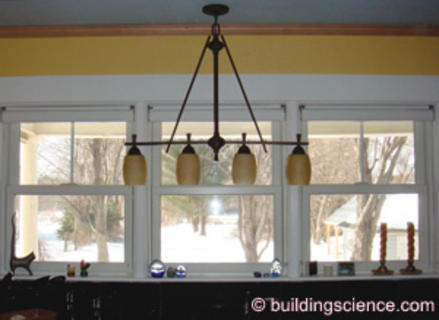
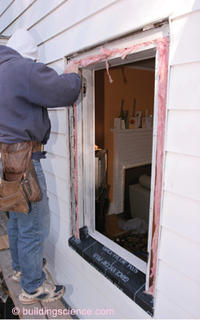
Photograph 2 (top) and Photograph 3 (bottom): Windows—Insulation was installed around the window opening. The membrane pan flashing installed to receive the replacement windows was extended upwards and wrapped the entire opening.
Drainage Plane Continuity
Draining water away from the enclosure starts at the roof. The rooftop vents were removed, and the roof was stripped down to the original board sheathing. Two layers of foil-faced foam were installed followed by a new layer of plywood sheathing. The roof sheathing was covered entirely with ice and water shield and new shingles were installed. Care was taken to retain the depth of the original overhang which was achieved by furring out the fascia board.
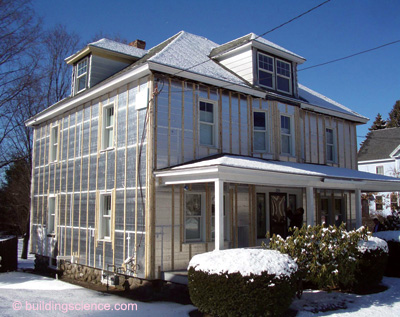
Photograph 4: Wood furring strips hold exterior foil faced rigid insulation in place. The windows are recessed inboard of the rigid insulation so that interior window trim geometry was not altered. The interior look remained true to the original design.
The original wall shingles had been covered with aluminum siding. The siding was removed and hauled away by a scrap metal contractor. The shingles were removed to expose the original board sheathing.
A corrugated house wrap was installed over the board sheathing and connected to the window wrap as well as the top and the bottom of the wall sheathing (with a continuous bead of caulk for air barrier continuity). Then, the two layers of 2-in. polyisocyanurate were applied with the joints staggered and taped with adhesive construction tape. The insulation board was held in place with 1 by 3 furring strips screwed back to the board sheathing. The pre-primed cedar siding was then attached to the furring strips. This resulted in a ¾-in. space (open at top and bottom) that allows drainage of water and ventilation to dry much of the remaining water.
Multiple mechanisms in the new assembly shed water. When rain hits clapboard siding, the majority of the incident water drains to the outside. The ¾-in. ventilated space provides added protection (water is not “sandwiched” between the clapboard and the underlying structure, plus the space allows for ventilation drying).
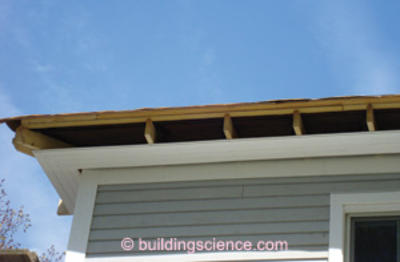
Photograph 5: Two layers of rigid insulation were installed over the top of the roof deck. Rafter tails were extended to provide a sufficient overhang.

Photograph 6: Crown molding was installed to hide the thickness of the two layers of rigid insulation installed on the top of the existing roof deck.
Any small amount of water that penetrates past the cladding is drained on the outside face of the insulating sheathing. Finally, any water that manages to get between the two layers of insulating sheathing is carried down the wall on the draining housewrap. Since the windows were installed back at the face of the housewrap/board sheathing, the rain is kept away from the face of the window, further increasing the long-term durability of the window.
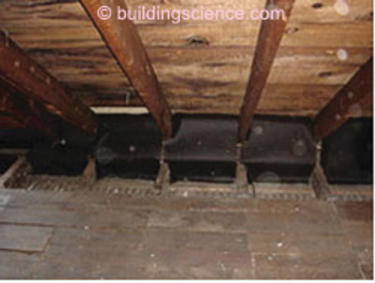
Photograph 7: Building paper “insulation stop” retained the spray insulation when it was installed under the roof deck.
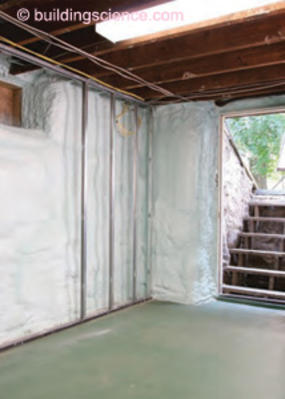
Photograph 8: Exposed spray foam insulation on the basement walls was covered with gypsum board over metal studs.
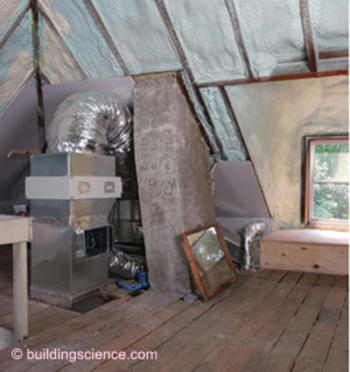
Photograph 9: An air handler in the attic supplies the attic and second floor. A pleated media filter was installed at the return. The original builders left their mark embedded in the parge coat over the chimney, “Built July 1915.”
The basement did not show any signs of ever having water leakage, but as a precaution, the interior face of the existing wall was drained at the bottom with the drainage mat that was turned up the wall from the floor. The drainage mat below the insulated slab will allow some water to be stored and will carry any excess water to an interior sump pit. This pit can be fitted with a sump pump in the future if there is any sign that the ground water level is changing.
Air Barrier Continuity
For an air barrier to be effective, it needs to wrap all six sides of the “conditioned cube,” and all components need to be connected in a continuous manner. The new slab was connected to the basement walls with spray foam that extended from the new basement slab to the rim sill, directly under the first floor. The corrugated housewrap became the air barrier at the exterior wall above grade, helped by the two staggered layers of foam sheathing installed over it.
At the roof-wall interface, the air barrier was transferred back to the interior at the soffit where the housewrap was adhered to the board sheathing and then connected with spray foam to the top plate of the second floor wall. It was continued with more spray foam to the interior side of the roof board sheathing.
Thermal Continuity
The insulation followed the same path as the air barrier to wrap all six sides of the cube. Starting at the basement, the existing slab floor was covered with 2 in. of XPS. The existing basement walls were covered on the inside with 4 in. of closed-cell spray foam. The exposed sills at the basement were sprayed from the inside as well. Then the exterior above-grade walls were filled with cellulose, using the traditional method of making small holes in the exterior sheathing. The two 2-in. layers of polyisocyanurate were installed over the whole exterior wall.
The roof vents were sealed, and the wall-roof intersections were lined from the inside with building paper to provide a temporary dam for the application of spray foam from the interior. Two additional 2-in. layers of polyisocyanurate were then installed on top of the roof deck.
Vapor Diffusion Profile
The roof assembly with its layers of insulation, plywood roof deck, and self-adhering membrane is impermeable. The exterior walls of the house were rendered vapor impermeable by the addition of the exterior foil-faced polyisocyanurate insulating layers. However, the thermal resistance of the insulating sheathing is sufficient to stop any condensation on interstitial surfaces that might otherwise occur. A small area of the basement wall was left exposed above grade, allowing the concrete and stone structure to dry to the outside.
Mechanical System Upgrades
The draft hood water heater was inefficient and vented through the masonry chimney, so it also was removed. A low-mass condensing boiler was chosen to provide space heat and hot water, and connected to the air handlers described below. A well-insulated storage tank provides domestic hot water. Three zones are tapped from the boiler, one for each air handler and one for the hot water storage tank.
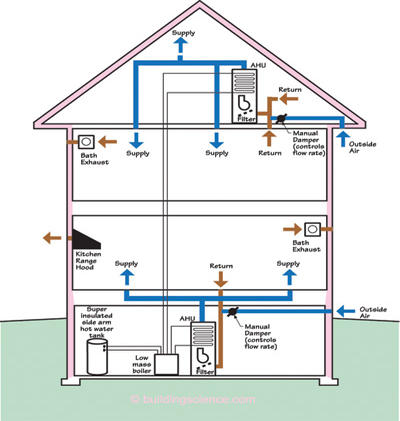
Figure 2: Mechanical Schematic
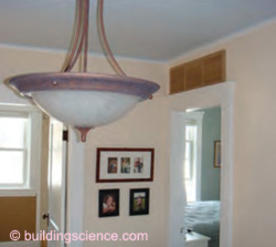
Photograph 10: The transfer grilles above the hallway doors provide a return path to the air handler.
One air handler located in the basement serves the basement and first floor. One central return for that air handler is located on the floor of the first floor central hallway. The other air handler, located on the conditioned attic level, serves the second floor and the attic. One return is on the ceiling of the second floor hallway and another is in the attic. Transfer grilles over the doors to the bedrooms on the second floor prevent room pressurization due to inadequate return paths. Each air handler is equipped with a MERV 13, 5-inch pleated media filter.
Providing air change with a controlled mechanical ventilation system is important for interior moisture control and for good indoor air quality. There is an outside air duct to the return of each air handler with a manual damper, which provides ventilation during air handler run time. Four individual exhaust fans (one in each bath and powder room) and a ducted exhaust over the gas range provide source control of pollutants.
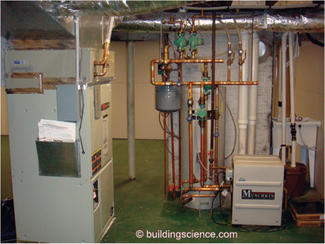
Photograph 11: Mechanical systems upgrades in the basement include an air handler, high efficiency boiler and a super insulated water tank.
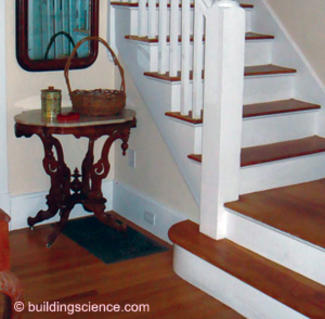
Photograph 12: A return grille for the basement air handler is located at base of main stairwell.
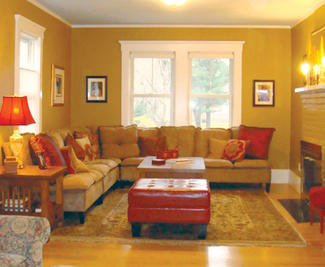
Photograph 13: Keeping the existing plaster, wood trim and maple floors makes this home beautiful as well as comfortable and energy efficient.
The actual equipment installed includes the following:
80,000 Btu/h input 92% AFUE condensing gas modulating low-mass boiler (25,000 to 74,000 Btu/h nominal output);
variable speed/ECM (electronically commutated motor) air handler (x2);
2.5-ton 14 seasonal energy efficiency ratio (SEER) outdoor condenser unit with R-410a refrigerant (upstairs air handler only);
MERV 13 pleated media (5-in. thick) filters on air handlers;
low-sone 50 cfm bathroom exhaust fans;
and 600 cfm exhaust range.
Lighting, Appliance, And Plug/Miscellaneous End Use Loads
One clear pattern seen in high performance houses is that when heating, cooling and domestic hot water loads are reduced, the other loads start to form an increasingly larger piece of the pie. These other loads include lighting, large appliance loads and miscellaneous end use loads (MELs).
Use of pin-base compact fluorescent lamps fixtures reduced lighting loads by roughly a third of typical use. ENERGY STAR® large appliances (dishwasher, refrigerator, clothes washer) installed at this house reduced both electric and domestic hot water loads.
Results of Performance Testing
An invaluable tool for achieving high performance houses—both new and retrofit—is performance testing. Several sets of tests were run during the construction and then after the completion of the house, including overall air leakage (aka blower door), duct system leakage (Duct Blaster®), and thermal/infrared camera scans (with and without the use of a blower door to induce air leakage).
Blower door tests run near the end of the construction turned out to be quite informative on details that were missed, despite having excellent quality tradespeople. This test can be done by depressurizing the house with the fan and walking around the house, feeling for air leakage. For instance, the basement bulkhead door was disastrously leaky, despite the presence of some ineffective weather stripping.
In addition, the drainage mat under the finish slab was turned up at the base of the masonry chimney; the testing showed that soil gasses could be pulled from the space between the two slabs to the interior, so it was capped off with concrete and fire-rated caulk. After addressing these worst leakage points, the house met the original airtightness target.
Predicted Performance
Energy simulations of several variations of this house were run before and after the renovation. They were broken up by principal loads—heating, cooling, domestic hot water, and lighting/appliance/miscellaneous electrical loads. The data were compiled in million Btu/year of source energy—i.e., taking into account the energy consumed to generate electricity plus transmission losses (roughly a factor of three).
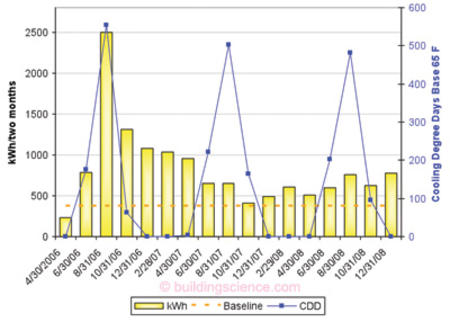
Graph 1: Electricity Use (kWh/two months) with CDD Base 65°F
Predicted Performance vs. Actual Performance
One criticism of “green” buildings—which definitely has some merit—points to a lack of consistent demonstrated energy savings in these buildings. Analyzing the energy usage—for instance, simply collecting utility bills—is an excellent validation of performance. In addition, it allows comparisons between the computer energy simulations and actual performance. Sub-metered usage would provide even greater insight, but requires greater investment in instrumentation.
The utility bills for the past three years are shown. Gas was billed monthly, but electricity was only billed every two months, reducing available resolution. Heating degree days and cooling degree day data (NOAA data for Boston weather station) are also plotted for reference.
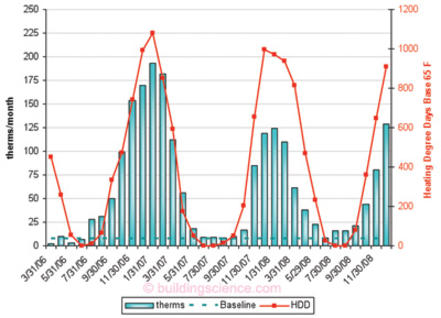
Graph 2: Gas Use (Therms/Month) With HDD Base 65°F
While the home was purchased and occupied starting in mid 2006, construction was taking place until the end of 2007. 2008 was the first full year of data after renovations were completed.
The most recent 12 months of bills were examined to see how they compared to the model. During that period, weather and house operating conditions were as follows:
5,448 HDD Base 65°F (Boston weather site 5,596 HDD; this year was 3% lower);
two occupants (both adults) living in the house;
interior thermostat setpoint 69°F winter/74°F summer; and
exhaust fan in second floor central bathroom continuously runs (~50 cfm).
The resulting energy use is shown on the bar graph, “Energy Use Before, After Renovation.” It shows the annual gas and electric use (in terms of source energy), with the unrenovated house, Benchmark and model for comparison.
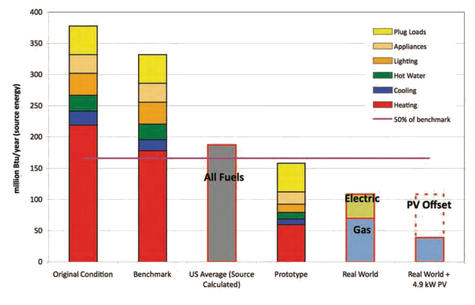
Graph 3: Energy Use Before, After Renovation
The utility bill data showed even greater savings (54%) than what was modeled (44%). The graph shows that gas use was less than predicted (614 therms vs. 731 therms); space heat and domestic hot water were provided by gas.
Similarly, electrical use was less than predicted (3,865 kWh versus 5,694 kWh simulation). The air-conditioning use—and therefore, resulting load—were lower than expected.
One final step was to examine the effect of adding a photovoltaic system using renewable energy to reduce the net energy use. A 4.9 kWp system would produce roughly 6,000 kWh/year in a Concord, Mass., climate at the orientation used. This would more than cover the meter electrical use of the past year (3,865 kWh), and start to partially offset the energy use of site fuel combustion (gas use). Note that in the graph “Energy Use Before, After Renovation,” the electricity produced by the PV system is graphed in terms of the amount of source energy it offsets (i.e., roughly three times multiplier). The overall result would be an 83% reduction from the benchmark house.
Renovation Costs
The total renovation to date has cost $300,000 or $83 per ft2. This amount includes upgrades that were not done purely for energy efficiency, including total electrical and plumbing replacement, the finishing of the attic and basement space, the addition of two new full baths and the renovation of the existing baths and kitchen.
It also included the cost of a new roof and new exterior siding. Separating the cost of the windows, the insulation, and the heating system, the additional cost to provide energy improvements alone came to $75,000.
A natural gas price of $1.50 per therm financed over a 30-year mortgage with an interest rate of 7%, results in a negative cash flow per year of $827. However, reduce the interest rate to 4% and it is cash flow neutral. Furthermore, imagine the cost of gas increasing over the $1.50 per therm rate, and the improvements are easily justified.
The experience allowed my company to understand what parts of this renovation were the most costly and how savings might be achieved while still achieving the same impact on the energy performance.
Lessons Learned and Future Work
The air leakage goal set at the project outset was met, and the heating performance very closely followed the predicted performance. However, it is clear that with more attention to detail, a more airtight enclosure could be achieved. Testing showed that the major air leakage areas were around the range hood fan exhaust and at original exterior wall electrical outlets that could not be sealed at the baseboards. Other major air leakage occurred where interior plaster and baseboard were removed but not replaced, specifically behind the new kitchen cabinets. One of the replacement windows was particularly leaky, and plans have been made to replace it.
Better windows would be another place to look for improvement. Triple-glazed windows would have a significant impact. The double patio glass doors used at the back were particularly poor performers, both in terms of air leakage and thermal qualities. And the thermal scan showed that keeping the existing wood front door was probably not a good decision.
A heat recovery ventilator (HRV) installed inline with the return of the second floor air handler would likely have a significant effect on the heating savings as well, so plans for the fan cycling will be coupled with an HRV installation.
The installation of photovoltaic units could offset the electrical loads, and based on actual electrical use, it is clear that a 3.5 kWp system would reduce the electric load to next to nothing. By late April, a 4.9 kWp system will be installed on a south-facing boat shed in the backyard in anticipation of the plug-in cars of the future.
Work that involves new construction technologies cannot be done without the help of experienced and patient contractors.
Finally, this project was informed by the work being done under contract with the Department of Energy’s Building America Program, which aims to lead the country to zero-energy homes by the year 2020.
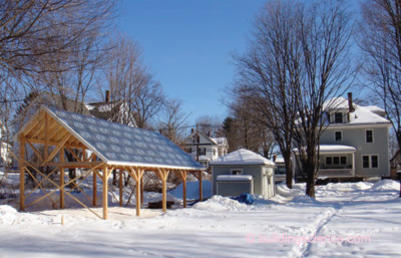
Photograph 14: In April 2009, 28 photovoltaic panels with micro-inverters will be installed on the shed. They will further offset the house’s total source energy use to approximately 40 million Btu.
