What we learned from updating a 16-year-old deep-energy retrofit. Reprinted with permission from Fine Homebuilding, February/March 2012, pages 55-59.
Update: Letter to the Editor from Fine Homebuilding, April/May 2012, page 14
Previous articles in FHB detailing rain-screen walls have called for strips of felt between the furring strips and siding, but not this article. Are they necessary? Plus, the author used 1x2 furring strips. Can thinner stock be used? Also, how important is that trim be furred off the walls?
Executive editor Daniel Morrison replies: I've not seen felt strips specified between the furring strips and the siding except at joints in siding to direct water that may get behind the siding back to the surface. This is a good practice regardless of whether you build a rain-screen wall. Second, Joe Lstiburek's minimum thickness for furring strips, which is based on Canadian building codes, is about 3/8 in. When it comes to furring the trim off the wall, the corner boards on Joe's original barn retrofit may offer some clues. They were not furred out in such a way that there was air ciculation behind them, and Joe paid a price for it: The paint didn't hold up. The guys from Synergy Construction who do the work for Joe prefer to use solid backing behind corner boards because with such thick foam, it's hard to angle the screws or nails into solid framing. They use wide strips of 3/4-in. AdvanTech subfloor as backing. To make up for the lack of back ventilation, they used plastic trim boards from Azek this time around, which will hold up better than wood.
Joe Lstiburek's response: Dan and I have a minor disagreement here. In my view there is no need for strips of felt between the furring strips and siding. Plus for the record I used 1x4 furring. Thinner furring would not work structurally for this assembly. A minimum 3/4-inch thickness of wood is necessary for withdrawal strength for the siding attachment. In theory you could go to 1/2-inch strips of plywood - but why worry about a 1/4-inch? The 3/8-inch is for minimum drainage and back ventilation and would work for a 1 inch thick layer of foam sheathing where the 3/8-inch strip is just a spacer and the siding is attached through the foam, through the furring and directly into the studs.
Foam Shrinks, and Other Lessons: Correction (download complete "Correction" document here; see the original full article below)

I did a deep-energy retrofit on my barn 16 years ago. Building Science Corp. was young and growing, and we needed a bigger office. The barn would be that office for the next 10 years. In fact, Betsy Pettit wrote about it in “Remodeling for Energy Efficiency” (FHB #194).
The first thing we did was to cut all the overhangs off the barn roof and wrap the outside of the building with plastic. Next, we applied 8-in.-thick expanded polystyrene (EPS) foam on the walls and 10 in. of EPS on the roof. On top of the roof, we installed a layer of plywood as a nailing base for the shingles. The plywood cantilevered past the edge of the barn’s roof to form the
new overhang.
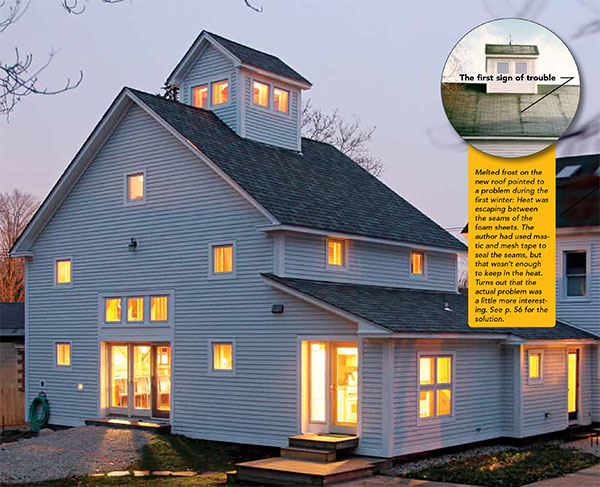
Our first lesson came about four months after the retrofit was complete: When the first frost hit the roof, I discovered an obvious melting pattern. At the seams between the foam panels, warm air was escaping and melting the frost. Rather than installing one thick layer of foam, I should have installed multiple layers, offsetting the joints and staggering the seams. I decided to fix that when I replaced the shingles.
I was curious about a few other things:
- We had carpenter ants, which indicated a water problem. I couldn’t figure out where they came from exactly, but I knew that I wanted to hunt them down and find out what was going on.
- The air-leakage test revealed that the barn wasn’t as tight as I thought it should be. I wanted 1.5 air changes per hour (ACH) at 50 pascals, but what I got was 3 ACH. We haven’t retested with a blower door yet, but testing on similar buildings with this same retrofit system have netted excellent results: 0.1 ACH at 50 pascals.
- I wanted to know whether I had any other bugs living in the furring-strip space between the siding and the foam sheathing.
- I wanted to know how my water management actually worked. You can’t really tell with computer simulations.
Clearly, there were more issues with this building than just the shingles and the foam, and they have been nagging at me for more than a decade. I decided to look at the project like an experiment—take the barn apart, see how the components performed, and then put it back together again using the best off-the-shelf technology available now.
Beginning at the outside, I’ll take you through what we learned.

Paint can last a very long time
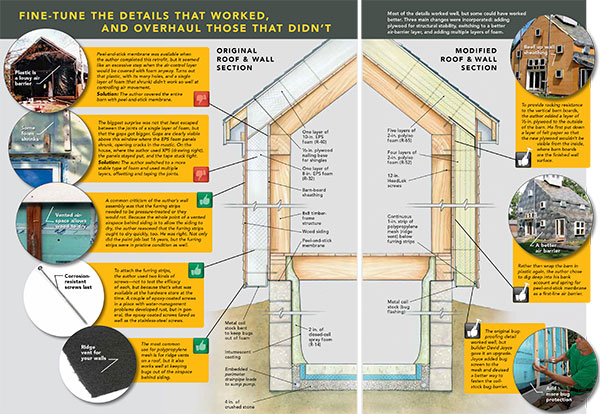
There was nothing special about the siding we had chosen for the barn except that it was installed over a vented rain screen and we were meticulous about sealing cut ends. The siding is lodgepole pine from Alberta. It was shipped to New Brunswick, where it was kiln-dried and then coated on all six sides with a penetrating wood preservative. Next, it was coated on all six sides with an oil-based primer and painted with acrylic-based latex paint. It was then shipped to Massachusetts as “Cape Cod” siding. We installed it over 3/4-in. furring strips, which allowed air circulation behind it.
This meant that the siding could dry evenly in front and in back. When we took the siding off the barn, it was pristine. The trim, also lodgepole pine treated the same way, did not hold up as well in some places. The trim was not backvented like the siding. Instead, it was nailed directly to 3/4-in. plywood strips.
The bug screen worked perfectly
Installing siding over furring strips is a water-management strategy that keeps siding and walls dry and free of rot. I can’t tell you how many times over the past 16 years that someone has said to me, “You can’t do that. There will be animals and bugs up there, and they’ll eat your house.” When we took the wall assembly apart, however, there was absolutely no evidence of bugs, bees, or other critters living in the space between the 1x4s.
We kept critters out by wrapping a 3/4-in. strip of attic ridge vent called Cobra Vent (www.gaf.com) at the bottom of the siding. We’re rebuilding it in much the same way, but with slightly more advanced materials.
Epoxy-coated screws perform as well as stainless steel
We used two kinds of screws to fasten the thick foam panels to the barn boards: stainless steel and epoxy-coated steel. When we opened the walls, all the screws looked brand new except for two of the epoxy-coated screws. Those two screws were in a place where we had some water-management problems, and the heads had rusted out.
In the past 16 years, the technology of epoxy coatings has improved significantly, so I have no reservations about using epoxy-coated screws on the rebuild. At about 35¢ per screw versus $1.50 for stainless steel, this is an easy choice. I have absolutely no hesitation in recommending epoxy-coated steel screws and non-pressuretreated furring strips.
Furring strips will not rot
I can’t tell you how many times I have heard, “You’ve got to use pressuretreated furring strips,” but it is absolutely untrue. When we took the walls apart, the furring strips looked brand new. Why does this detail work? Because the vent space is designed to dry. That is its whole job.
Why not use pressure-treated furring strips as an added measure of protection? One reason is that it means having to use stainless-steel siding nails, which has proven to be an unjustified extra expense.
Stagger the sheets and choose the right foam
When I took the photo of my frosty roof on p. 55, I thought the heat loss was the result of using a single layer of foam, which meant that I couldn’t stagger the sheets and offset the seams. That is what I’ve been telling people all these years in my confessional speeches about deep-energy retrofits. That, however, was only part of the problem. Now I know the rest of the story.
When we installed this foam, we covered the joints with mesh tape and mastic. Over time, the panels shrunk, and the tape/mastic combination cracked, opening the seams. This is where the heat came through to melt the frost on my roof.
Because we used XPS on parts of the main house, we dug into that siding to compare the EPS with the XPS, which was sealed at the seams with Tyvek tape. . .
Download complete original document here.

