The best strategy is not to have an ice-dam in the first place. We covered this way back when (BSI-046: Dam Ice Dam, February 2011). It is pretty straightforward on how to avoid them with a clean sheet of paper in new construction – airtight ceilings, insulation and under deck ventilation with outside air. But we did not address how to deal with them if you had them.
The physics of ice dams is well understood. Ice dams (Photograph 1) happen when the outside temperature is below freezing, the roof deck temperature is above freezing and there is snow on the roof. The warm roof deck causes the snow on top of the roof deck to melt and the melt water runs down to the edge of the roof where the water freezes leading to a buildup of ice and a back-up of water – hence the term “dam” (Figure 1).
The key is either to keep heat from the house from getting to the underside of the roof deck or to get rid of the heat once it gets there. The first approach is pretty straightforward….air tightness, air tightness, air tightness…. Yes, you read that correctly. Not so much insulation. Okay, we want insulation as well…but airtightness most of all.
So the first approach is air tightness and insulation. The second approach is to remove the heat by flushing the heat from the underside of the roof deck with ventilation using cold air from the exterior. Or we can use some combination of the two.

Photograph 1: Ice Dam –Beautiful but bad and sometimes dangerous. Folks die every year when big ones fall on them – or when they fall off roofs trying to get rid of them.
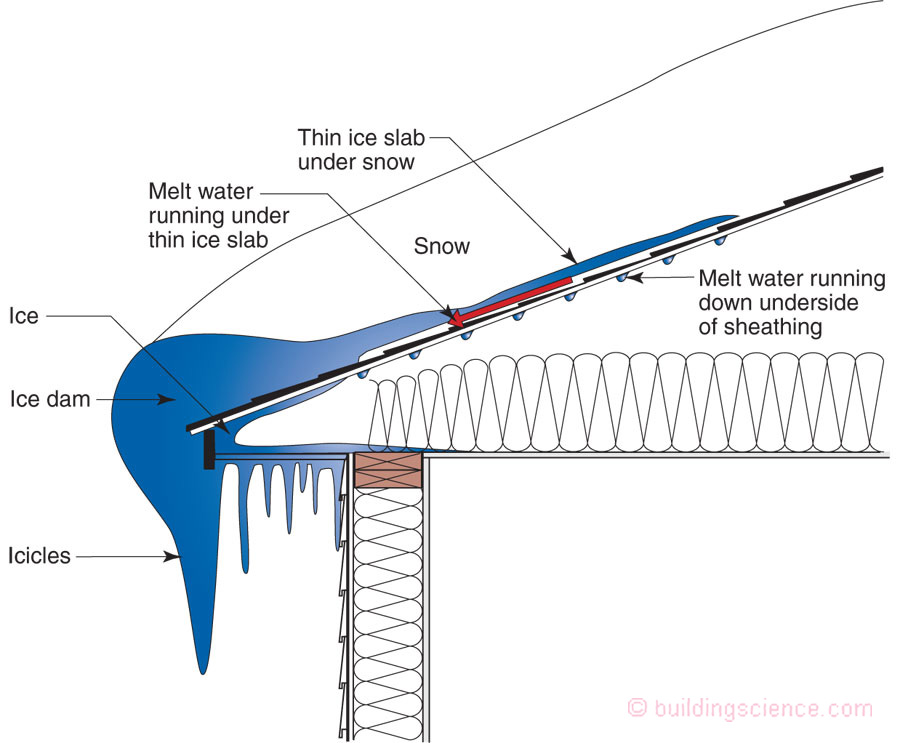
Figure 1: Melt Water –When the snow layer adjacent the roof deck melts the liquid water is wicked upward into the snow pack by capillarity away from the roof covering. As the liquid water migrates upwards it gets colder and freezes. As more snow melts and the liquid water phase exceeds the storage capacity of the snow it runs downward under the ice layer via gravity. At the roof edge and roof overhang the deck is much colder and the drainage gap freezes solid causing the water to back up. It gets ugly pretty quickly.
In new construction the classic approach to ice dam control is the vented roof (Figure 2). Keep heat from the interior from getting to the roof deck and then remove any heat that gets there using ventilation. For this to work – and it does work – we have to do the following things extremely well. First, construct an airtight “lid” or ceiling. Next, insulate the top of the lid with lots of insulation. And then flush away any heat that gets to the roof deck by ventilating the underside of the roof deck with exterior air. Done. No ice dams.
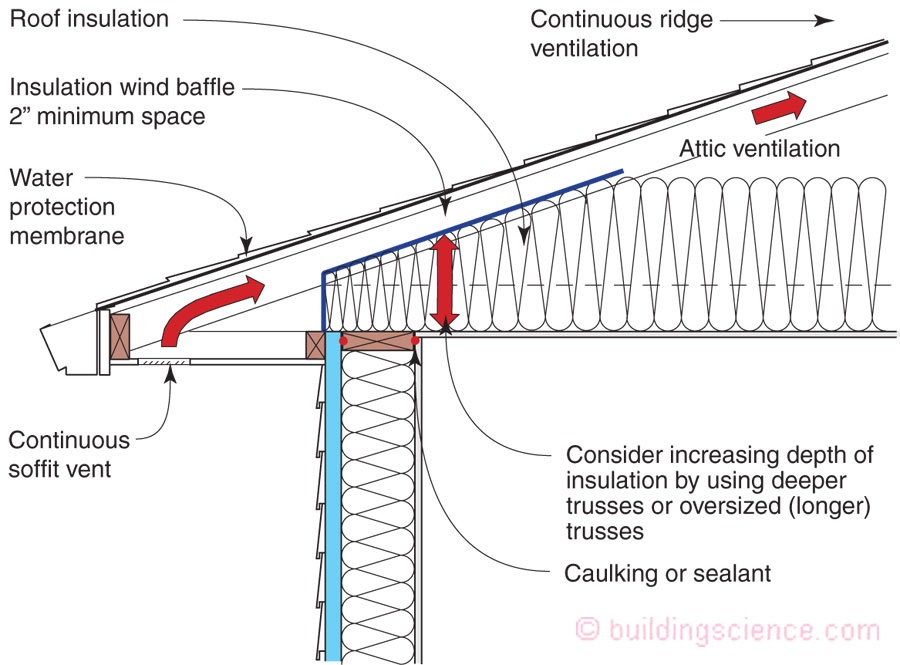
Figure 2: Classic Control Approach -Keep heat from the interior from getting to the roof deck and then remove any heat that gets there. Construct an airtight “lid” or ceiling plane. Insulate the top of the lid with lots of insulation. And then flush away any heat that gets to the roof deck by ventilating the underside of the roof deck with exterior air. Note the air seals at the top of the exterior wall. Exterior walls are like chimneys – you don’t want to vent the tops of them into your roof. Also, it is a good idea that the minimum thermal resistance directly over the top of the top plate be greater than the thermal resistance of the wall. So if the wall is R-30, you want at least R-30 directly over the top of the top plate. Also, note that a 2-inch minimum airspace is recommended under the sheathing. Most codes call for only 1-inch. The codes are wrong – in ice dam regions – where ground snow loads are greater than 30 lbs/ft2 you need 2-inches. This is because ventilation only works to remove small amounts of heat. You therefore need a lot of it.
Of the above approaches air tightness is the first best strategy. This is an opinion. My opinion. Pretty sure no one has done any statistical evaluation of the approaches. I could be wrong. Naw, not likely. Problem with this approach is that you actually have to be able to get into the roof space to implement it. If you can access the space good stuff happens. In new construction this is easy. In existing buildings it is not always easy.
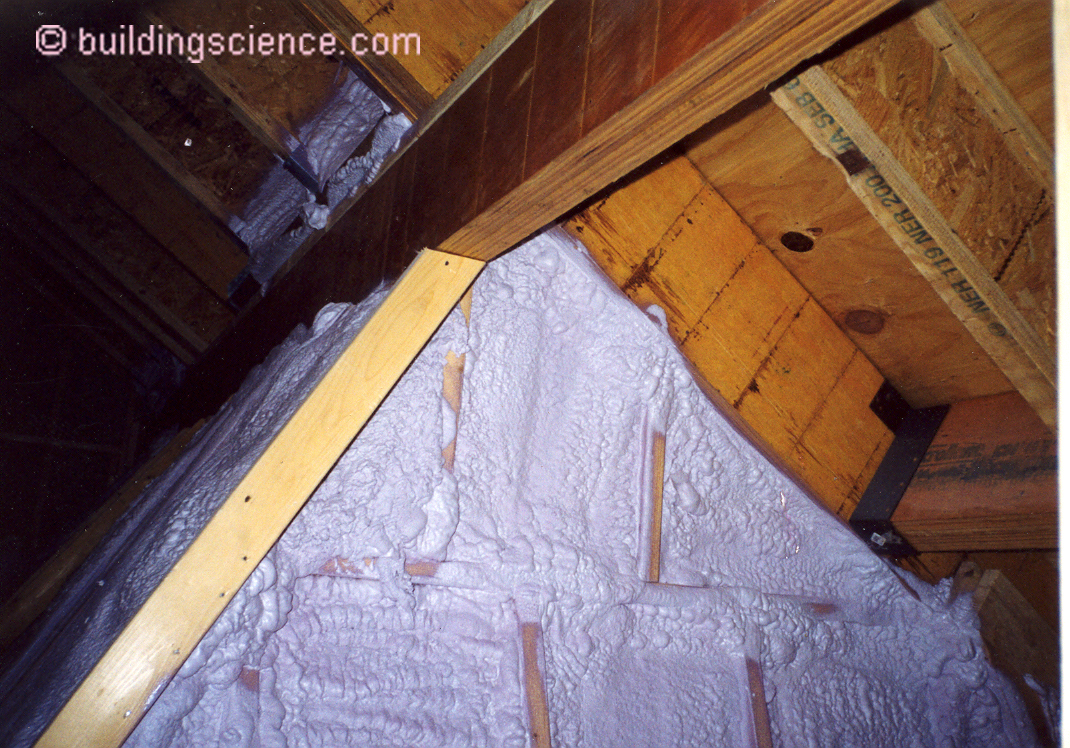
Photograph 2 shows the typical roof geometry of the classic leaky attic ceiling leading to ice damming….dormers, party walls. It gets better…note the sky lights on the back side of this roof assembly (Photograph 3)….yeah!!!. The good news is we can get into the attic space. The roof assembly has a flat ceiling and a steep pitch yielding a big space. The retrofit is pretty straightforward. Move the insulation to one side of the attic and air seal the air leakage pathways with closed cell high density (2 lb/ft3) spray polyurethane foam (SPF) (Photograph 4). Note the air sealing of the party wall and the exterior wall to ceiling interface. Also note the “baffle” or “chute” providing an unobstructed air channel between the vented soffit assembly and the attic space. Once you are done with the air sealing move the insulation and do the other side of the attic. Then redistribute the insulation…..and add more. How much more? Ah…lots more. Go to R-60 if you can1…

Photograph 2: Ice Dam Roof Geometry -Typical roof geometry of the classic leaky attic ceiling leading to ice damming….dormers and party walls. The good news is we can get into the attic space.
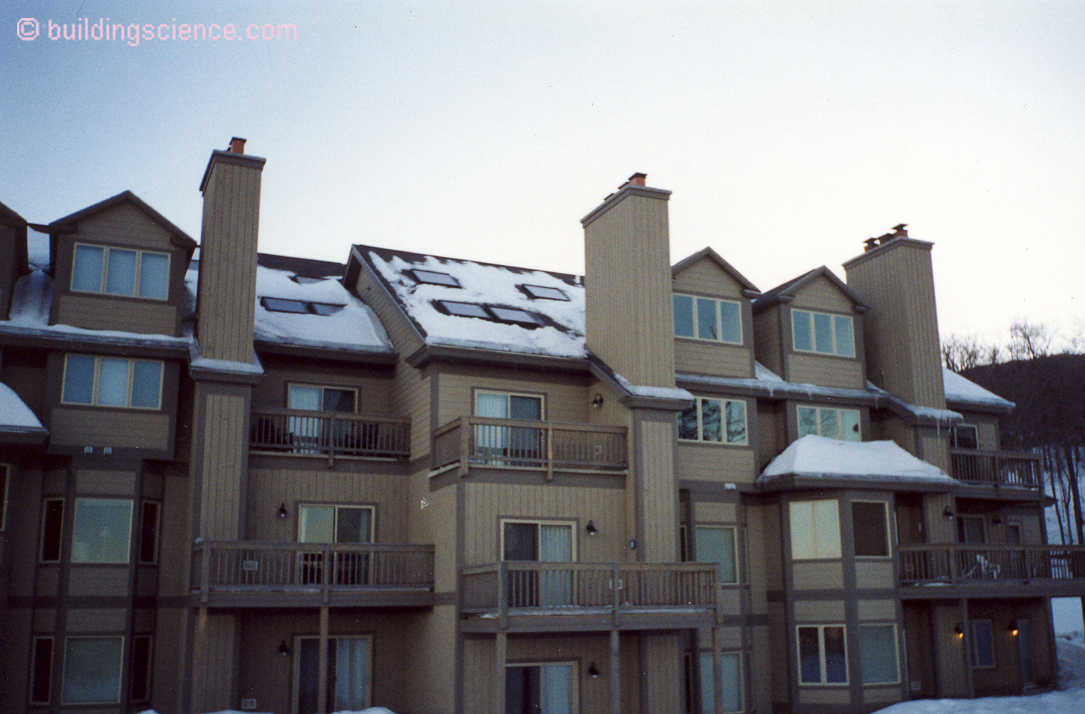
Photograph 3: Skylights - It gets better…note the skylights on the back side of this roof assembly….yeah!!!.
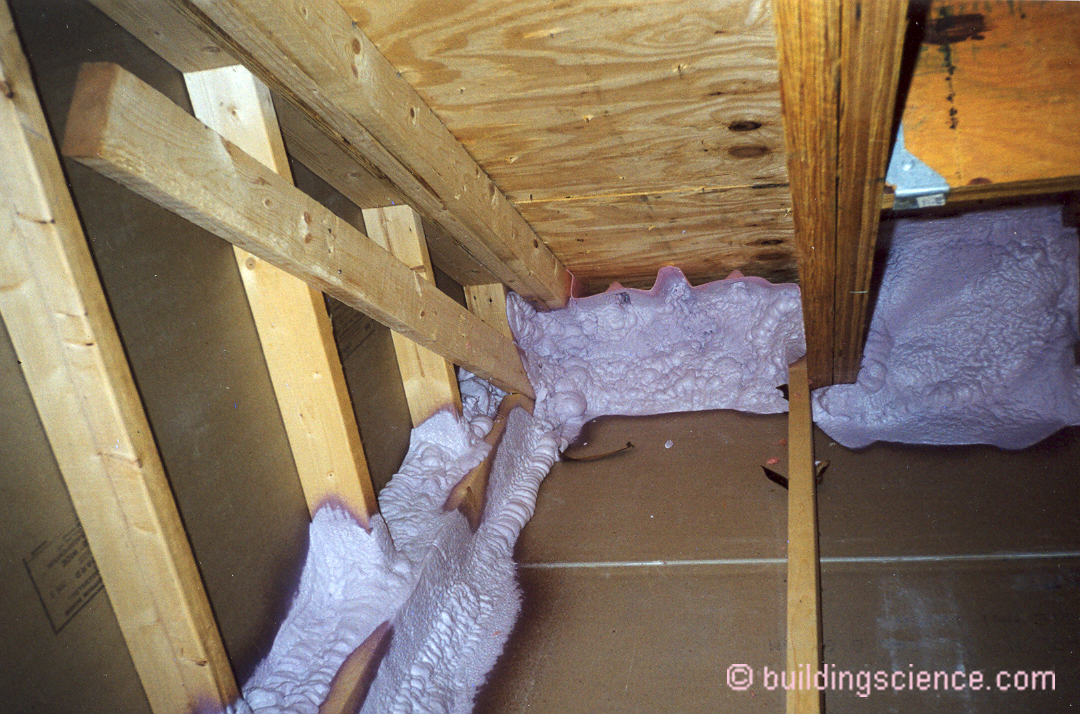
Photograph 4: Retrofit - Move the insulation to one side of the attic and air seal the air leakage pathways with closed cell high density (2 lb/ft3) spray polyurethane foam (SPF). Note the air sealing of the party wall and the exterior wall to ceiling interface. Also note the “baffle” or “chute” providing an unobstructed air channel between the vented soffit assembly and the attic space.
If you have skylights you have to air seal and insulate the shafts big time. In a retrofit situation I know of no easier way than going the SPF route (Photograph 5).
Let’s complicate things. What do you do if you have an air leaky cathedral ceiling with no access….a scissors truss with a wood board ceiling and limited attic insulation and limited attic ventilation (Photograph 6)….coupled with some soffit vents and gable end vents.
The best approach is to over roof. Add a vented roof over the top of the existing roof (Figure 3 and Figure 4). The vented over roof needs to be extremely well vented. We are not able to deal with improving airtightness to any real degree and we can’t add much thermal insulation to any real degree so removing the heat using ventilation is the only thing left in the tool box. Did I mention the vented over roof needs to be extremely well vented?
Photograph 5: Skylight Shaft -If you have sky lights you have to air seal and insulate the shafts big time. In a retrofit situation I know of no easier way than going the SPF route.

Photograph 6: Now What? -Air leaky cathedral ceiling with no access….a scissors truss with a wood board ceiling and limited attic insulation and limited attic ventilation. Beautiful and ugly at the same time.
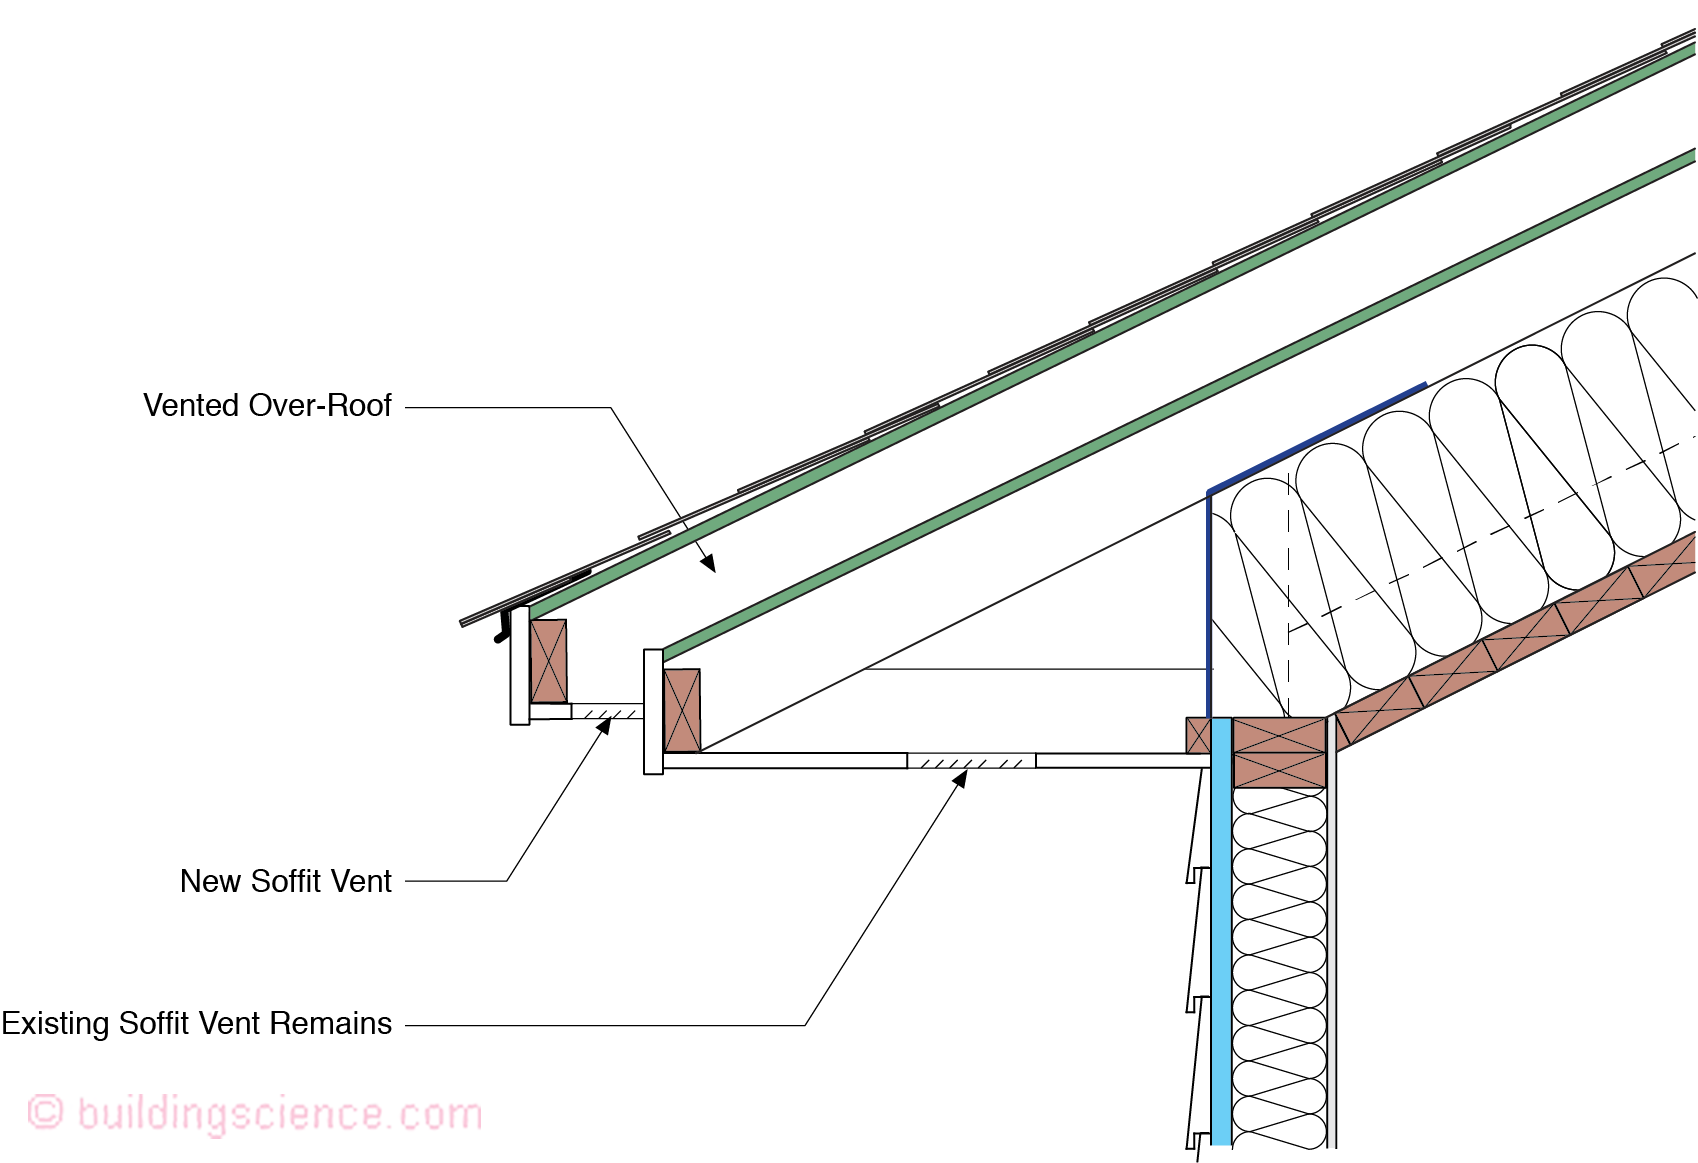
Figure 3: Vented Over Roof Soffit -The best approach is to over roof. Add a vented roof over the top of the existing roof. The vented over roof needs to be extremely well vented. We are not able to deal with improving airtightness to any real degree and we can’t add much thermal insulation to any real degree so removing the heat using ventilation is the only thing left in the tool box.
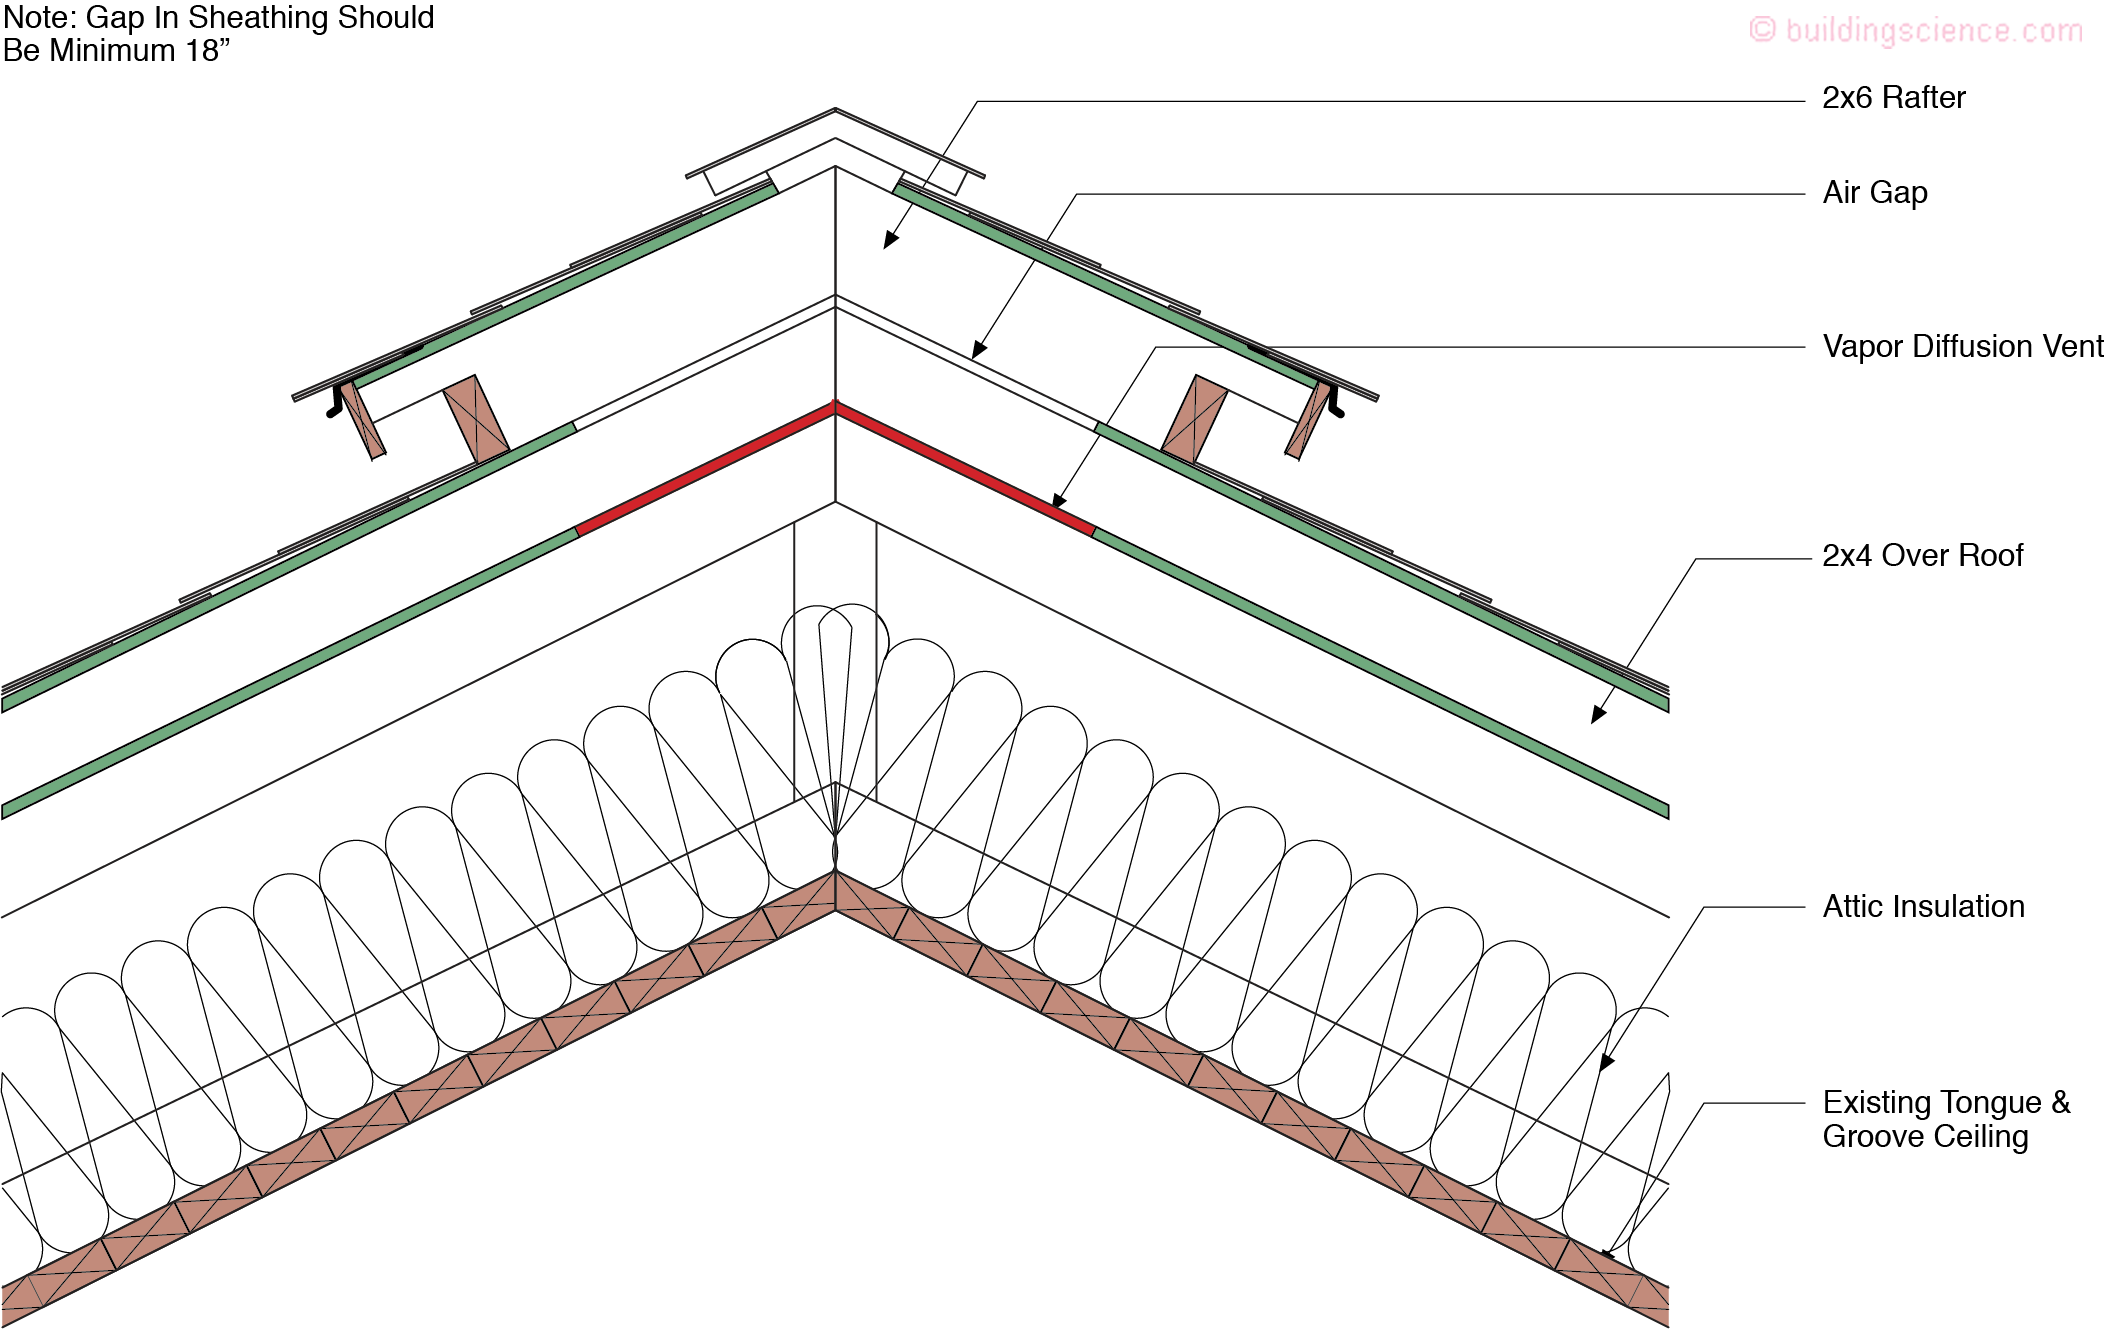
Figure 4: Vented Over Roof Ridge -One of the “tricks” to the ridge detail is to limit the air flow out of the existing attic space by using a vapor diffusion port rather than just connecting the existing attic space to the vented over roof. The rationale for this is to reduce the heat transfer from the building to the ridge without leading to a moisture problem. Moisture in the vapor form can still exit but we do not have much air flow carrying heat accessing the upper roof over vent. The physics of this was covered earlier (“BSI-088: Venting Vapor”, July 2015). This approach tends to increase the airtightness of the lower assembly.
One of the “tricks” to the ridge detail is to limit the air flow out of the existing attic space by using a vapor diffusion port rather than just connecting the existing attic space to the vented over roof. The rationale for this is to reduce the heat transfer from the building to the ridge without leading to a moisture problem. Moisture in the vapor form can still exit but we do not have much air flow carrying heat accessing the upper roof over vent. The physics of this was covered earlier (“BSI-088: Venting Vapor”, July 2015). This approach tends to increase the airtightness of the lower assembly.
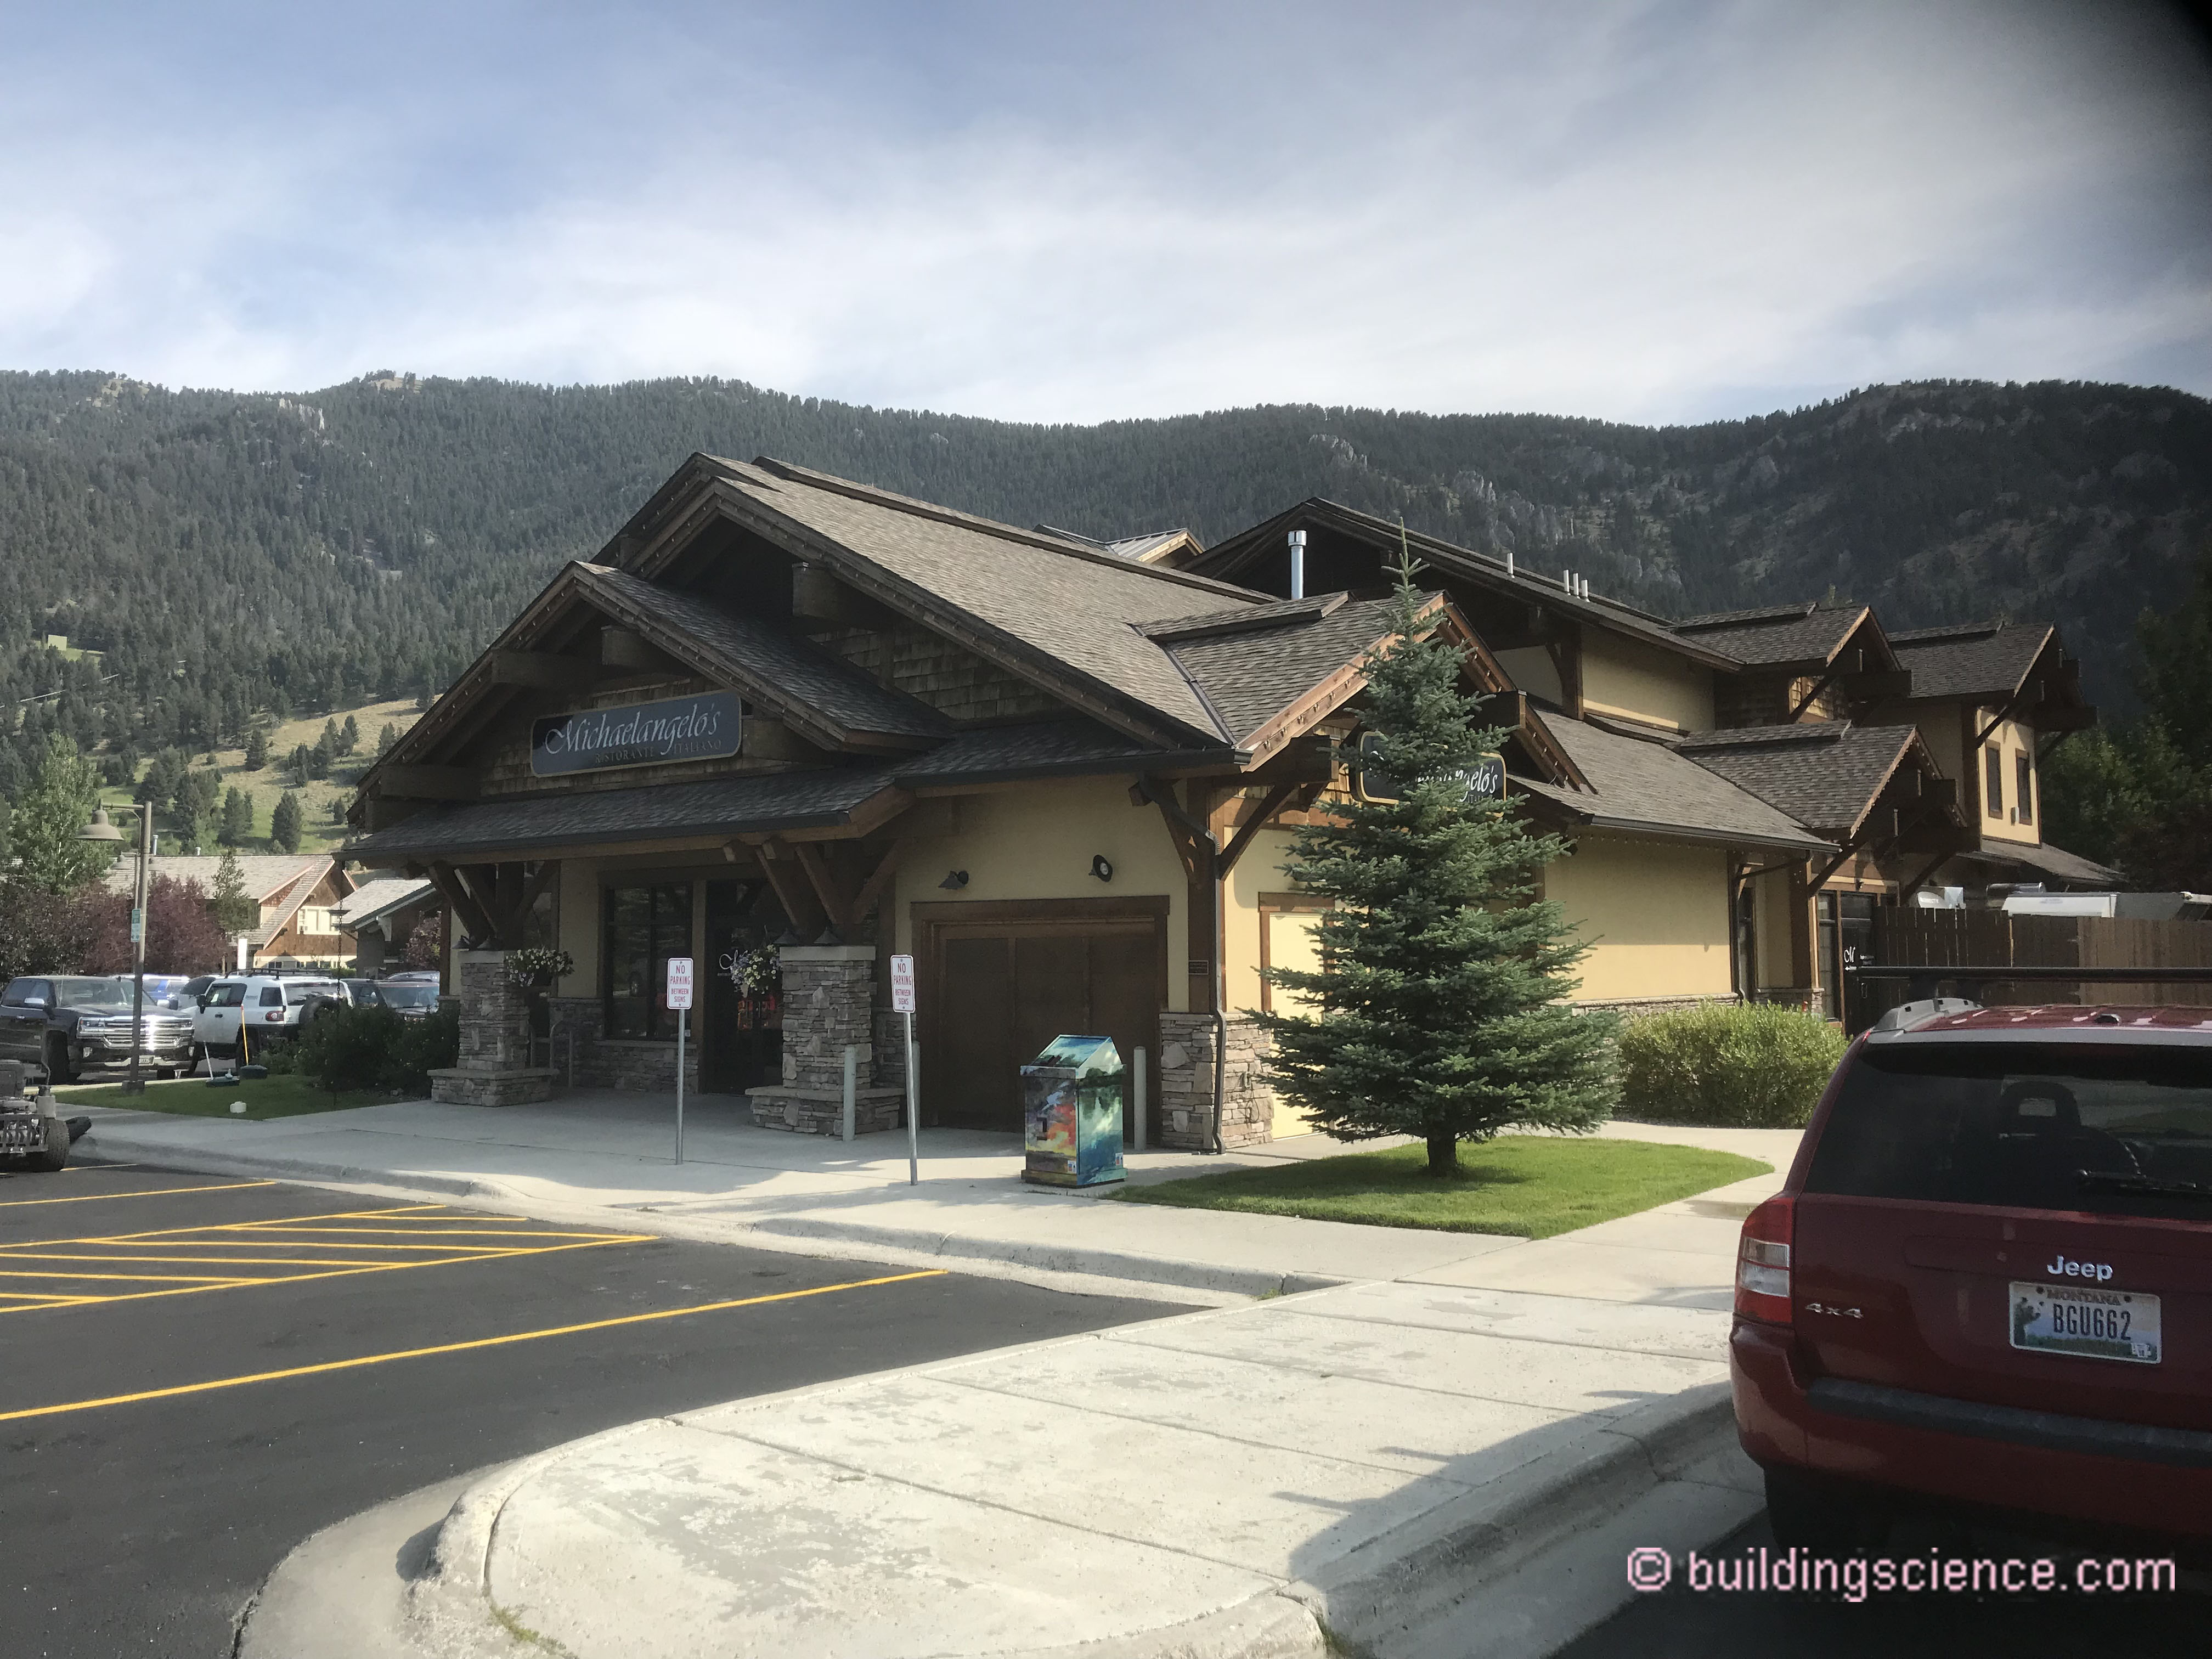
So what happens when you have a large overhang and the roof dead ends into a wall? You get an awesome ski lodge at the top of Ajax in Aspen, CO (Photograph 9). Note the large south facing overhang that traps the heat leading to ice dams and snow slides (Figure 5). You get a classic cladding thermal plume – dark cladding, solar radiation and large over-hangs combine to create ice-dam heaven. It gets better, the sloping roof terminates into a wall. Yikes! Better get the ice picks and ski bums working so you can damage your roof (Photograph 10).
The solution to this problem has two components. Insulate the projecting overhang with spray polyurethane foam (SPF) and then over roof. Where the over roof vent intersects the wall run the vent up the wall….you need to “over wall”….create a vented wall…like a “rain screen”….but bigger…a “snow screen” (Figure 6)…
Rain screen meet snow screen.

Photograph 7: Vented Over Roof Soffit -The fascia detail is continuous and unobtrusive.
Photograph 8: Vented Over Roof Ridge - The ridge detail is big and imposing. Lots of big ridges looking good.
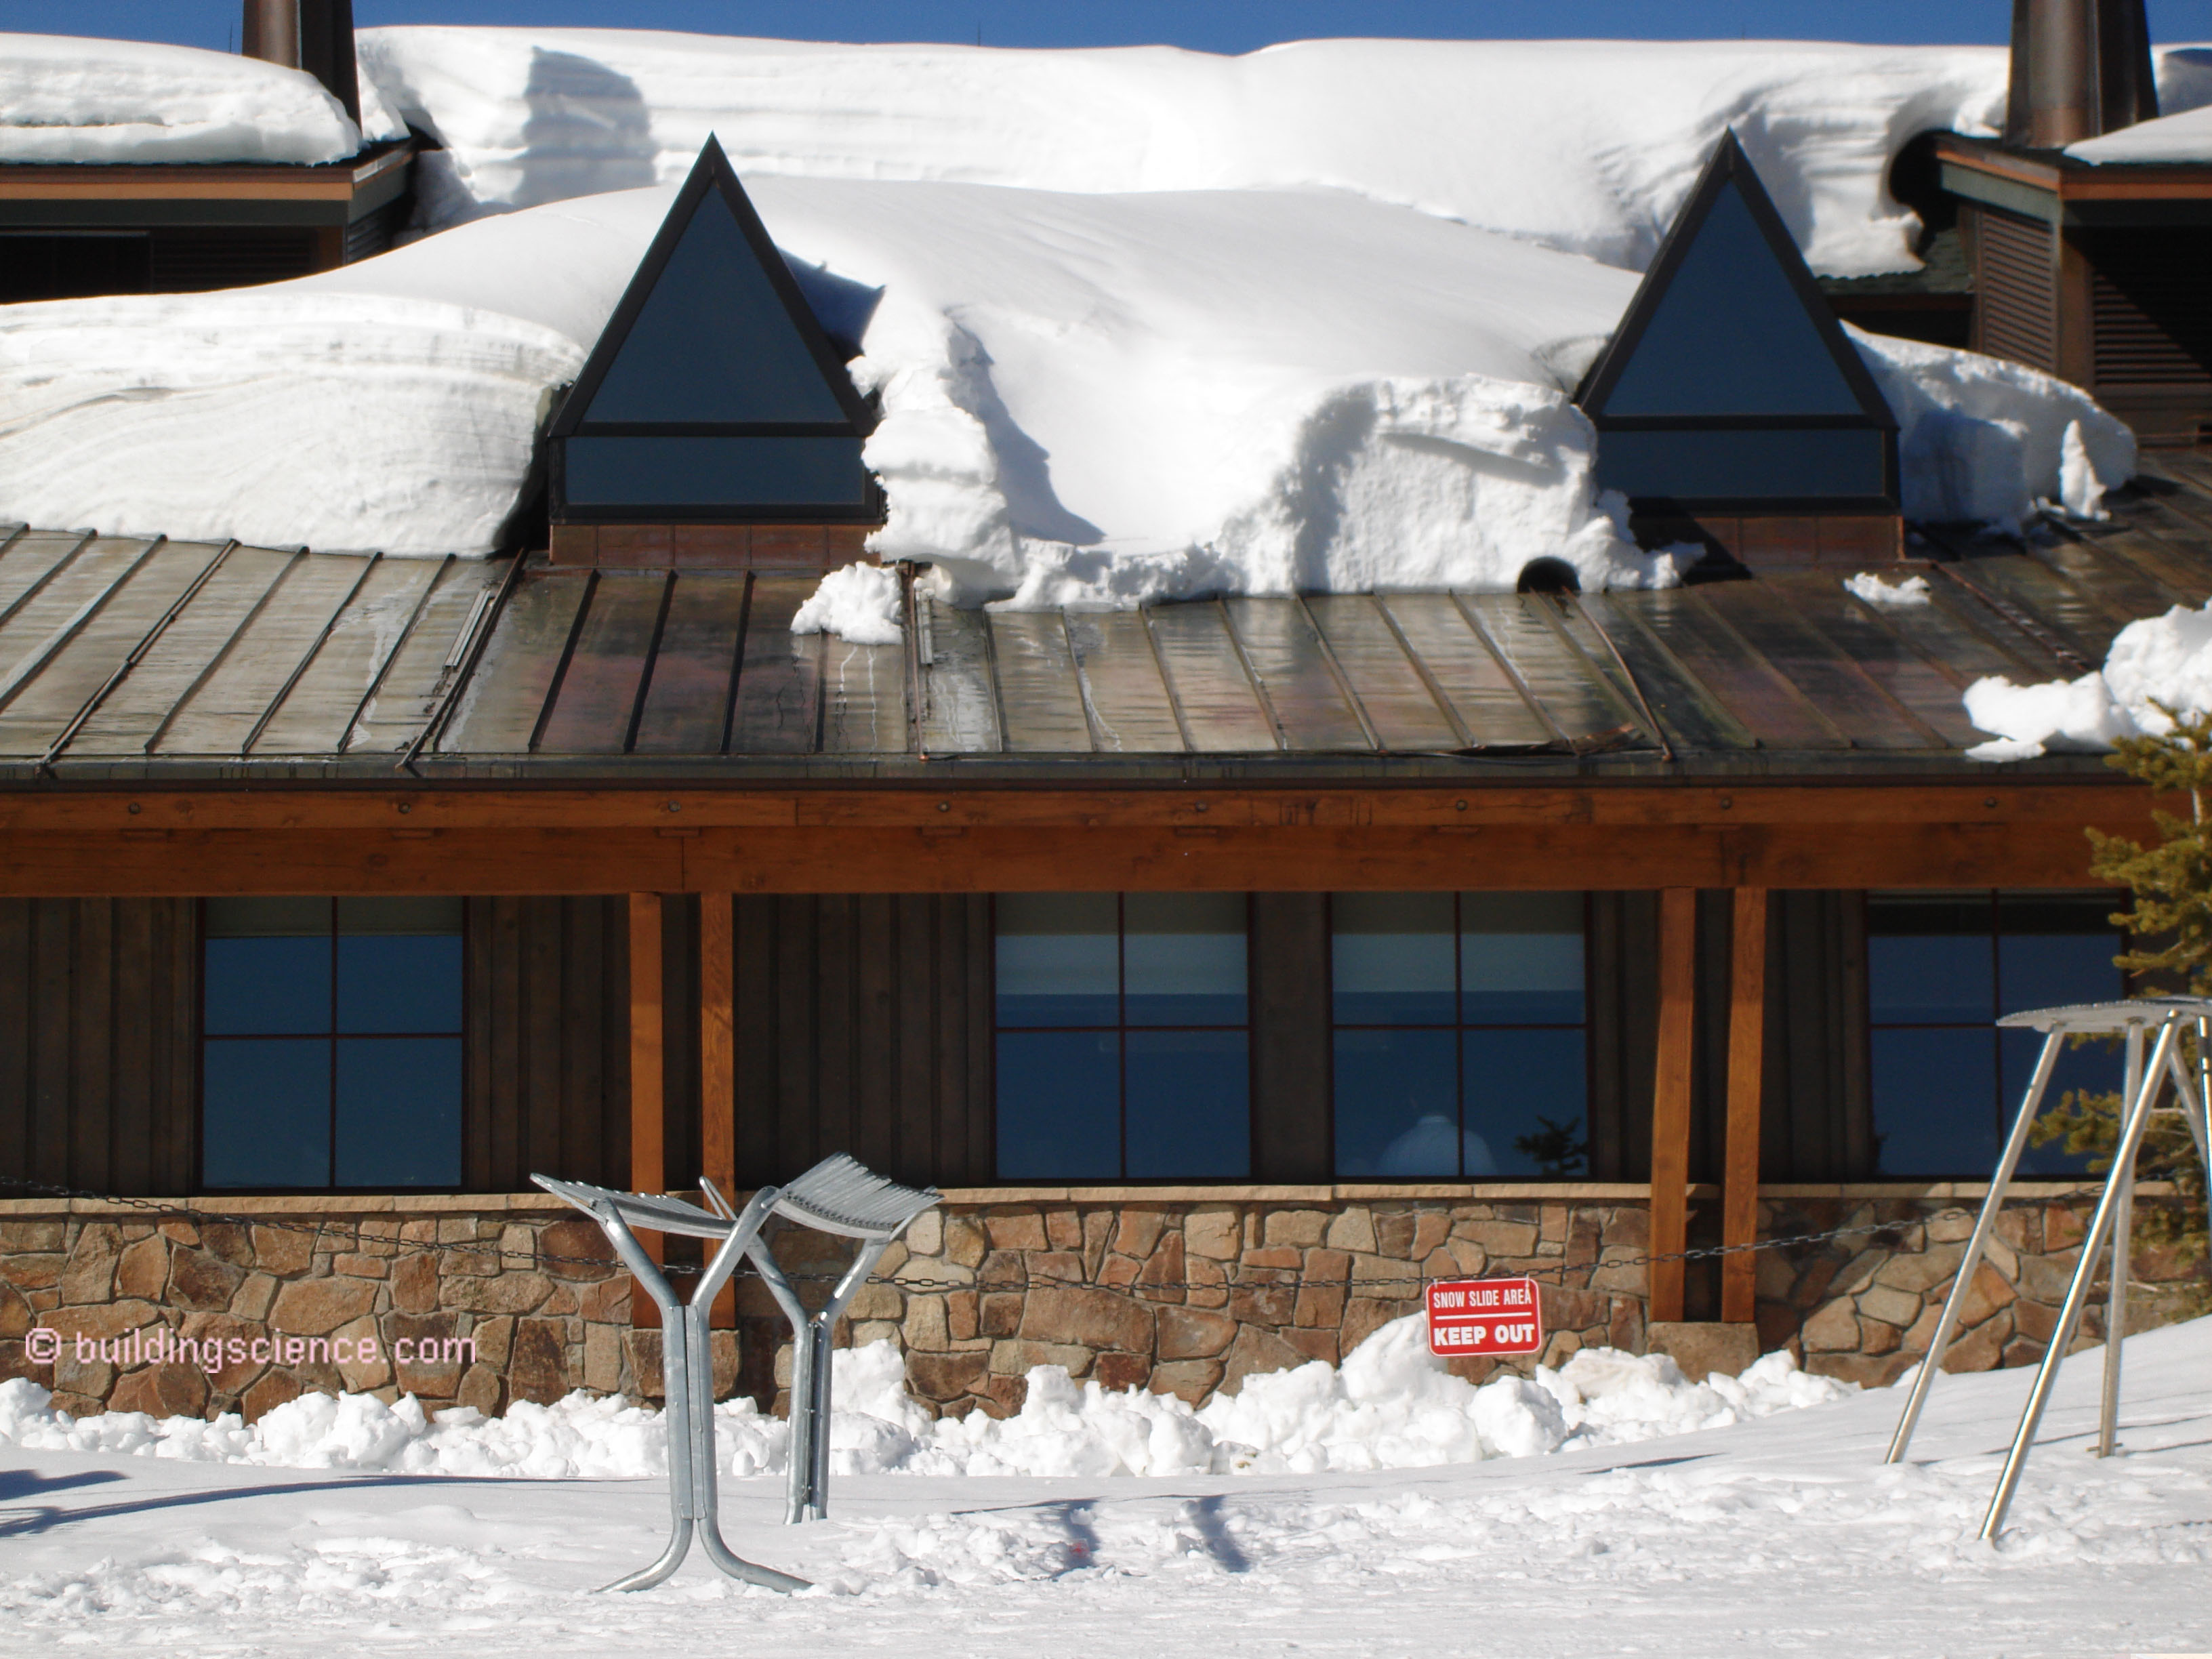
Photograph 9: Don’t You Just Love Aspen –Top of Ajax…awesome ski lodge. Note the large south facing overhang that traps the heat leading to ice dams and snow slides.
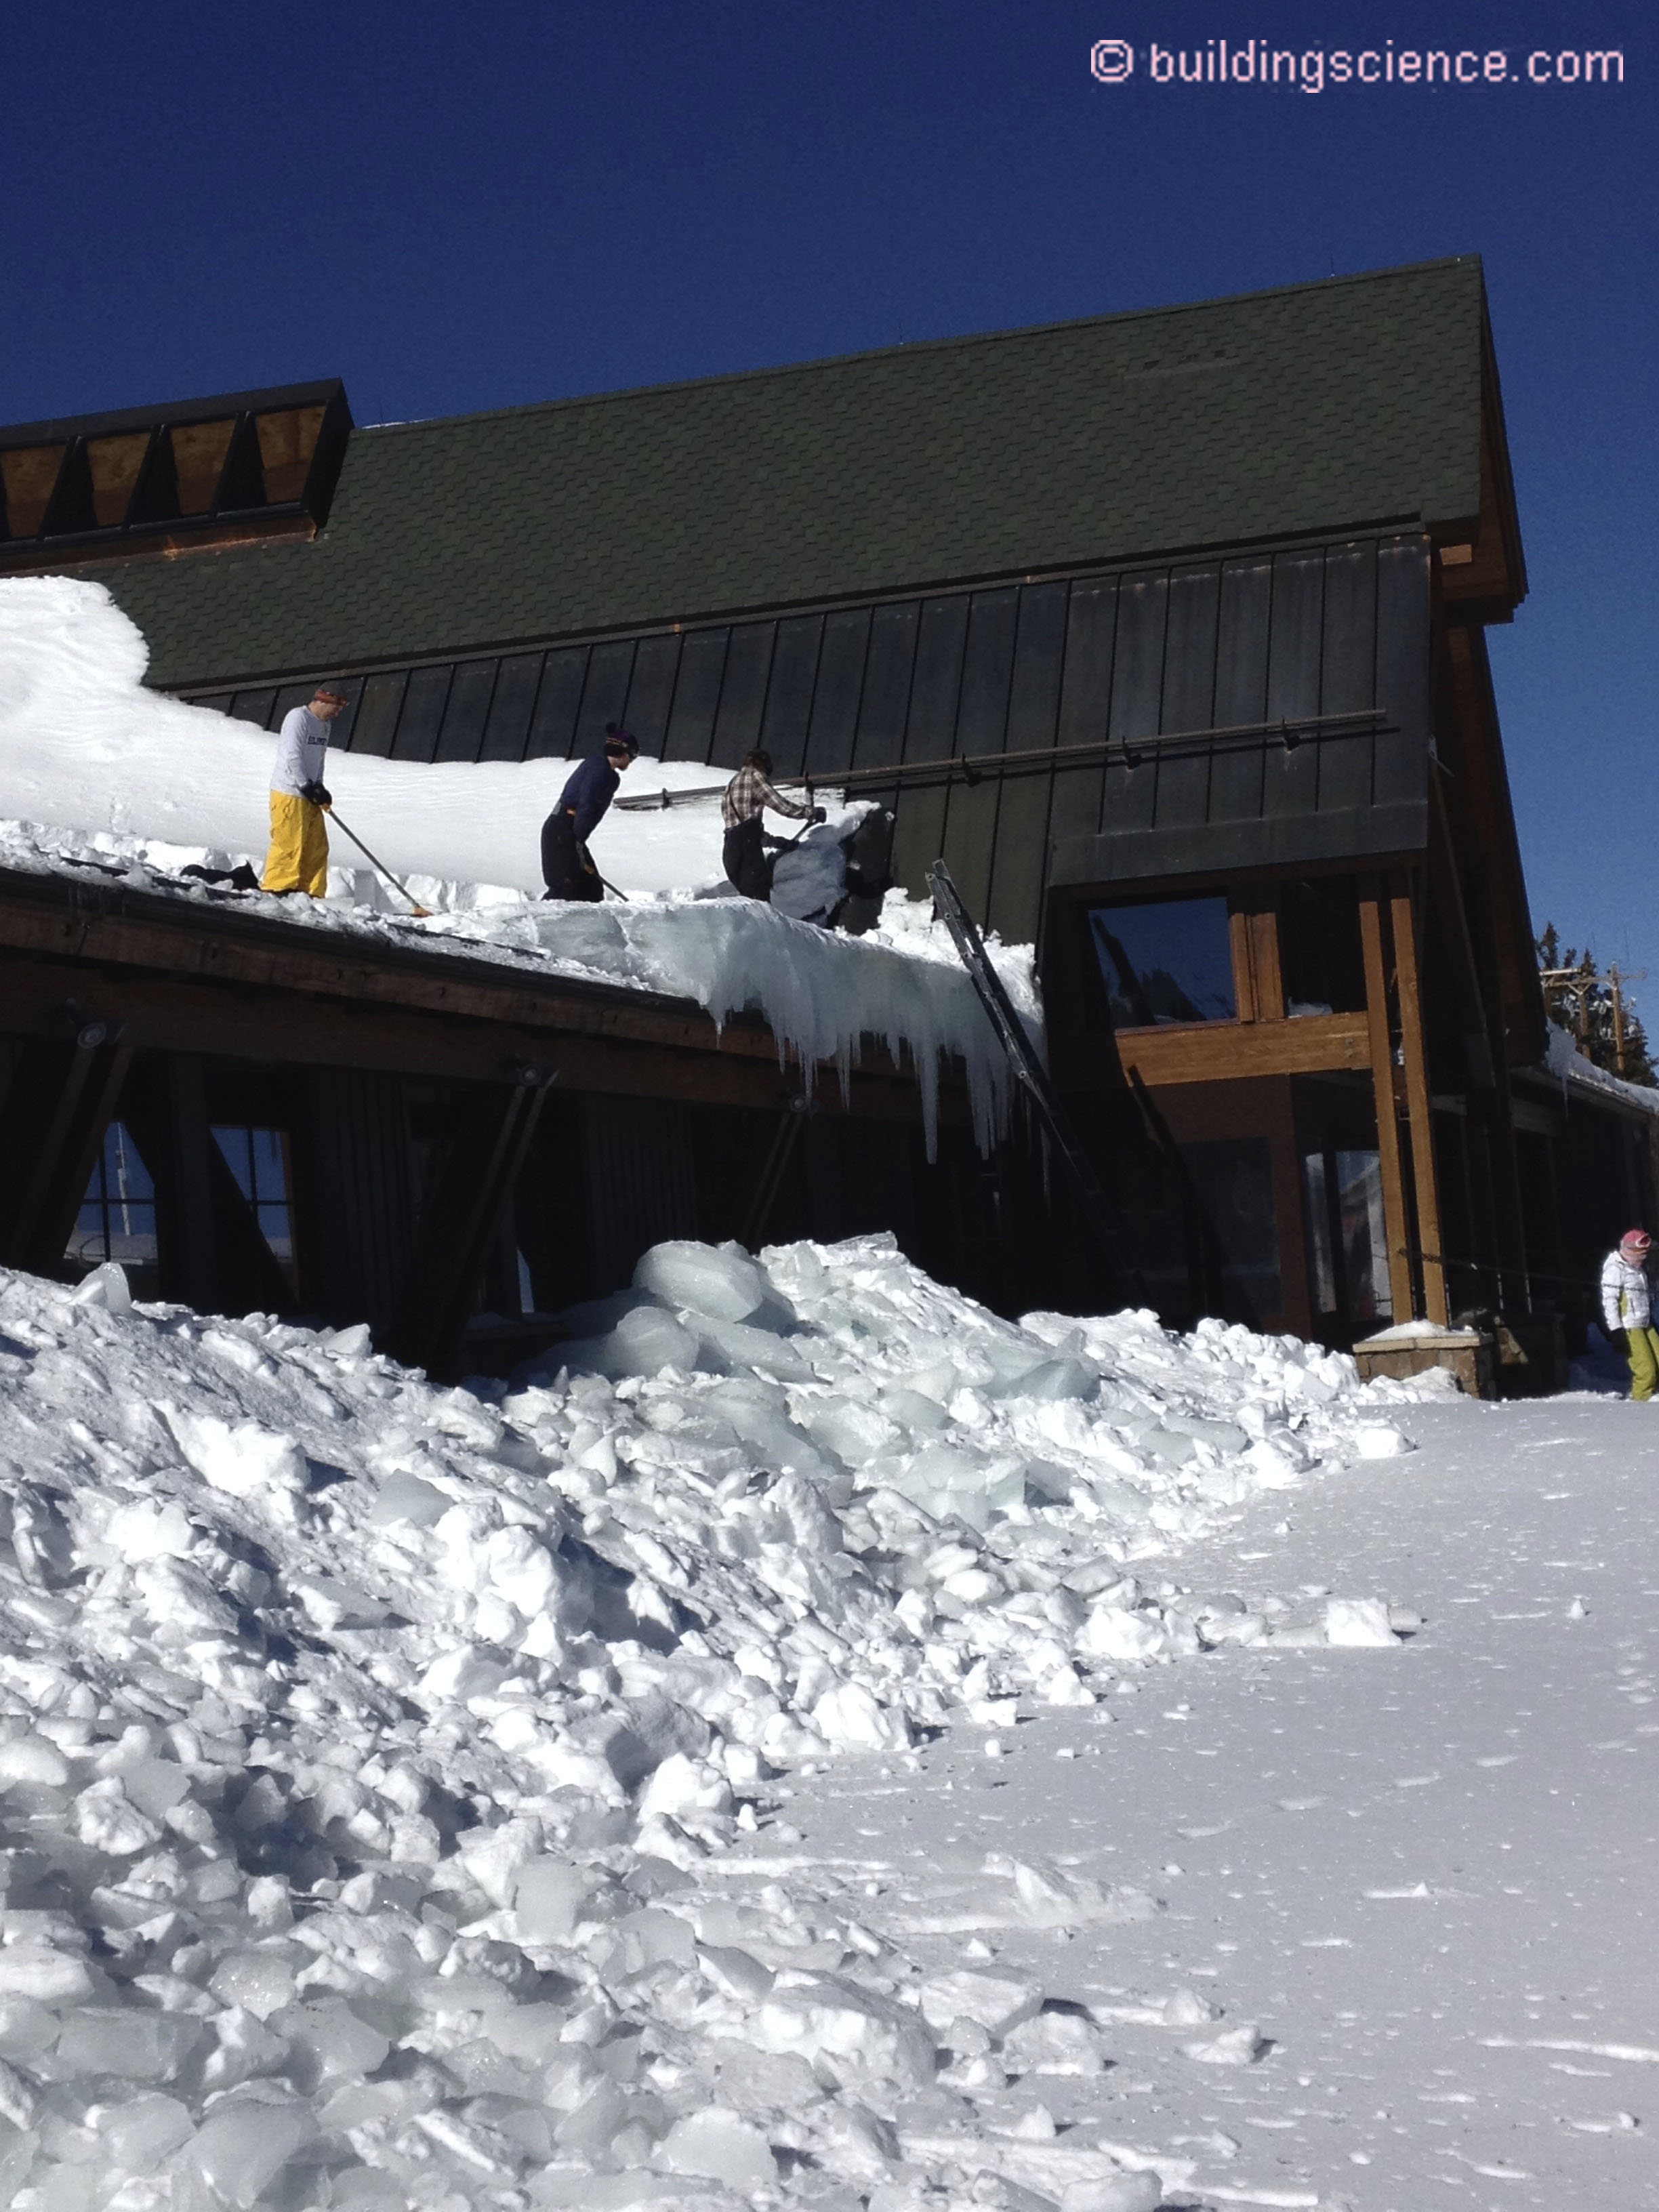
Photograph 10: Hacking Away at Ice Dams - Big time damage to your roof when you hack away at the ice dam.
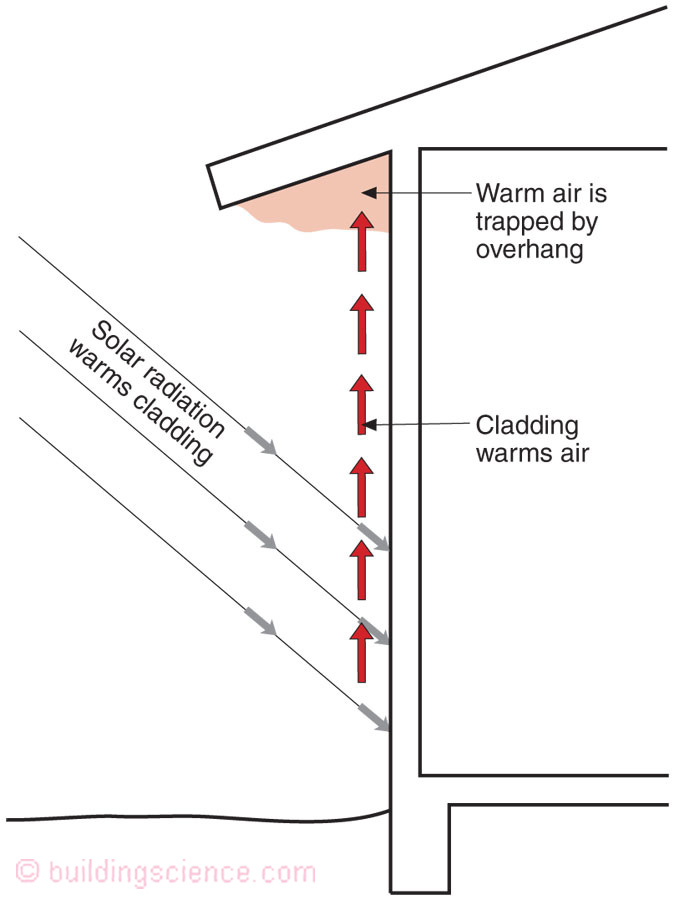
Figure 5: Cladding Thermal Plumes –Dark cladding, solar radiation and large over-hangs combine to create ice-dam heaven.
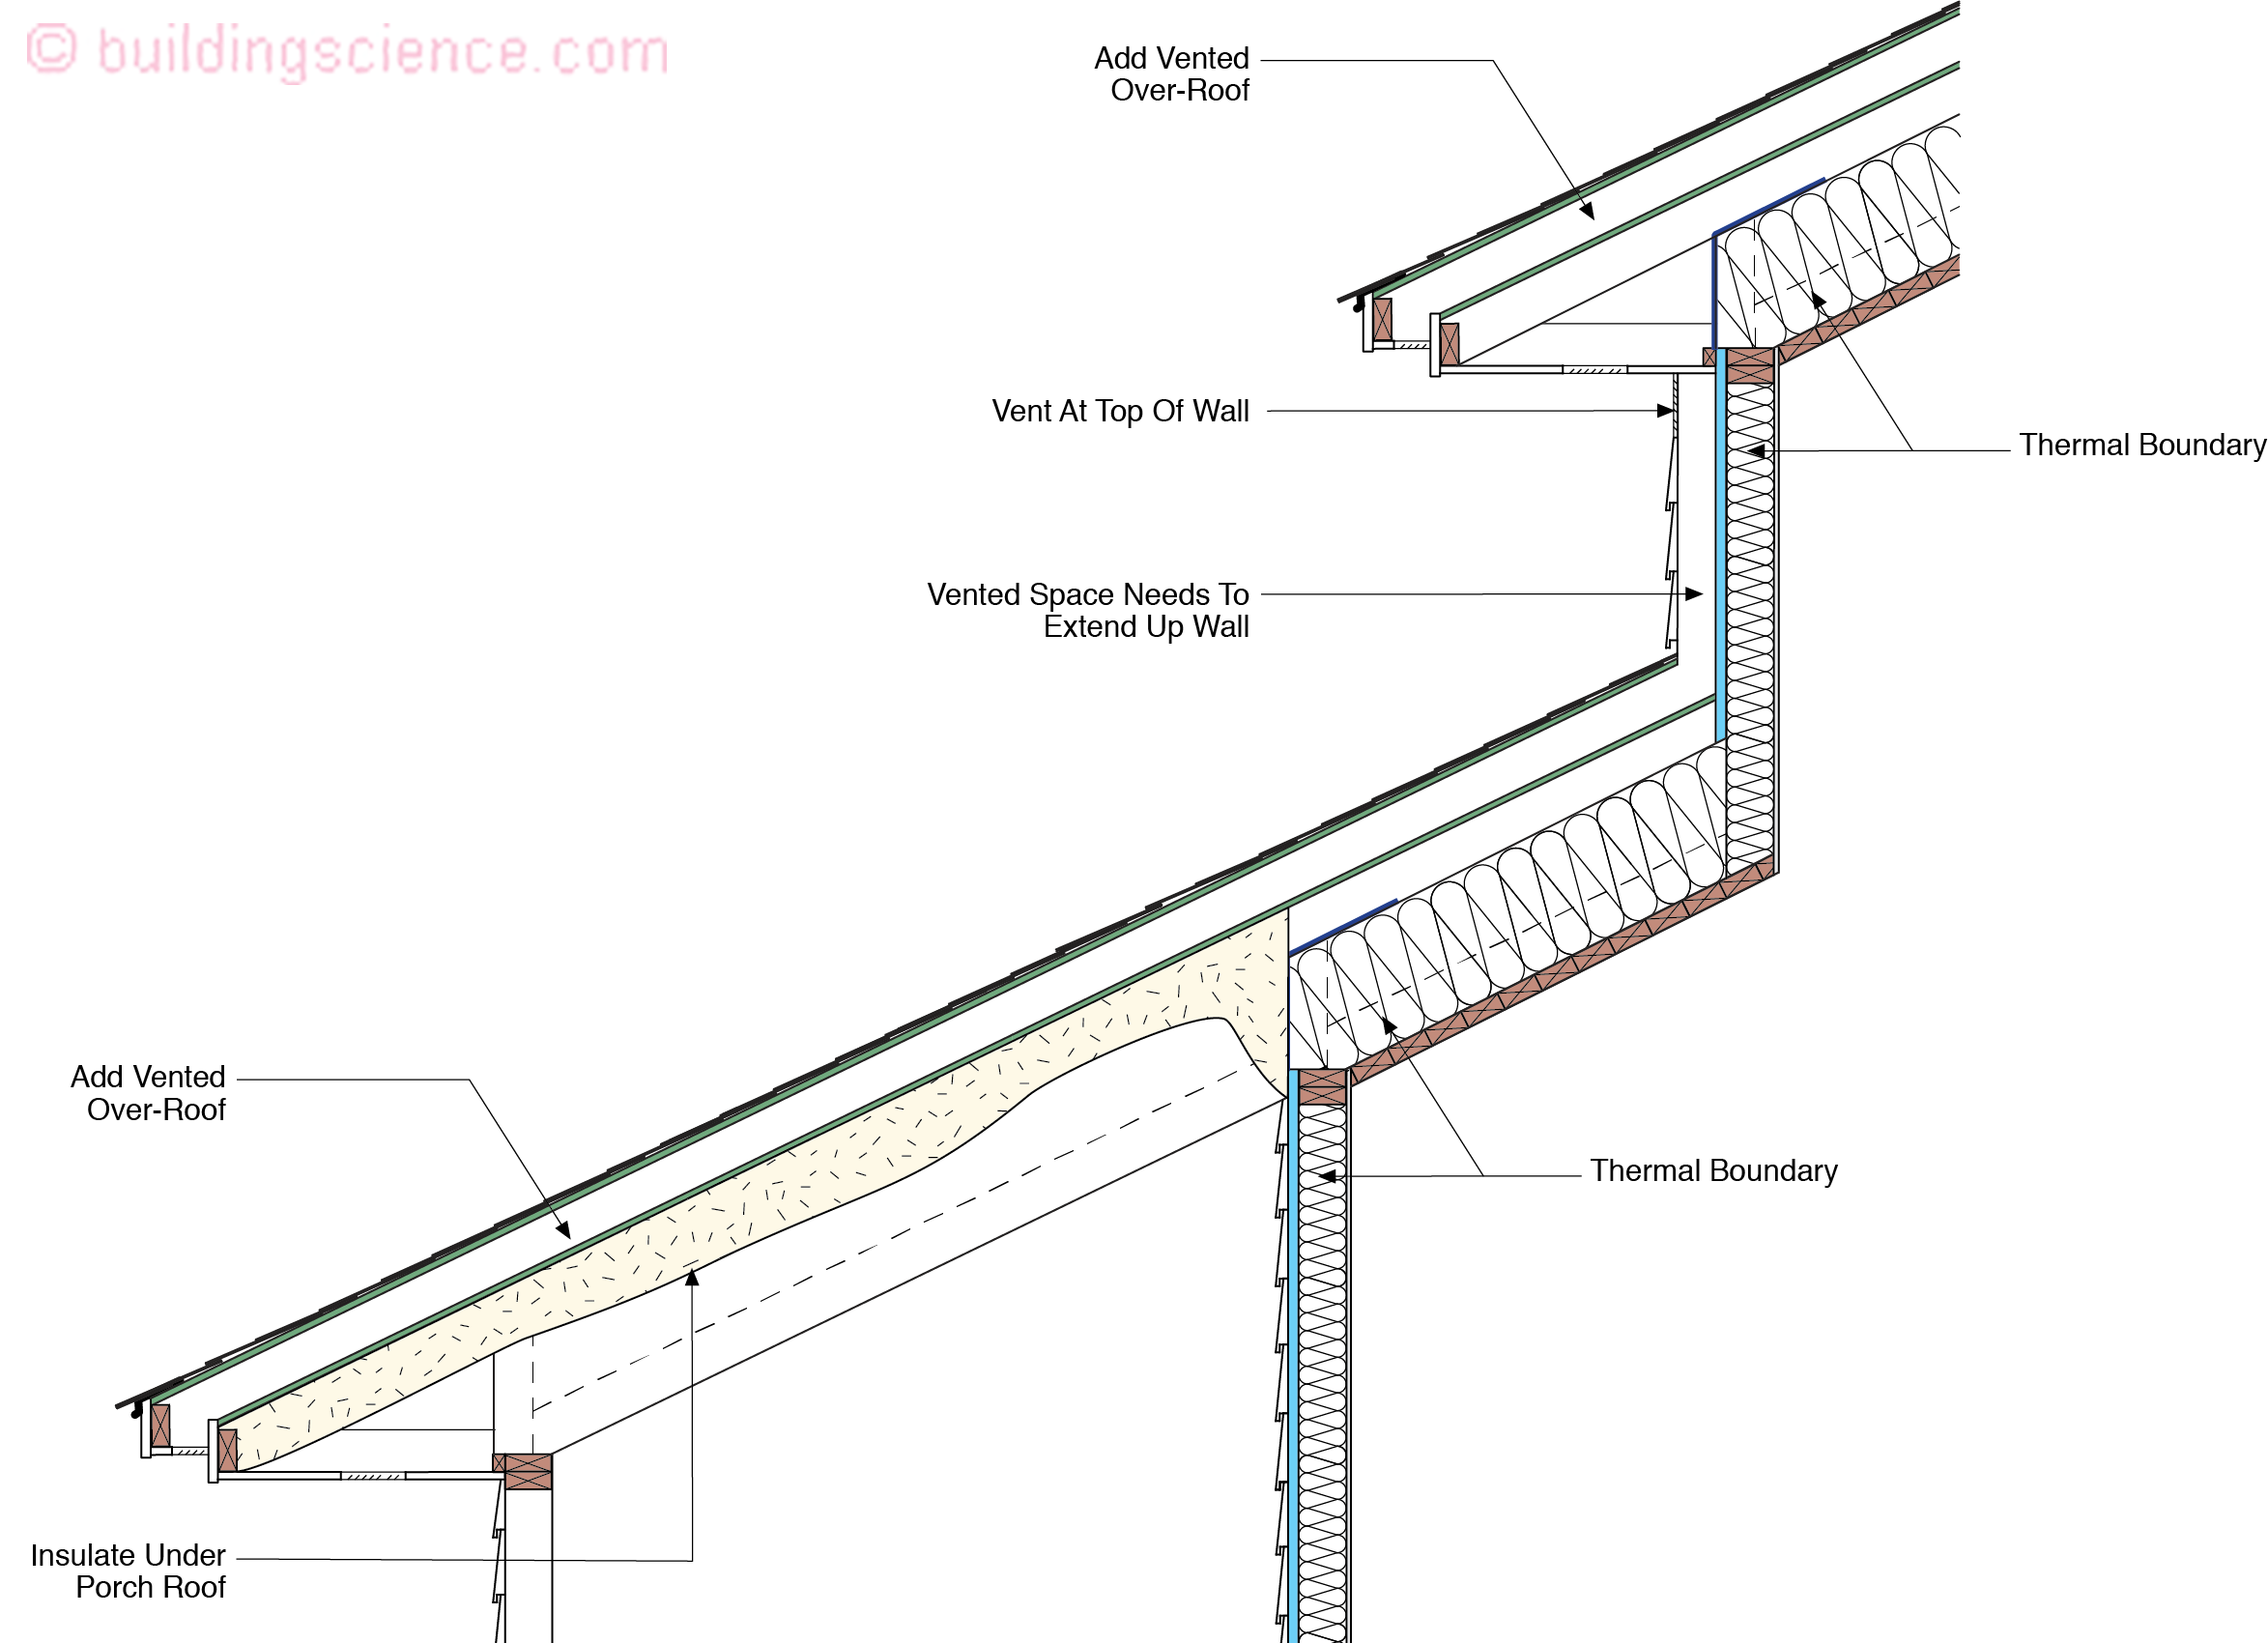
Figure 6: Venting Up The Wall –Insulate the projecting overhang with spray polyurethane foam (SPF) and over roof. Where the over roof vent intersects the wall run the vent up the wall…you need to “over wall” create a vented wall…like a “rain screen”…but bigger… a “snow screen”
1Ice damming is an IECC Climate Zone 5, 6, 7 or 8 issue. Relax. R-60 is where you should be with roof insulation in any event….