Five Integrated Pest Management Strategies to Consider
Pests include insects and animals that have a harmful effect on humans, food or living conditions. Pests include insects, termites, ants, cockroaches, mice, rats and dust mites. We are not going to address telemarketers or lawyers…
Water, food, dust and clutter provide the conditions for insects, termites, ants, cockroaches, mice, rats and dust mites to inhabit buildings. Pests inside homes can lead to allergic reactions. Pests often lead to the use of pesticides that are not good for people to breathe or ingest (eat). Pests can damage or destroy building materials. Water and food are an invitation for pests. Designing homes to be dry controls pests. Keeping homes dry and clean controls pests. Disconnecting buildings from the surrounding soil and ground controls pests.
Infestations of dust mites, cockroaches, mice and rats can all cause allergic reactions. Even after pests are gone, pest skin, hair and feces can remain and cause allergies.
Pest resistant homes reduce exposure to allergens and asthma triggers released by pests and can reduce the amount of pesticide used when pesticides are necessary.
First Strategy
Keep pests out of homes. Pests tend to love water. Control surface water – slope the ground away from building perimeters (Figure 1). Direct rainwater from gutters and downspouts away from buildings (Figure 2).
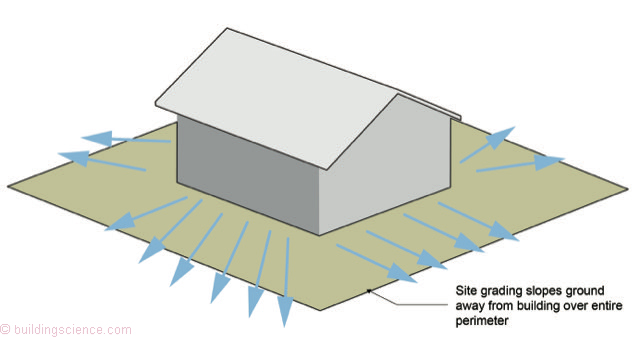
Figure 1: Control Surface Water – Slope the ground away from building perimeters.

Figure 2: Gutters and Downspouts - Direct rainwater from gutters and downspouts away from buildings.
Keep bushes and trees at least 3 feet from homes. Bushes and trees near a home provide food, a living place and sheltered passage for pests such as rats, mice, birds, cockroaches and ants. For similar reasons trash and clutter should not be stored near buildings.
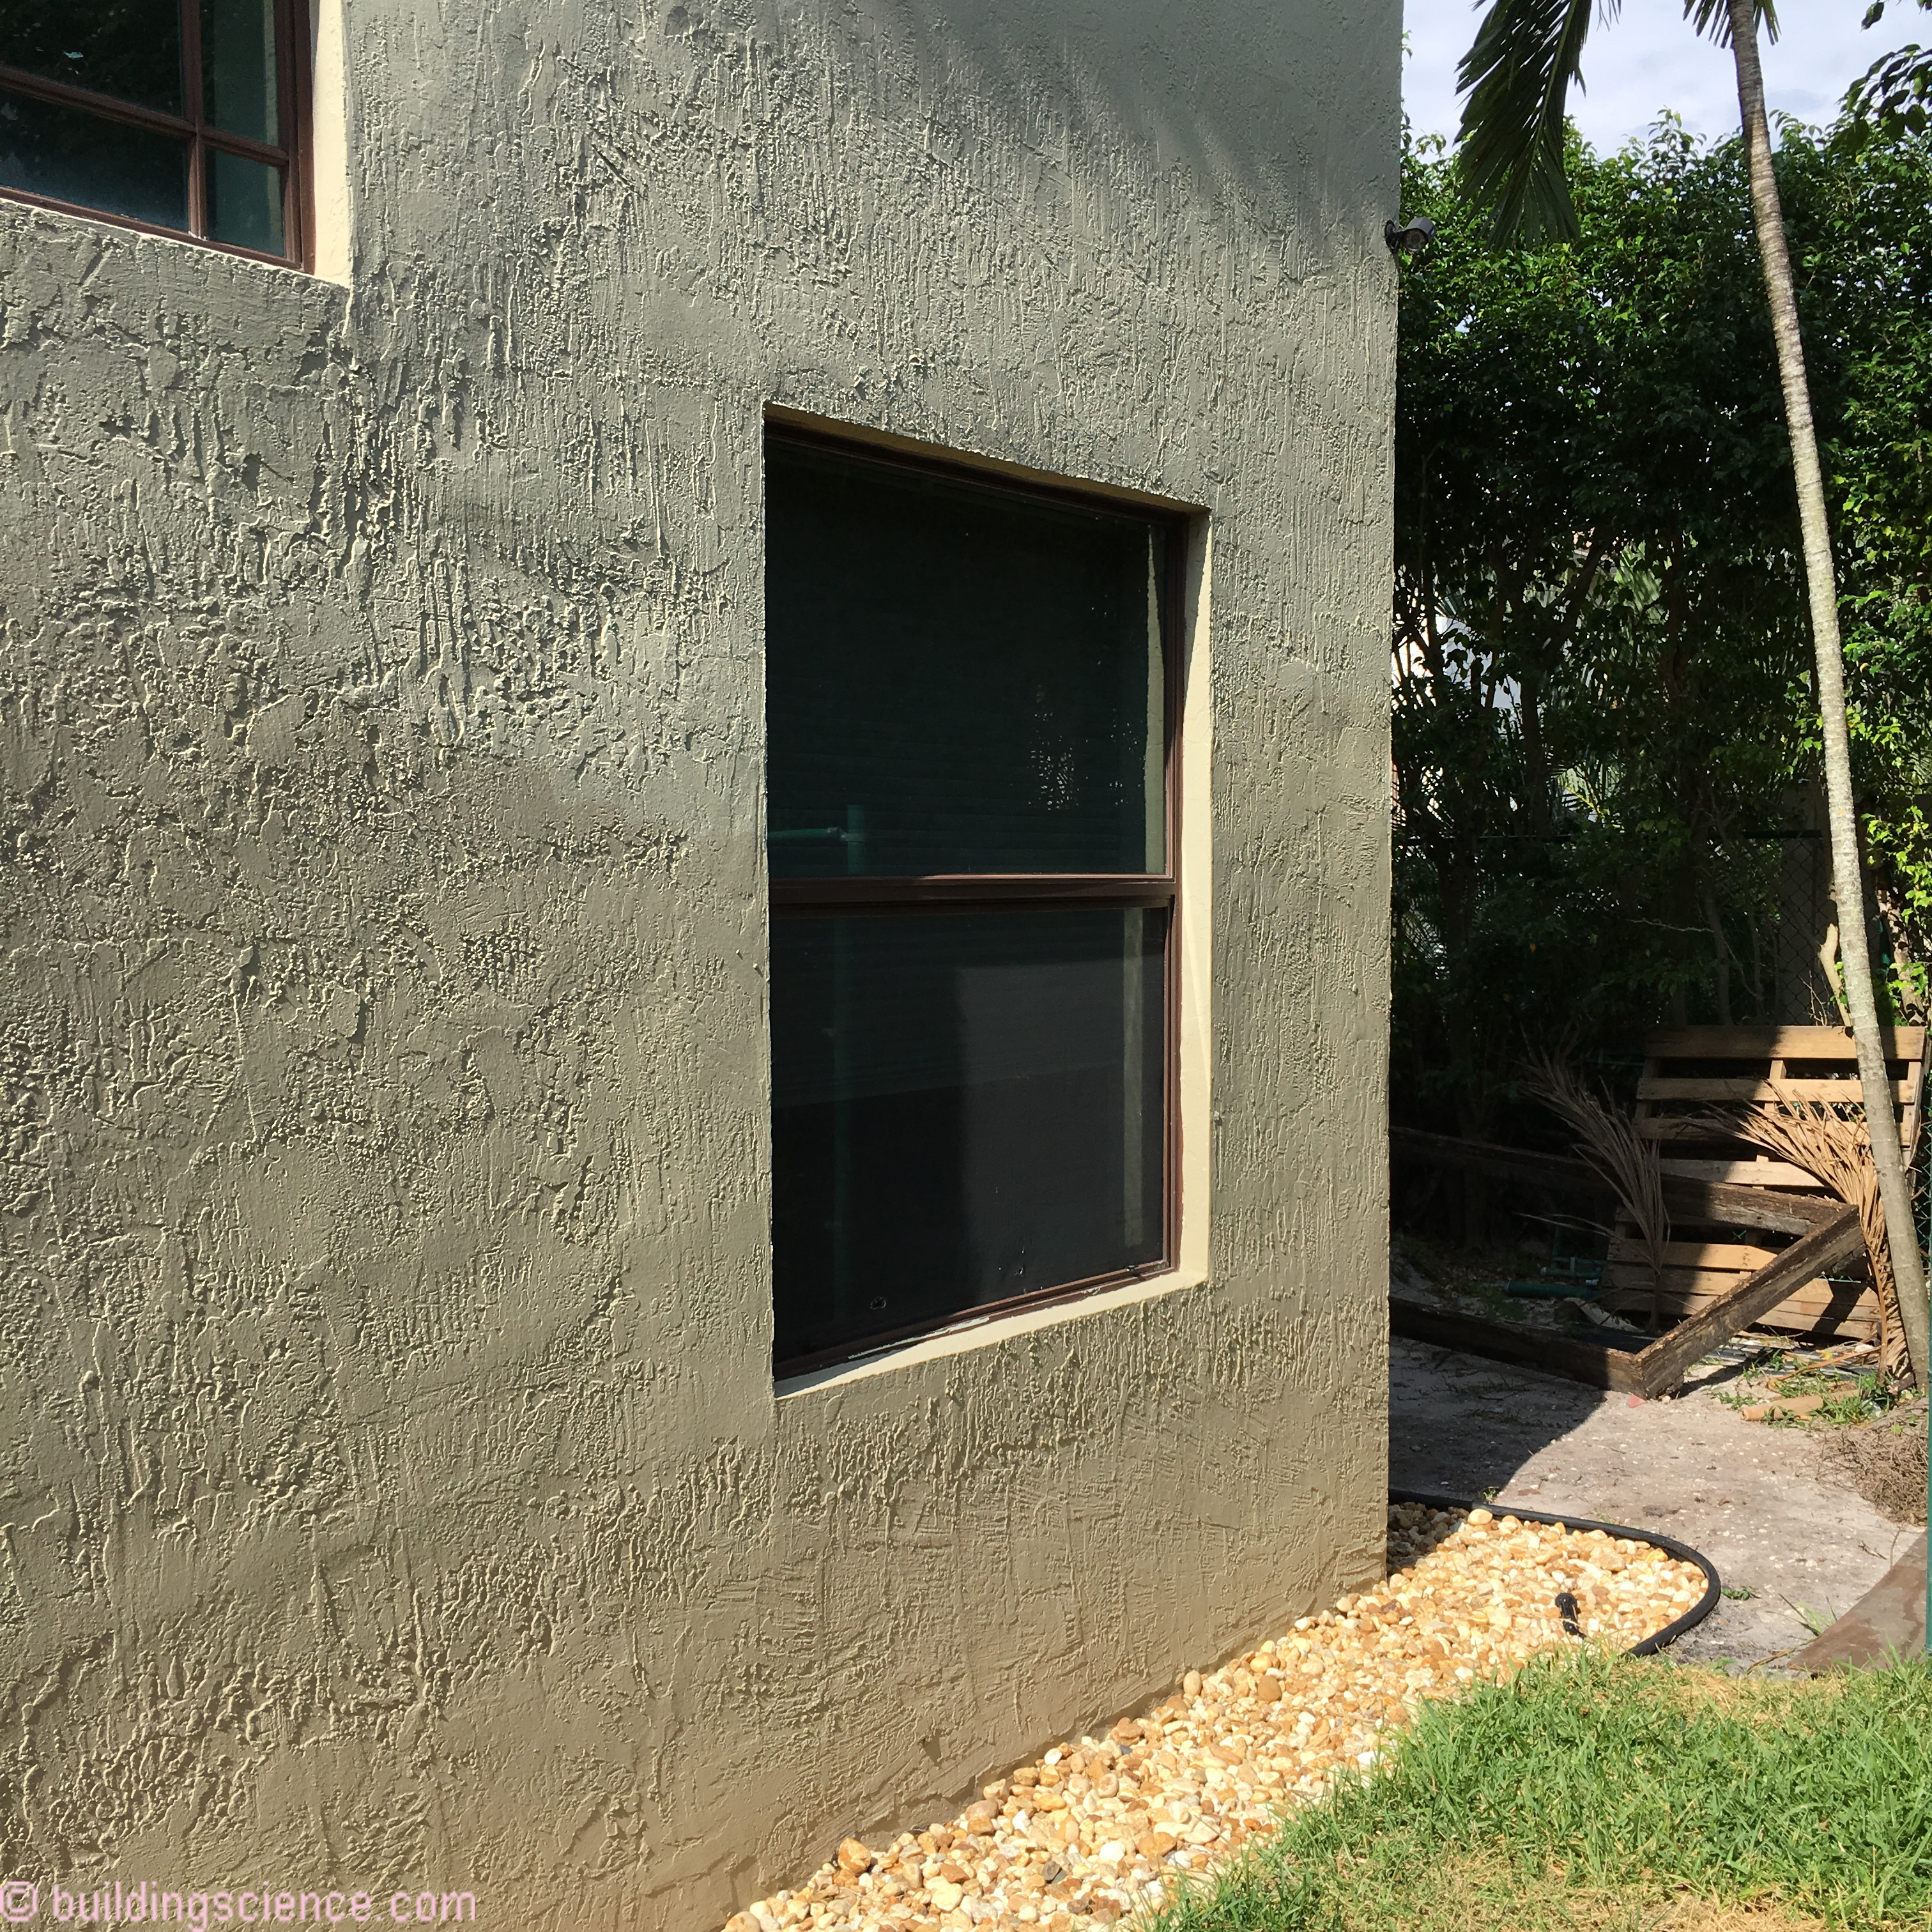
Provide 2 feet of pea gravel or crushed stone and then drought-resistant plants and do not over-irrigate. Alternative pest resistant ground breaks such as graded basalt particles, concrete skirts or concrete pavers are also effective.
Figure 3 and Figure 4 as well as Photograph 1 and Photograph 2 illustrate the use of a 2 foot wide perimeter pest resistant pea gravel – crushed stone ground break. The thickness of the pea gravel – crushed stone layer should be a minimum of 4 inches. The pea gravel – crushed stone ground break should slope away from the building at approximately 5 percent (1/2 inch per foot).
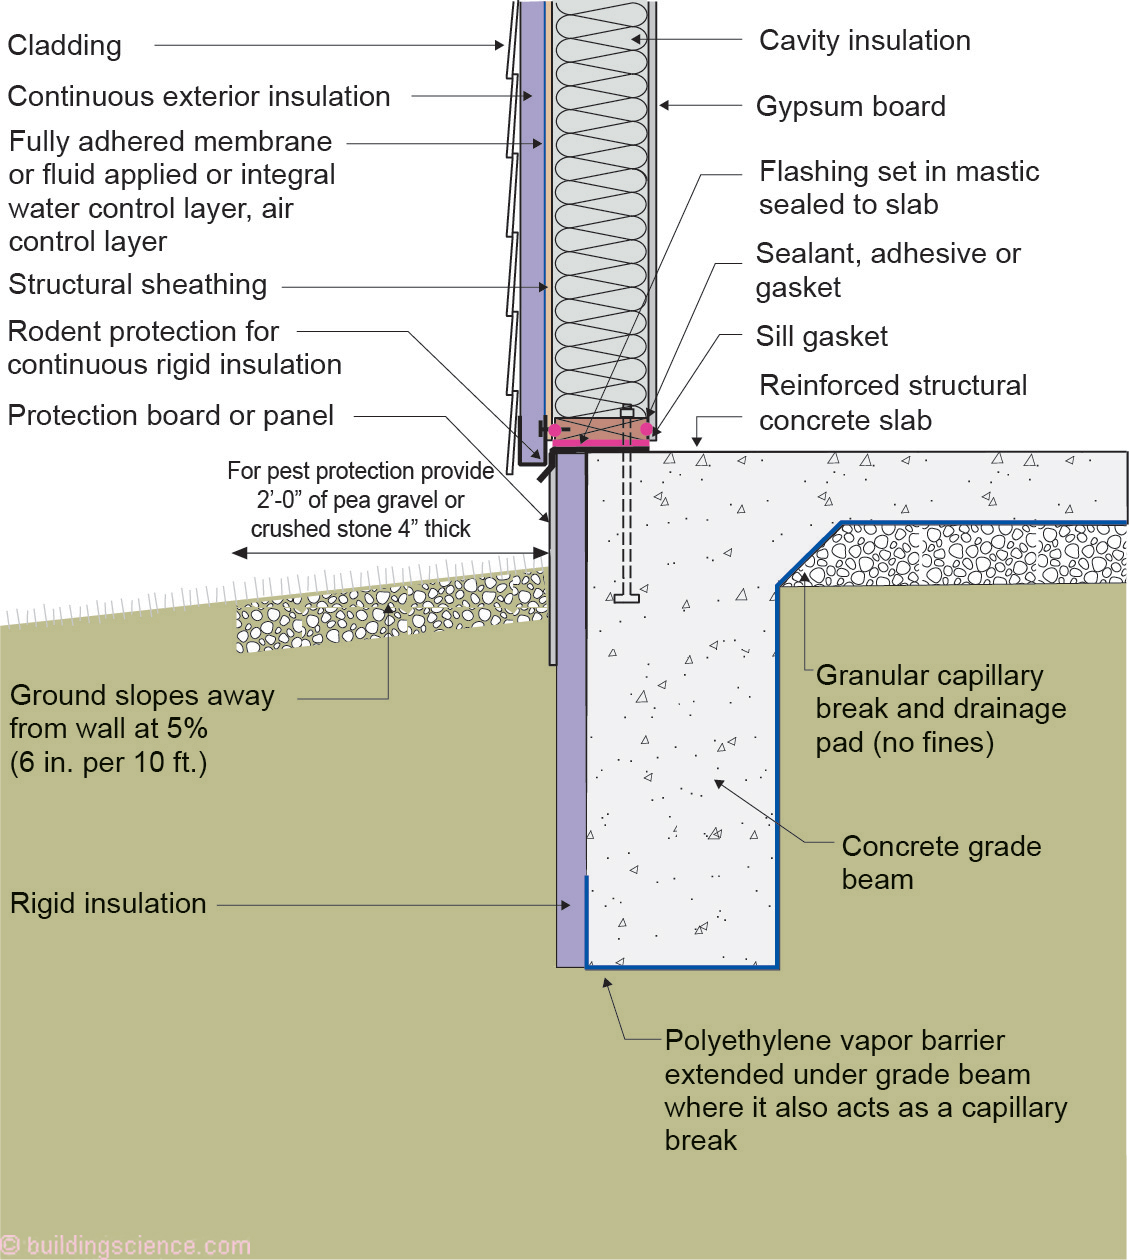
Figure 3: Pea Gravel – Crushed Stone Perimeter Pest Resistant Ground Break – Slab Foundation - The thickness of the pea gravel – crushed stone layer should be a minimum of 4 inches. The pea gravel – crushed stone ground break should slope away from the building at approximately 5 percent (1/2 inch per foot).
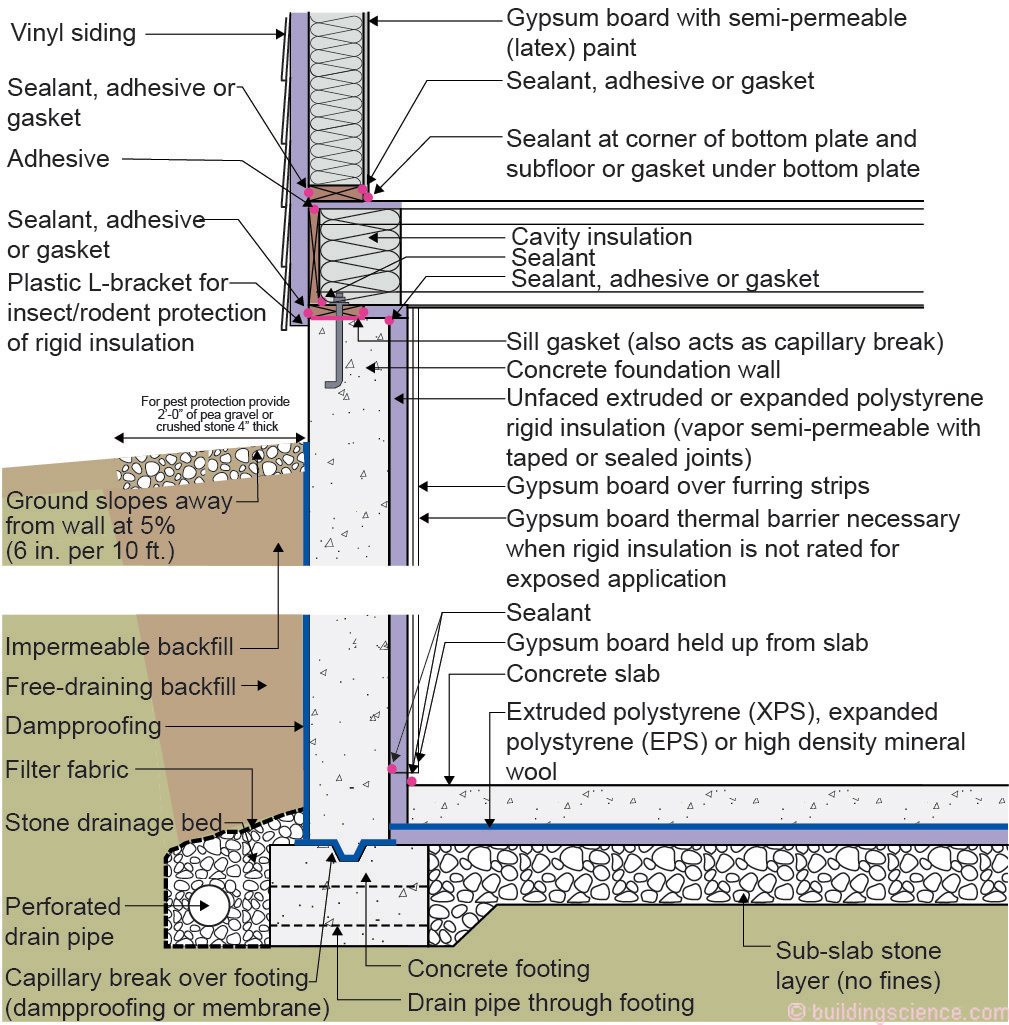
Figure 4: Pea Gravel – Crushed Stone Perimeter Pest Resistant Ground Break – Basement Foundation - The thickness of the pea gravel – crushed stone layer should be a minimum of 4 inches. The pea gravel – crushed stone ground break should slope away from the building at approximately 5 percent (1/2 inch per foot).
Photograph 1: Pea Gravel – Crushed Stone Perimeter Pest Resistant Ground Break
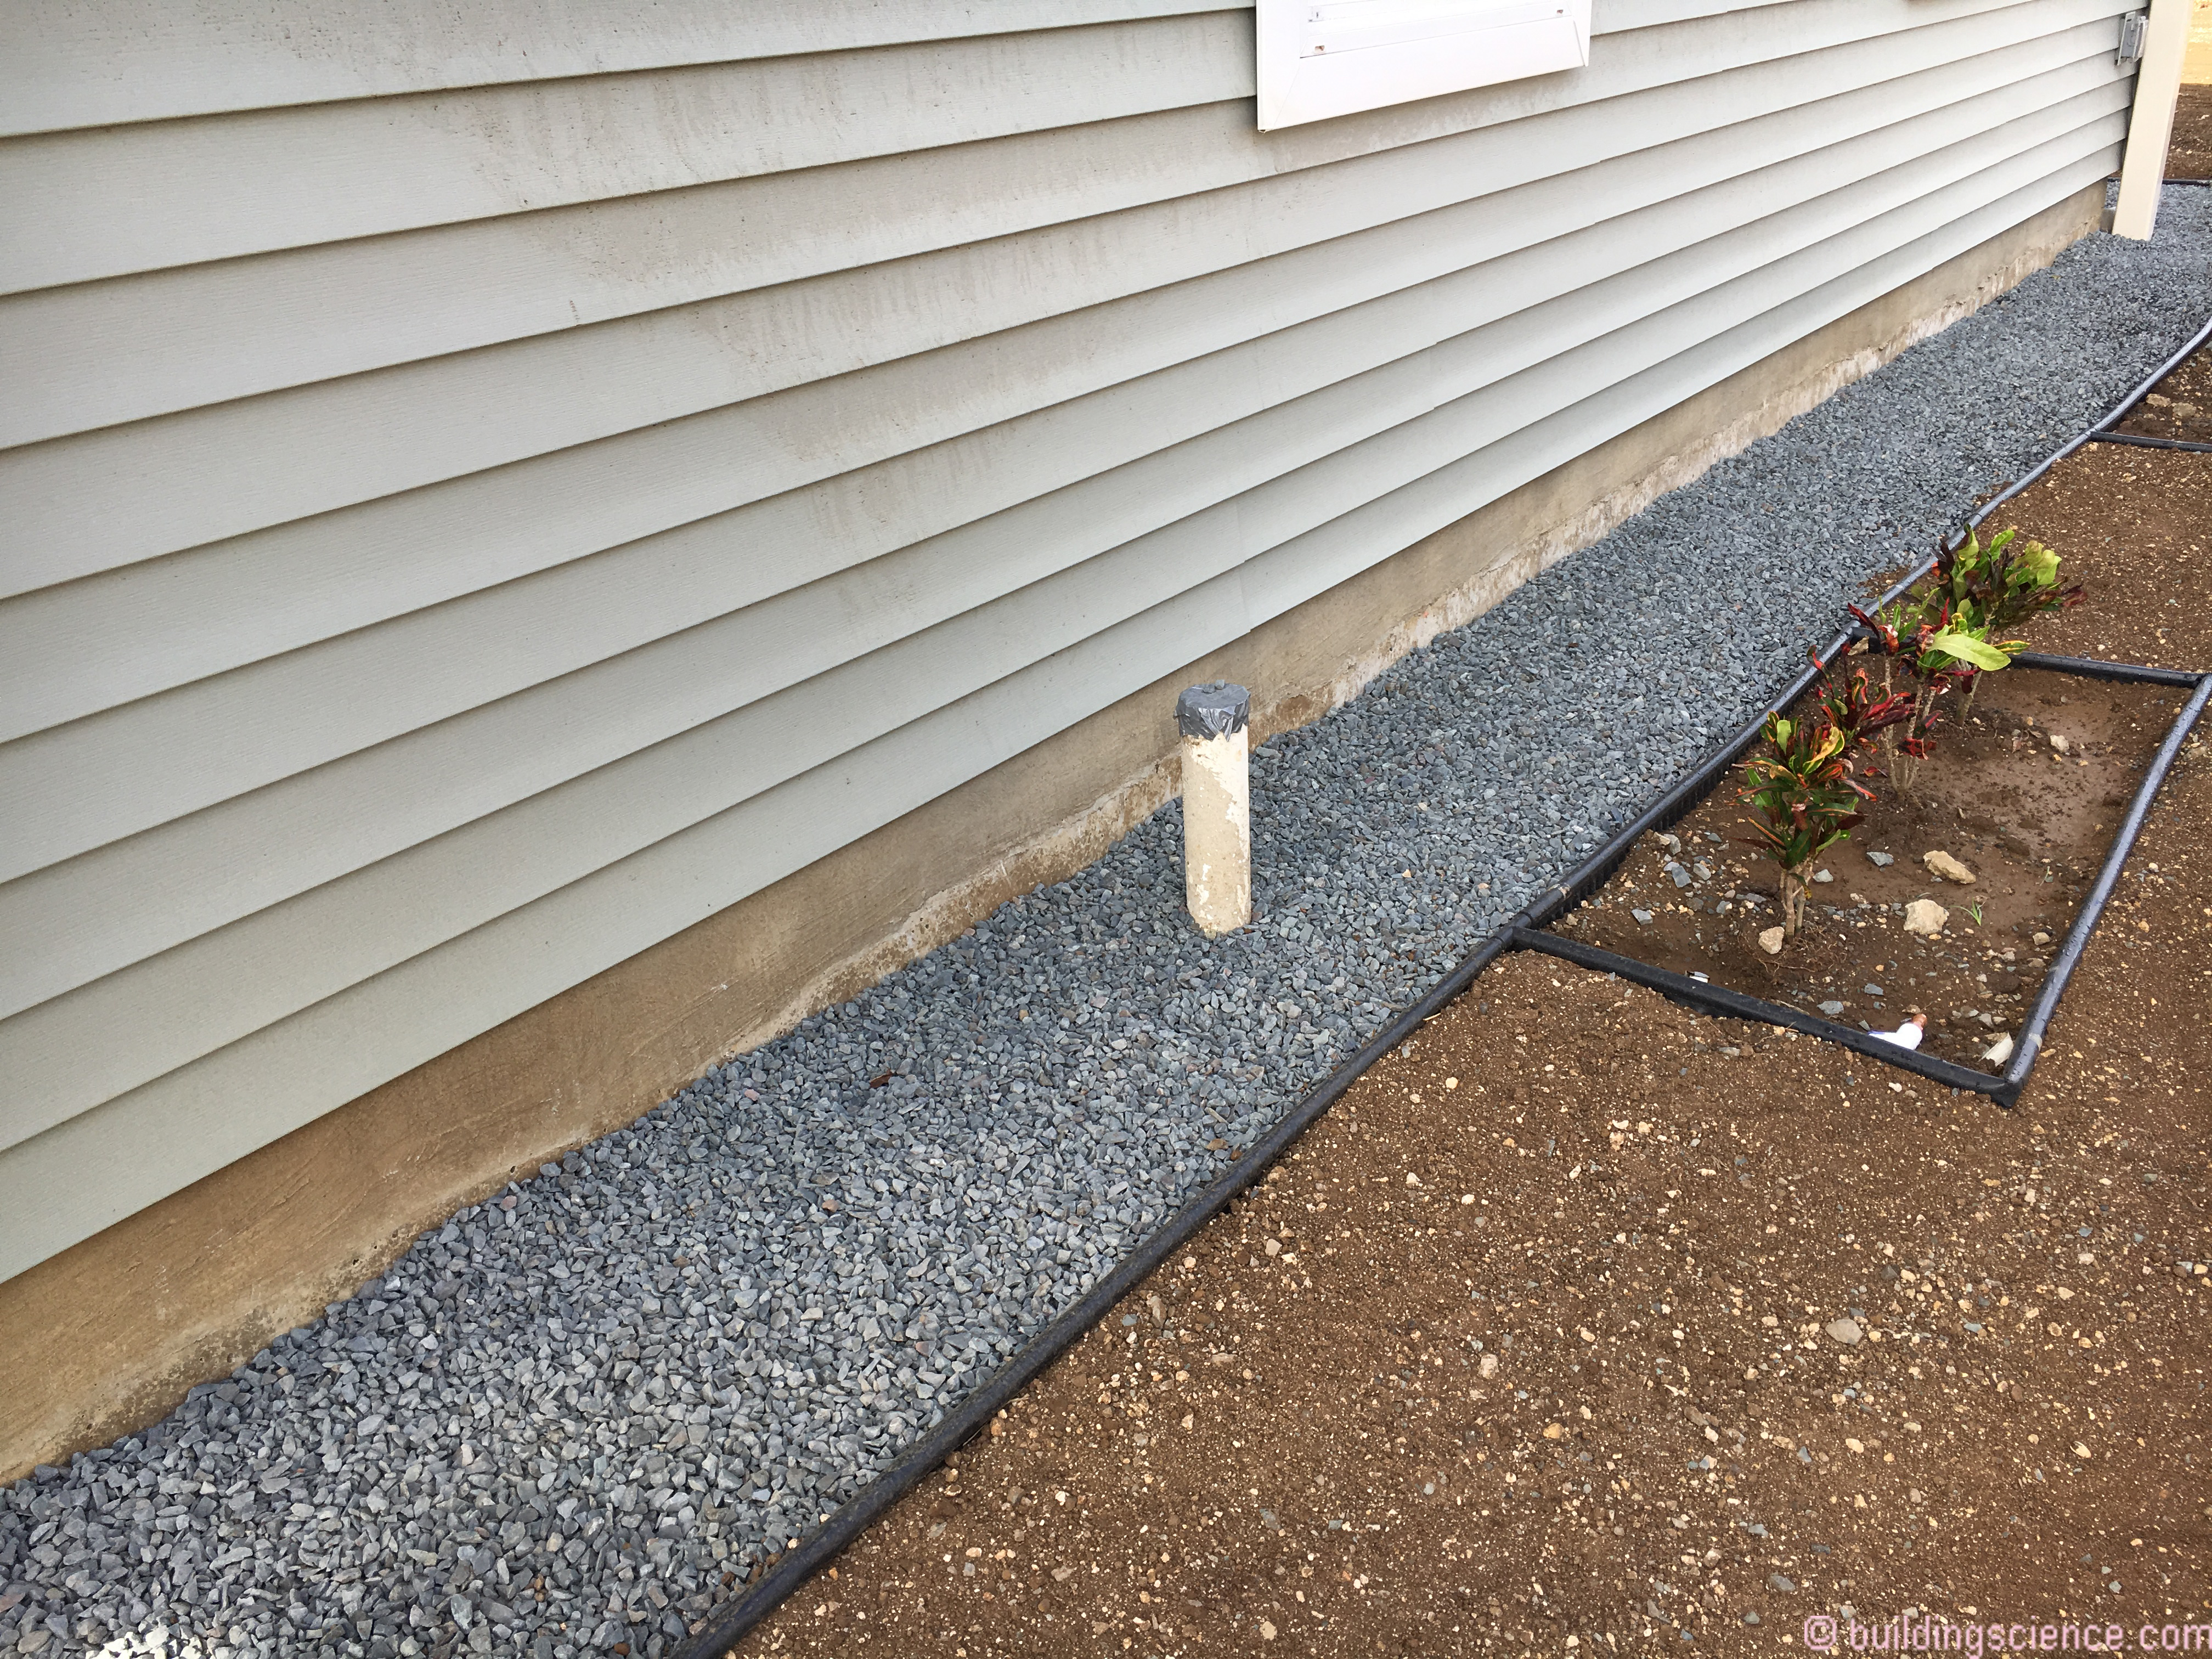
Photograph 2: Pea Gravel – Crushed Stone Perimeter Pest Resistant Ground Break
Photograph 3 and Photograph 4 illustrate the use of a 2 foot wide perimeter concrete skirt ground break. The thickness of the concrete skirt should be a minimum of 4 inches. The concrete should be cast on a 4 inch thick stone capillary break. Control joints should be provided every 4 feet. In Climate Zones 5 and higher the concrete should be air entrained to a minimum of 5 percent @ compressive strength of 3,500 psi in order to resist freeze-thaw damage. The concrete skirt ground break should slope away from the building at approximately 5 percent (1/2 inch per foot).
Photograph 3: Concrete Skirt Perimeter Pest Resistant Ground Break
Photograph 4: Concrete Skirt Perimeter Pest Resistant Ground Break
Photograph 5 illustrates the use of a 2 foot wide perimeter concrete paver ground break. The concrete paver should be set on a 4 inch thick sand layer. The concrete paver ground break should slope away from the building at approximately 5 percent (1/2 inch per foot).
Photograph 5: Concrete Paver Perimeter Pest Resistant Ground Break (photograph courtesy of the San Francisco Department of the Environment - Pest Prevention by Design)
One of the worst pests are termites. Termites are a major threat to the structural integrity of homes. Here is something obvious…most damage to buildings caused by termites can be avoided by preventing the entry of termites where buildings are connected to the ground. Although obvious, we do dumb things and then try to rely on inter-species chemical warfare to compensate for our dumbness. Let me repeat the obvious…preventing the entry of termites into the building is the first best strategy. More specifically, prevent the entry of termites into and through basement foundations, crawl space foundations and slab on grade foundations:
Provide termite shields between foundations and framing
Provide inspection ability
Seal foundation service penetrations
Additionally, homes can be constructed with termite resistant materials such as borate treated lumber framing and borate treated insulations or materials that are inherently termite resistant such as mineral wool insulation.
Borate treated lumber framing materials must be protected from liquid water to prevent leaching of the borate treatment. Exposed treated lumber framing will lose its efficacy over time. Borated treated lumber framing should not be exposed to rain and should not be used in ground contact or below grade.
Borate treated lumber framing is recommended for use in “heavy” termite infestation regions. Such regions are defined in the 2018 International Residential Code (IRC) in Figure R301.2(7) “Termite Infestation Probability Map (Map 1).
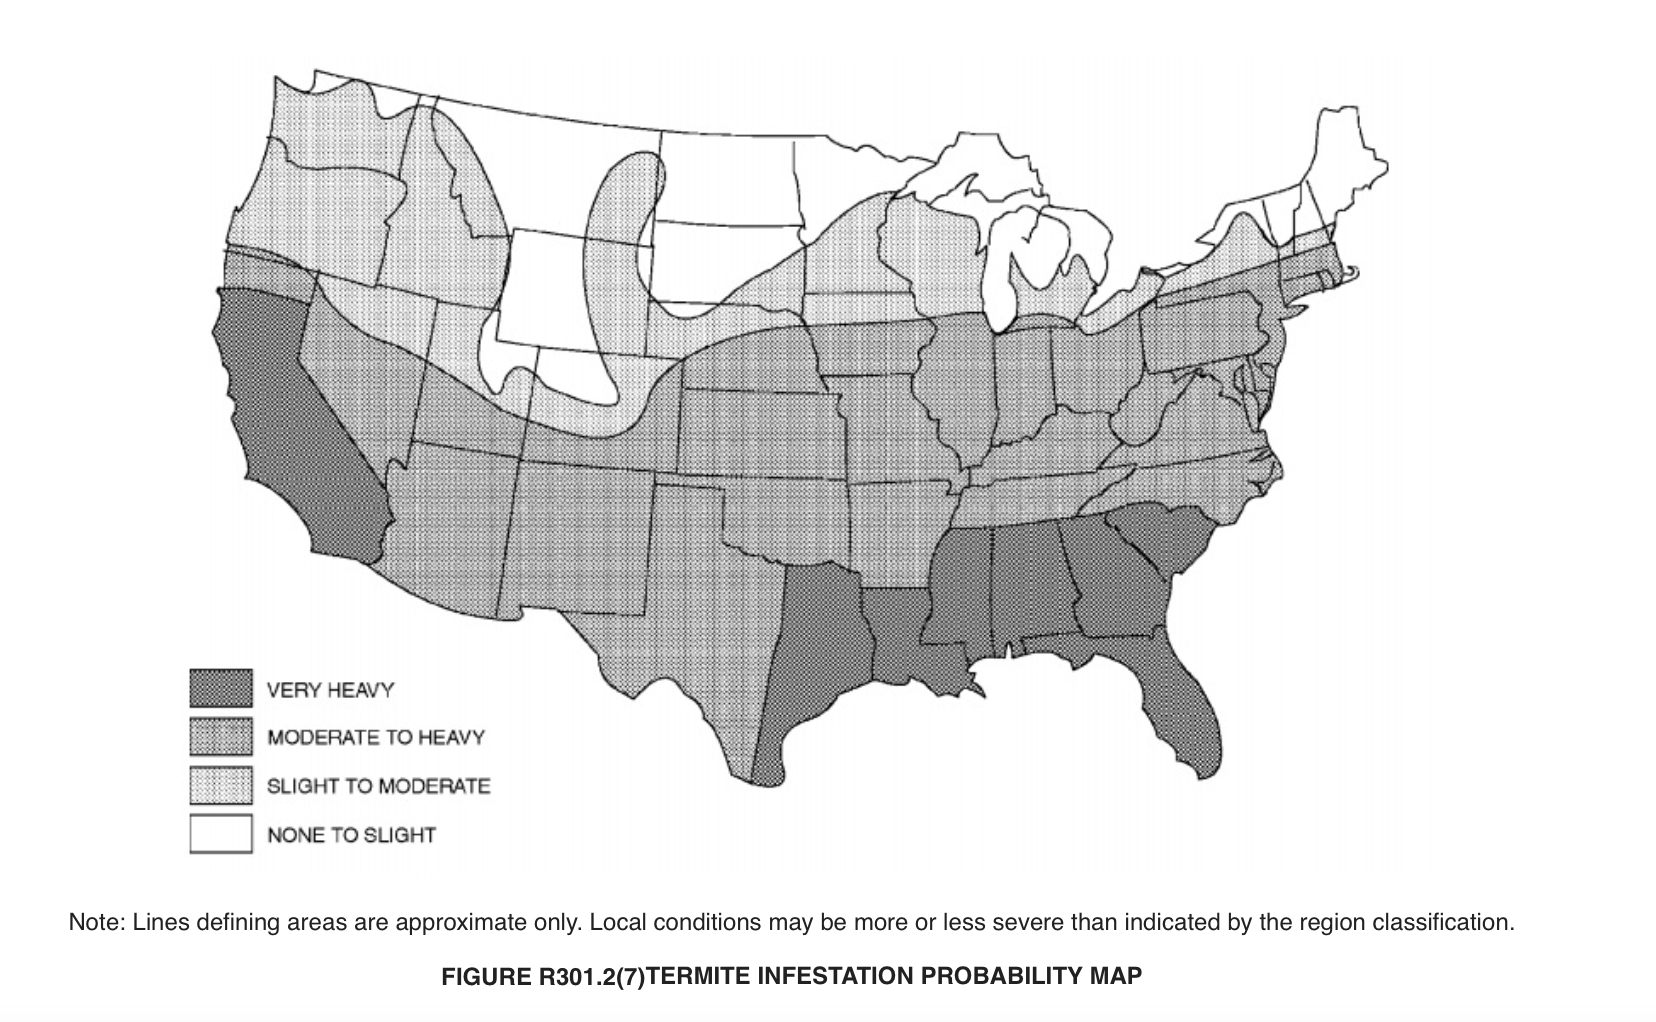
Map 1: Borate treated lumber framing is recommended for use in “heavy” termite infestation regions. Such regions are defined in the 2018 International Residential Code (IRC) in Figure R301.2(7) “Termite Infestation Probability Map.
Borate treated cavity insulations such as cellulose are not likely to be exposed to rain and therefore present very little risk from leaching of the borate treatment and are also recommended in “heavy” termite infestation regions. Inherently termite resistant cavity insulations such as mineral wool insulation are also recommended.
Borate treated expanded polystyrene (EPS) can experience leaching when used below grade or in ground contact. However, the EPS can be protected from liquid water leaching with the use of drainage membranes or capillary breaks. In all cases all ground contact rigid insulations, including borate treated EPS should be employed in conjunction with termite shields.
Borate treated expanded polystyrene (EPS) used above grade as continuous exterior insulation is typically protected by back ventilated and drained cladding assemblies and present low risk from leaching of the borate treatment.
Figure 5 illustrates a basement foundation insulated on the exterior. Exterior basement foundation insulation can act as a pathway for termite entry. The use of stainless steel termite shields set in mastic and sealed to the top of the foundation wall address this pathway. The joints in the termite shield need to be overlapped and sealed. The termite shield needs to extend outward past the exterior edge of the exterior basement foundation insulation and its associated protection layer a minimum of ¾ inch to impede the ability of termites to bridge the shield. This also facilitates visual inspection of the effectiveness of the termite shield.
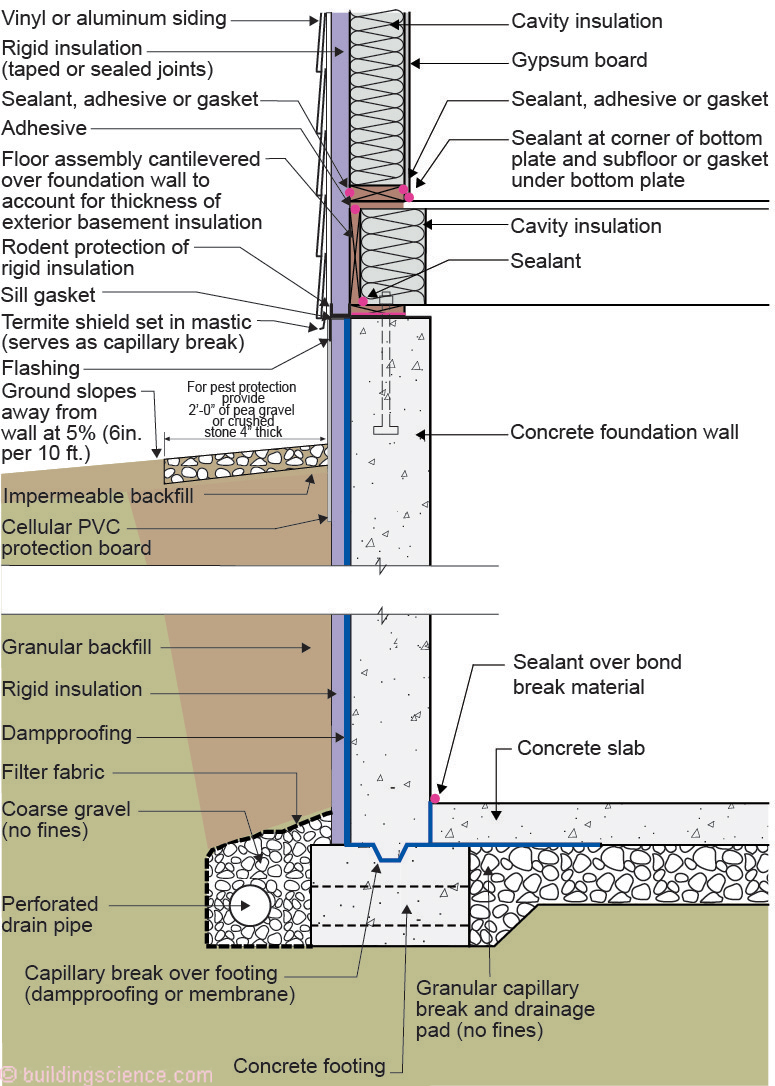
Figure 5: Basement foundation insulated on the exterior. In “heavy” termite infestation regions borate treated lumber framing and insulation should be used.
Note that continuous exterior insulation also needs to be protected from rodents and insects – particularly at the bottom of frame wall and floor assemblies. Rigid formed plastic and “bent” sheet metal have been shown to be effective.
Figure 6 illustrates a crawlspace foundation insulated on the interior. Interior crawlspace insulation can act as a pathway for termite entry. The use of stainless steel termite shields set in mastic and sealed to the top of the foundation wall address this pathway. The joints in the termite shield need to be overlapped and sealed. The termite shield needs to extend outward and inward past the edges of the crawlspace foundation structural wall a minimum of ¾ inch to impede the ability of termites to bridge the shield. An inspection gap should be provided at the top of interior crawlspace insulation. This gap should remain open for the life of the building.
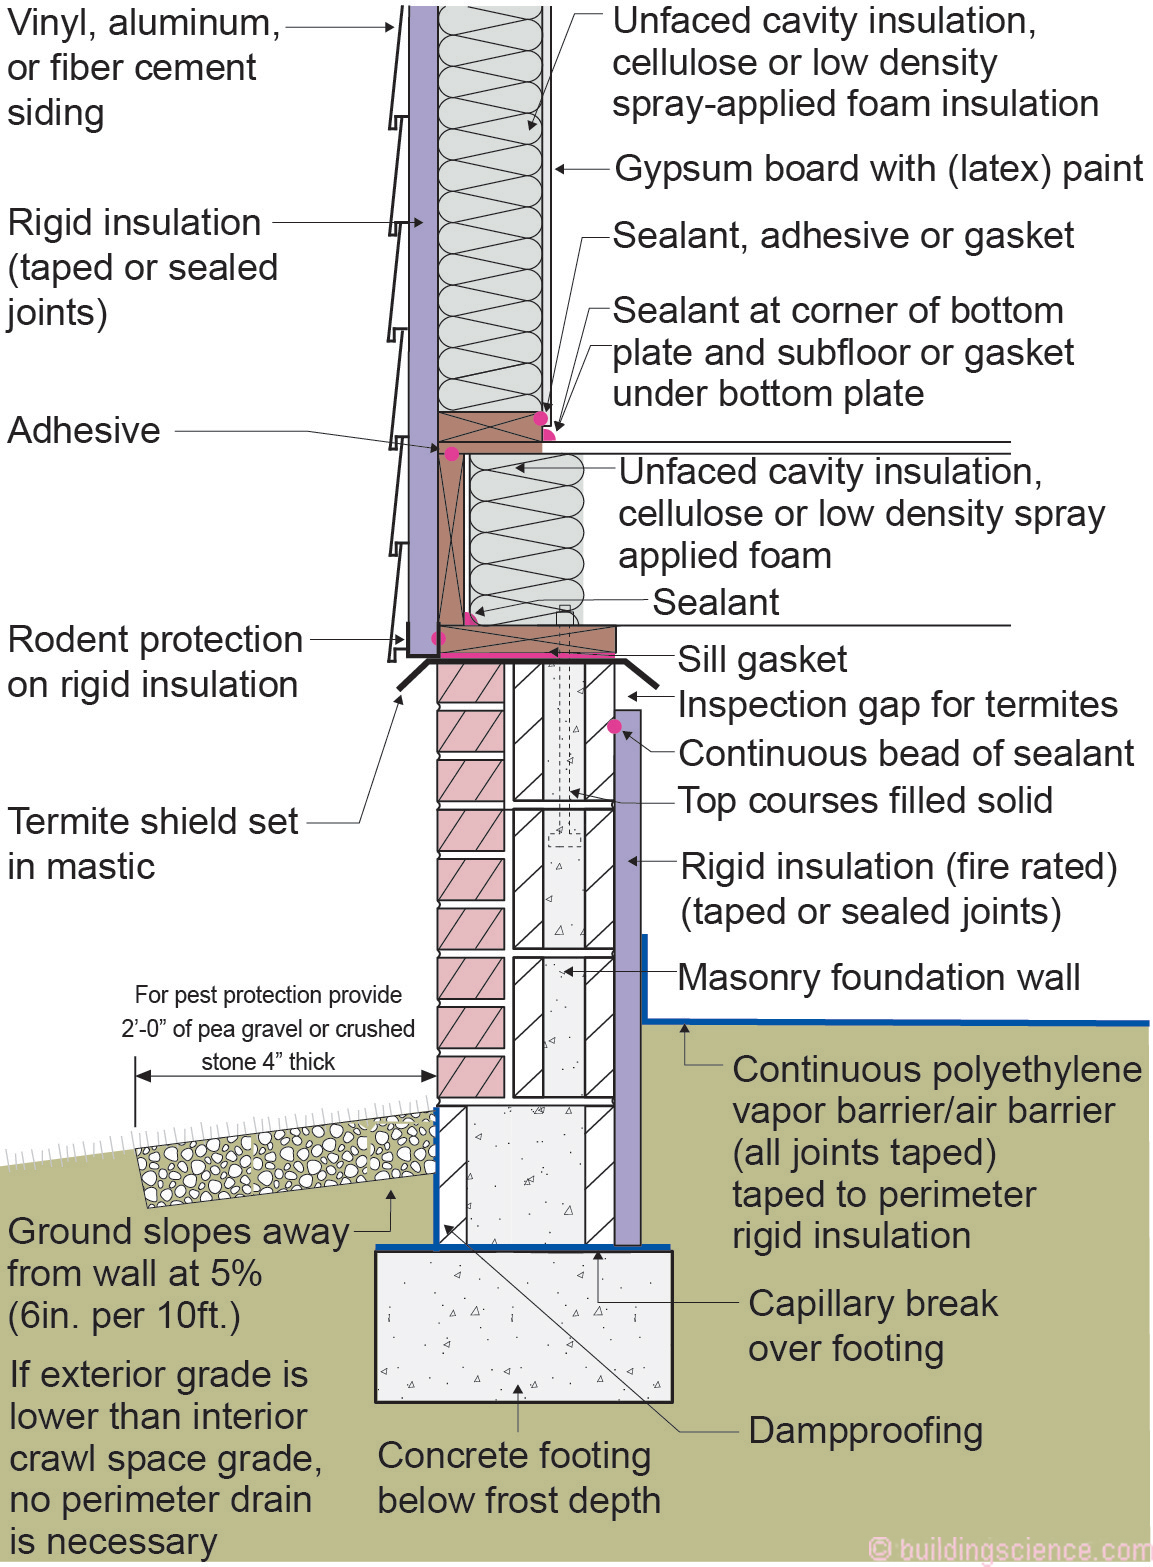
Figure 6: Crawlspace foundation insulated on the interior. The crawlspace is an unvented conditioned crawlspace. In “heavy” termite infestation regions borate treated lumber framing and insulation should be used.
Figure 7 illustrates a slab on grade foundation constructed using a masonry stem wall with a thermally uncoupled concrete slab. The concrete slab is cast over a layer of rigid insulation that is “turned up” at the perimeter. The “turned up” insulation provides an effective thermal break. However, this insulation layer can act as a pathway for termite entry. The use of stainless steel termite shields set in mastic and sealed to the top of the masonry stem wall spanning the insulation thermal break and subsequently sealed to the slab edge addresses this pathway. The joints in the termite shield need to be overlapped and sealed. The termite shield needs to extend outward and inward past the edges of the crawlspace foundation structural wall a minimum of ¾ inch to impede the ability of termites to bridge the shield. This also facilitates visual inspection of the effectiveness of the termite shield.
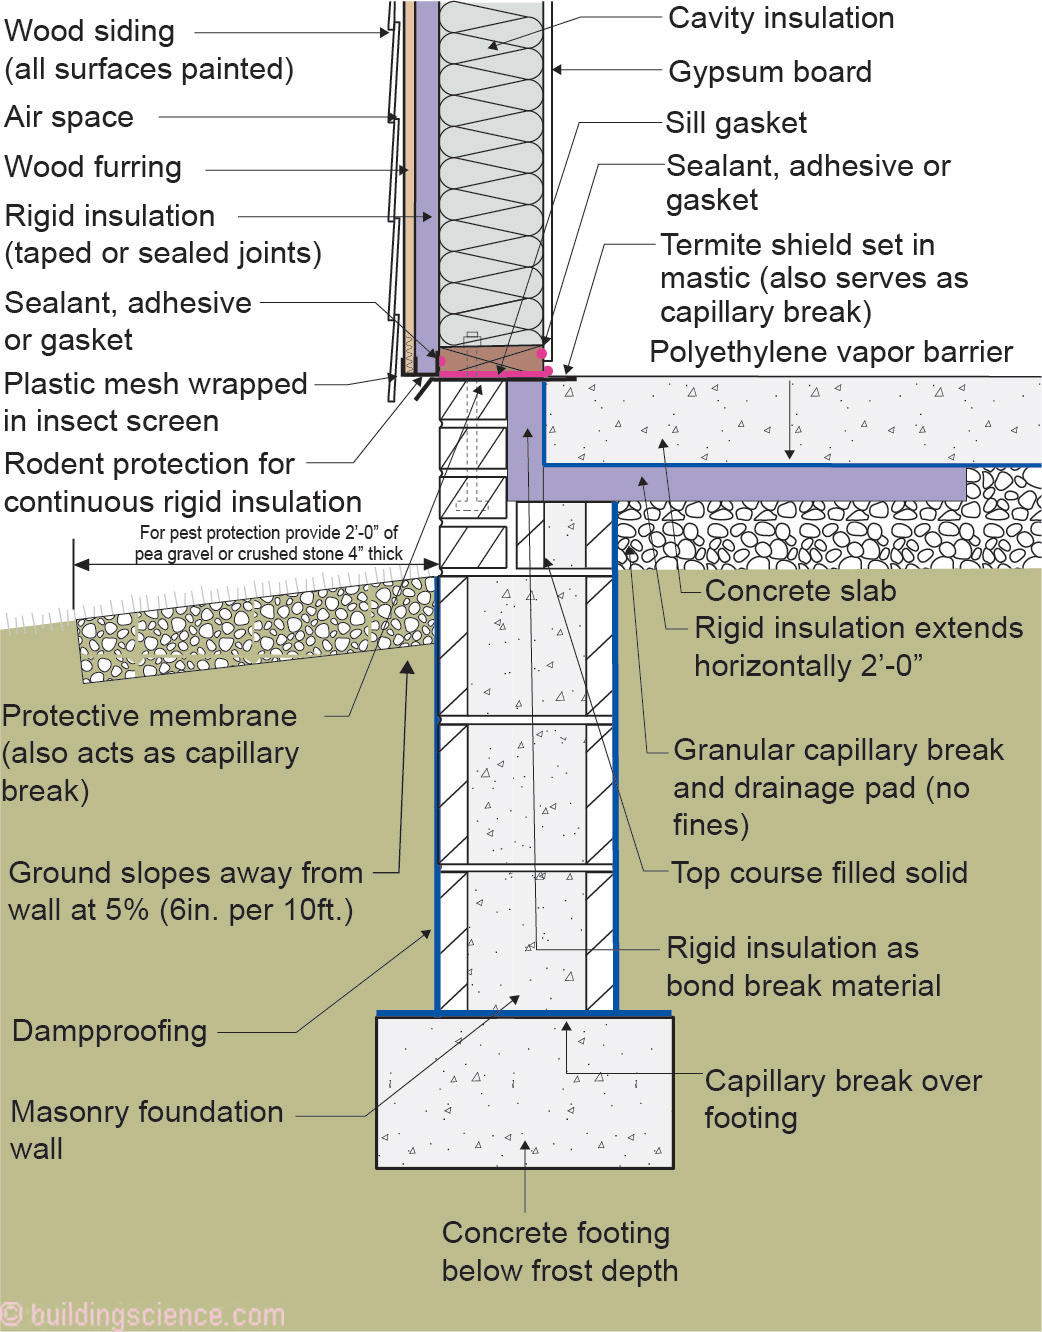
Figure 7: Slab on grade foundation constructed using a masonry stem wall with a thermally uncoupled concrete slab. In “heavy” termite infestation regions borate treated lumber framing and insulation should be used.
Further note that the gap created by the wood furring needs to be sealed at the bottom of the cladding. A plastic mesh wrapped in an insect screen serves this function.
Figure 8 illustrates a slab on grade foundation constructed using a monolithic concrete slab/grade beam. Note the “turned down” portion of the concrete slab at the perimeter. This “turned down” section acts as the “grade beam”. The monolithic concrete slab/grade beam is insulated at the perimeter with exterior rigid insulation. Exterior slab edge insulation can act as a pathway for termite entry. The use of stainless steel termite shields set in mastic and sealed to the top of the monolithic concrete slab/grade beam address this pathway. The joints in the termite shield need to be overlapped and sealed. The termite shield needs to extend outward past the exterior edge of the exterior slab edge insulation and its associated protection layer a minimum of ¾ inch to impede the ability of termites to bridge the shield. This also facilitates visual inspection of the effectiveness of the termite shield. Additionally, a removable strip of insulation and protection board providing an inspection gap is recommended.
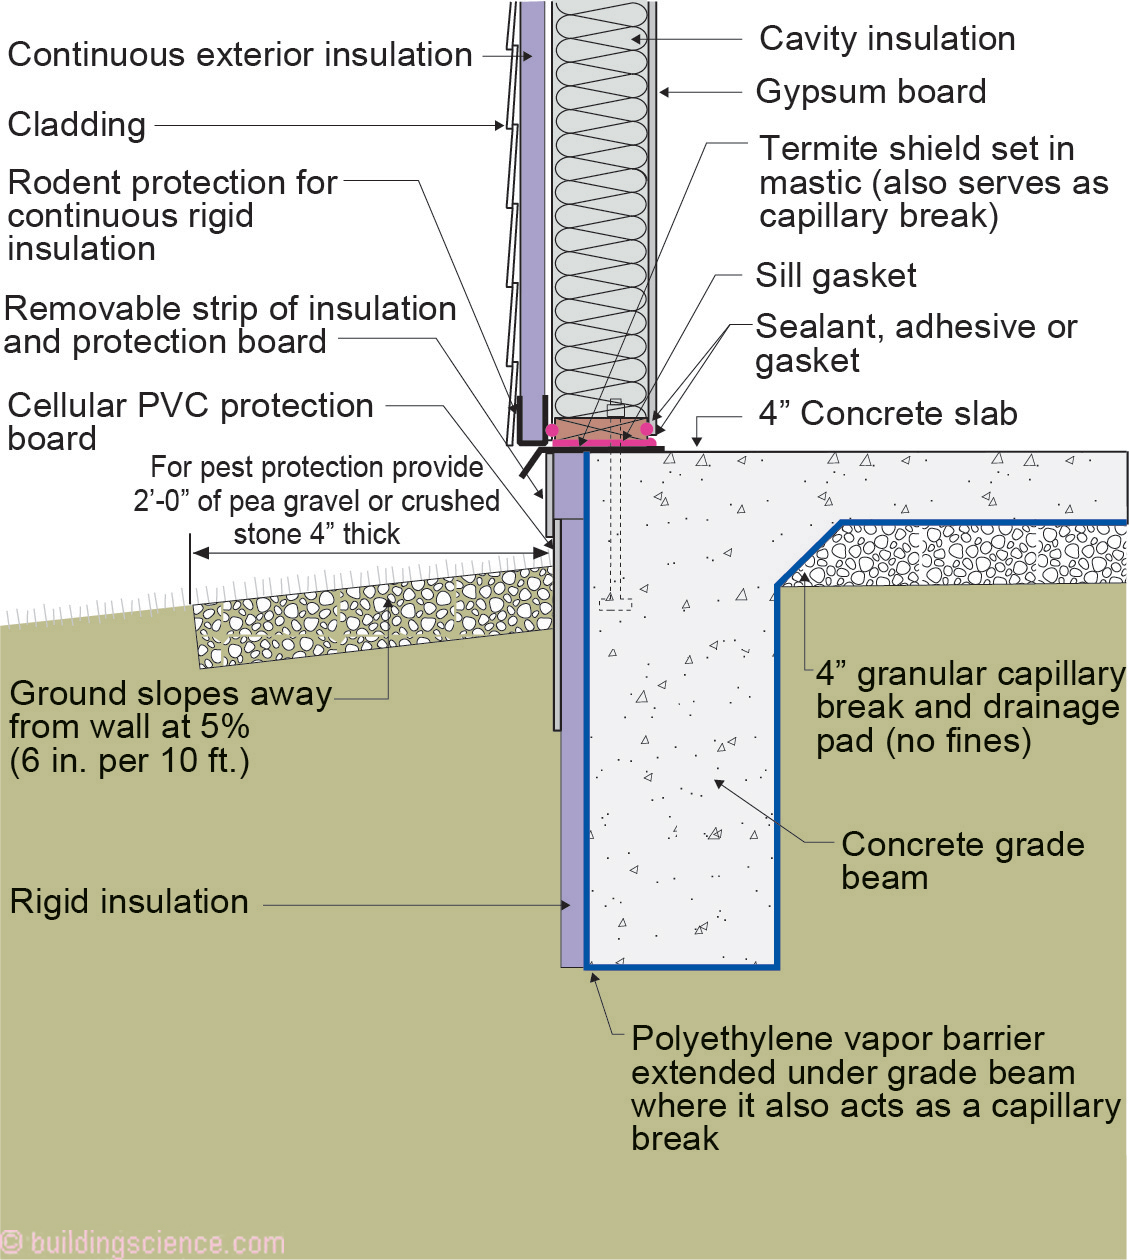
Figure 8: Externally insulated slab on grade foundation constructed using a monolithic concrete slab/grade beam. In “heavy” termite infestation regions borate treated lumber framing and insulation should be used. The termite shield needs to extend outward past the exterior edge of the exterior slab edge insulation and its associated protection layer a minimum of ¾ inch to impede the ability of termites to bridge the shield. This also facilitates visual inspection of the effectiveness of the termite shield. Additionally, a removable strip of insulation and protection board providing an inspection gap is recommended.
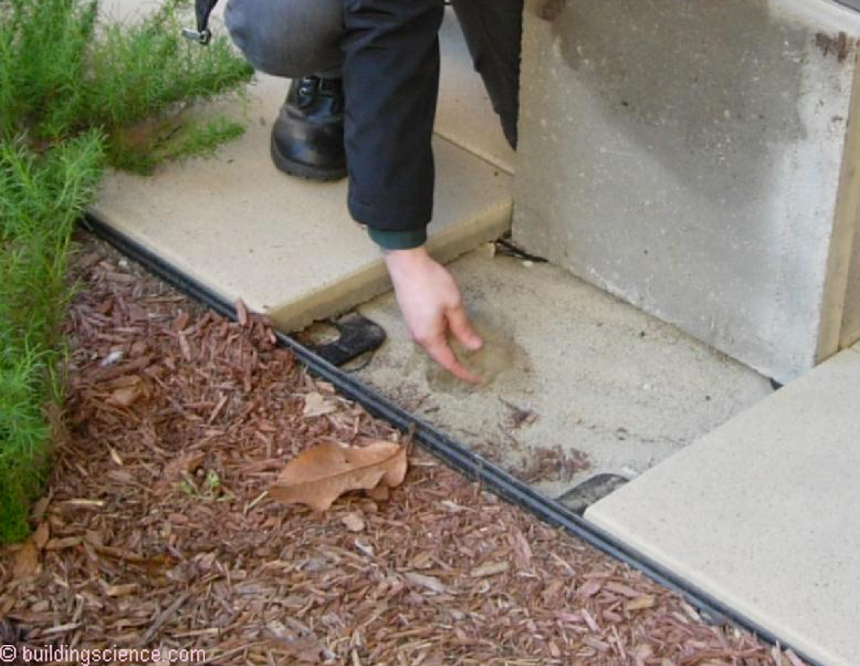
Where plumbing and other services penetrate concrete slabs these penetrations need to be sealed. The most effective approach is to wrap the service penetration with a stainless steel mesh “skirt” clamped to the service penetration. The mesh is subsequently cast into the concrete (Photograph 6).
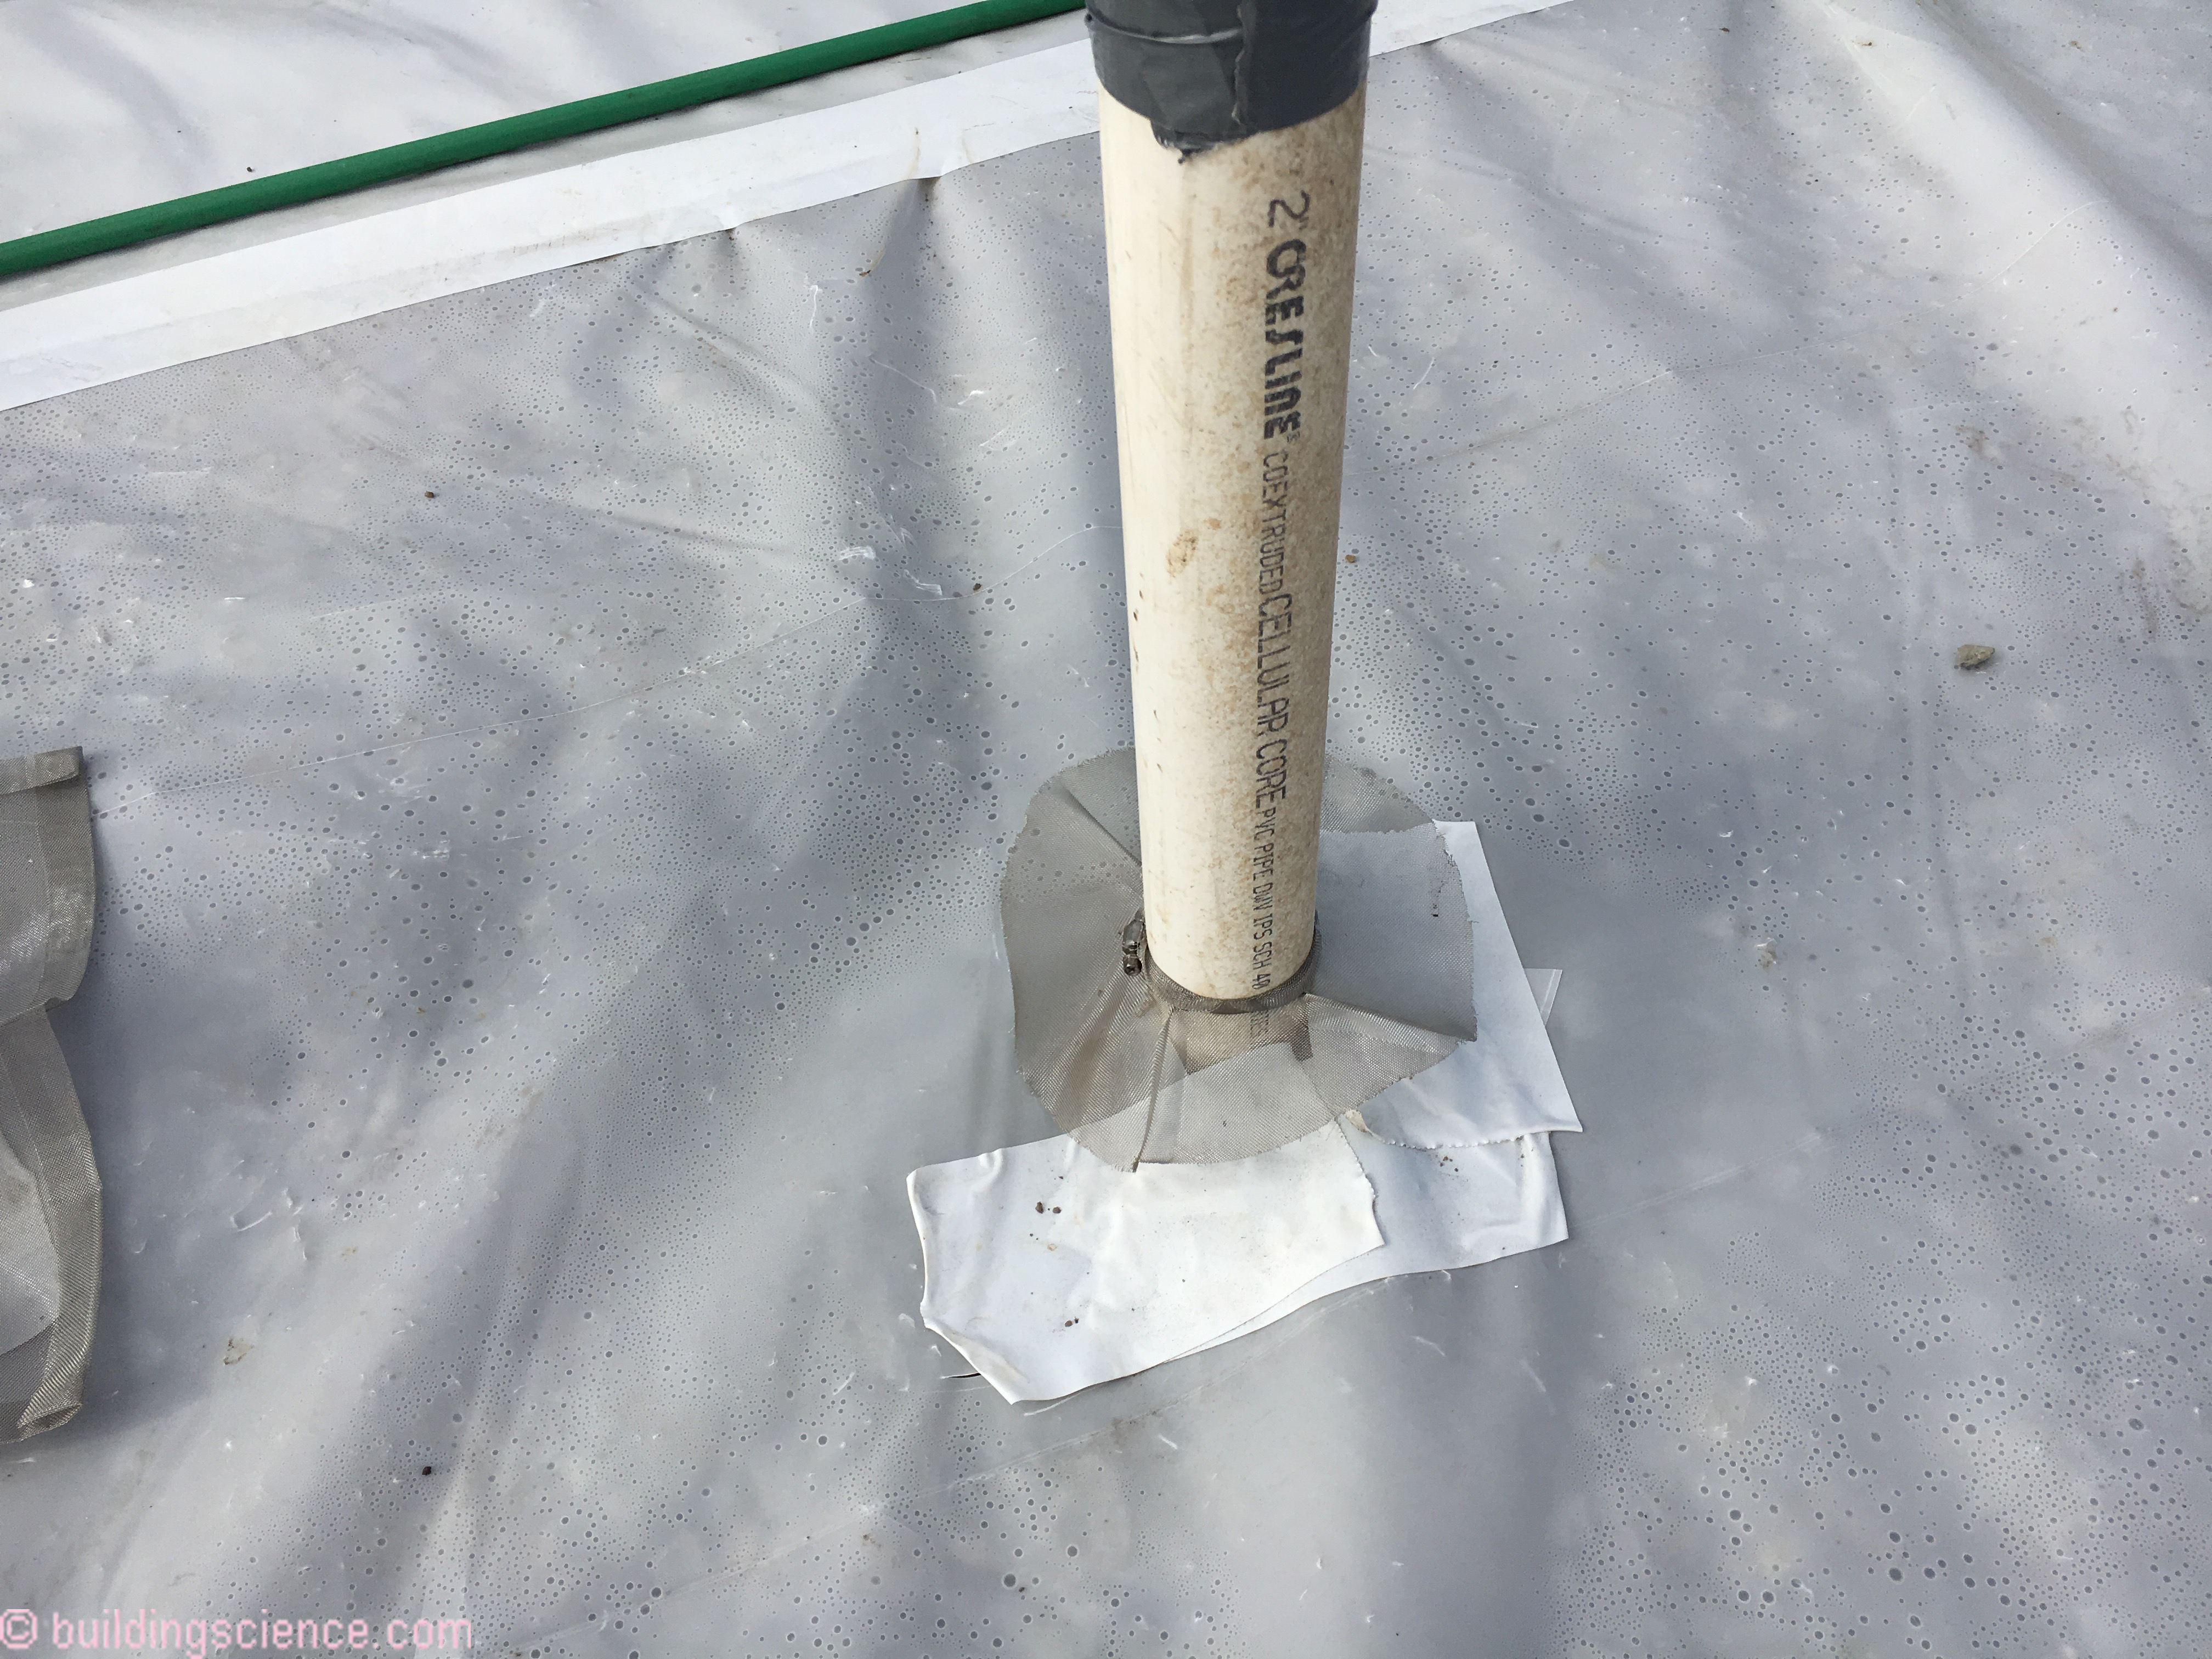
Photograph 6: Plumbing and other services that penetrate concrete slabs are sealed with a stainless steel mesh “skirt” clamped to the service penetration. The mesh is subsequently cast into the concrete.
Block pest entries. Seal utility openings and joints between materials. Use corrosion resistant materials such as copper or stainless steel mesh. Rodents can chew through many materials. Prevent animals and insects from entering cladding systems. Protect exterior insulation from ground contact. If ground contact cannot be avoided use termite shields.
Second Strategy
Pests tend to love water. Sound familiar? We already talked about reducing exterior water. We also need to reduce interior water/moisture availability. Too much interior water/moisture results in interior mold, insects, rodents and mites. During air conditioning periods interior humidity should be maintained at 60 percent or less. During heating periods interior relative humidity should be limited to 35 percent or less during the coldest parts of the winter – unless the house is designed to be able to withstand higher interior relative humidities during cold periods.
Dust mites require relative humidities of 70 percent or higher. Dust mites can colonize carpeting installed on cold surfaces such as uninsulated basement floor slabs. Cold slabs increase relative humidity adjacent surfaces. Cold carpets are an ideal breeding ground for dust mites. Interior humidity should be controlled. Install dehumidifiers in basements. Use dehumidifiers to address part-load humidity issues in energy efficient houses. Dust mites can colonize furniture and clothing. Washing items in hot water (greater than 130 degrees Fahrenheit), can kill dust mites and wash away allergens.
Third Strategy
Reduce food availability. Reduce interior food availability. Keep kitchen waste in covered containers. Don’t leave food out. Clean dishes. Don’t pour grease down drains. Don’t be a pig if you want to control pests.
Fourth Strategy
Control dust. Dust contains asthma triggers. Over two thirds of dust in homes originates outdoors, and is tracked on feet. House dust is known to contain many hazardous materials. Dust should be stopped at the door. Remove shoes and provide a place for shoes at the door. Provide a welcome mat and keep the welcome mat clean. Vacuum surfaces regularly. Vacuums with high efficiency filtration are recommended. Make the home easy to clean. Don’t clutter homes.
Last Strategy
Don’t do stupid things. Of course this is the most difficult strategy to implement. We tend to be inherently stupid. Don’t use moth balls. Moth balls release chemicals that are unhealthy. If pesticides are necessary professionals should be employed who specialize in integrated pest management. Do not inject pesticides into walls and building cavities – except boric acid.
Inter-species chemical warfare should be avoided wherever possible. You don’t want Dr. Strangelove1 doing the work. Done recklessly it can result in a mad outcome….mutual assured destruction.
Footnotes
__________________________________________________________________________________________
1 A 1964 satirical film by Stanley Kubrick. Dr. Strangelove was played by Peter Sellers. It is considered one of the greatest films of all time. One of the best lines in the film was “Gentlemen, you can’t fight in here. This is the War Room…”
Bibliography
Geiger, C.; C. Cox, Pest Prevention by Design, San Francisco Department of the Environment, November, 2012.
https://sfenvironment.org/sites/default/files/fliers/files/final_ppbd_guidelines_12-5-12.pdf
Lstiburek, J.W.; T. Brennan, Read This Before You Move In, Building Science Corporation, May 2001.
https://www.buildingscience.com/sites/default/files/migrate/pdf/GM_READ_This_Move_In_rev.pdf