I did a bunch of wood foundations in the early 1980’s. Time of Blondie, Kim Carnes and the Police. I learned a great deal…some good…. some bad. The bad taught me a lot of things to avoid. At the end of my “wood period” I pretty much felt that concrete and masonry foundations were the way to go. It’s not that the wood didn’t work…it just did not feel worth the effort at the time. I had a “steel period” as well…but that discussion is for another time.
Why talk about wood foundations now? Times change. Folks want to stop using concrete and masonry. The ghosts of Roman engineers are appalled. Apparently, after getting rid of natural gas we also need to get rid of concrete and masonry to become carbon neutral. I am not going to get into that discussion beyond saying lots of important folks are asking me how to do wood foundations…. we refer to these important folks as “clients”.
You want to do wood…I got your back. You want to not use natural gas…I got your back. I view my role as to keep clients out of trouble. And boy do I know trouble. The plan in this discussion is to go through some prior history and end with how I think you can do a wood basement, a wood crawlspace and a wood-slab-on-grade while staying out of trouble…based on what worked and what did not work…way back. It gets even better…we can add new materials and new experience to the old.
When I did my first wood basement I went with concrete footings. Made things a lot easier. You have no idea how difficult it is to get a crushed stone drainage pad level. For real level. Not approximately level. Level. Level enough to build a building on top of. So why go with the wood at all if I was using concrete footings? There was no carbon issue back then. I was building out in the boondocks. Real boondocks. Canadian boondocks. I had to mix concrete by hand. OK, I had a gas powered mixer. You get the idea. No concrete truck to come and place the concrete…unless you wanted it to drive up from civilization…and you had to place the concrete in a real hurry because you did not have much time before the stuff would set up. Learned a lot about additives that slowed things down back in the day[1].
I knew enough about wood back then to not rely on “preservatives”. The plan was to keep the wood warm and dry. Fool it into thinking it was above grade…or even better…inside. The obvious strategy was to insulate it on the outside and provide drainage. And when I mean insulate it on the outside I mean outside the walls and underneath. Separate the wood from the ground with insulation. And when I mean drainage, I mean real drainage outside and underneath. Lots and lots of crushed stone…and new at the time…. draining insulation.
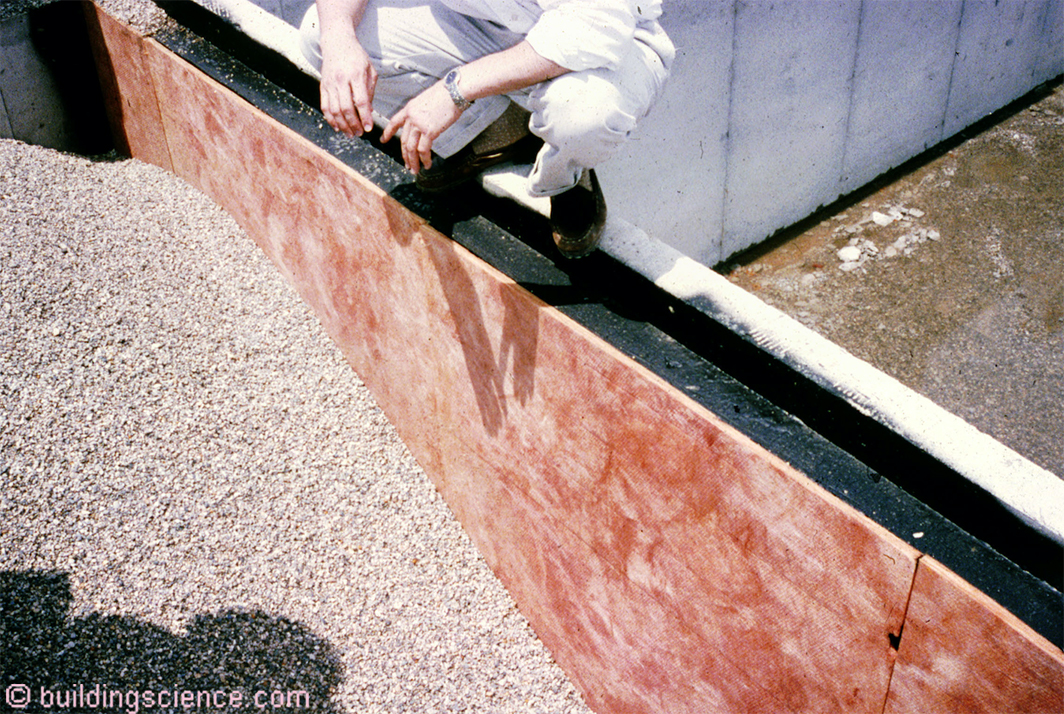
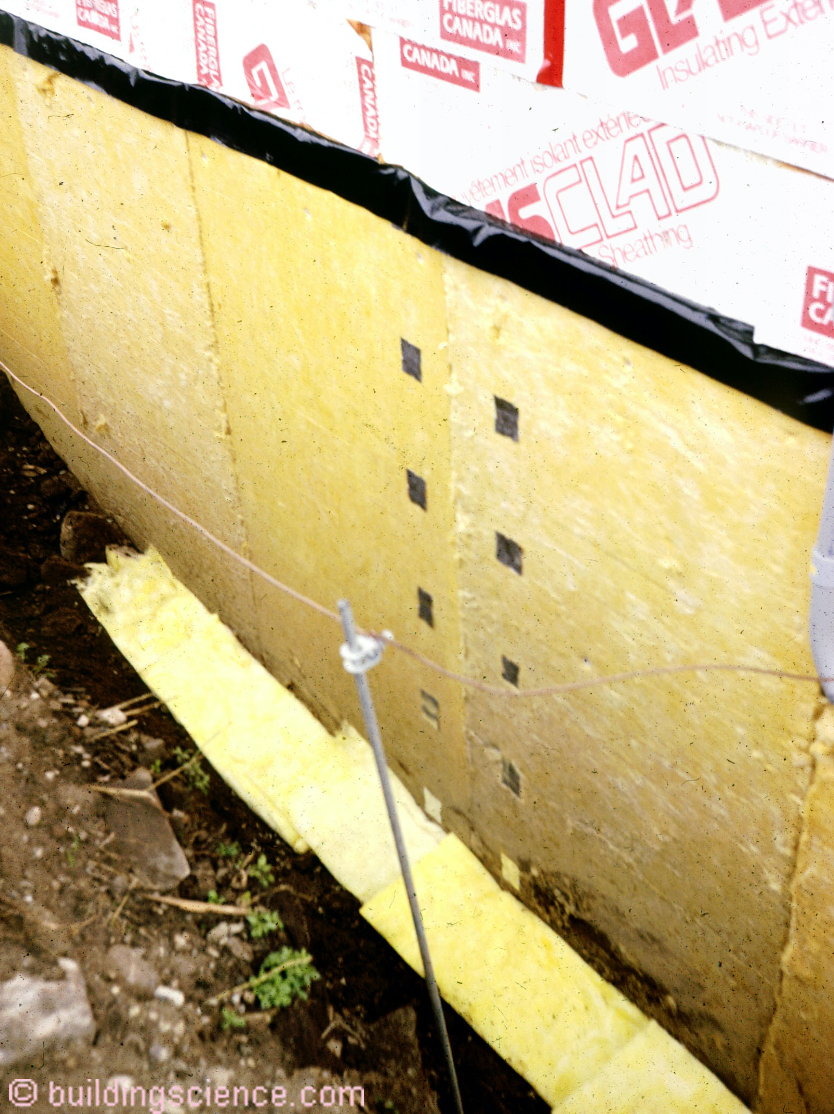
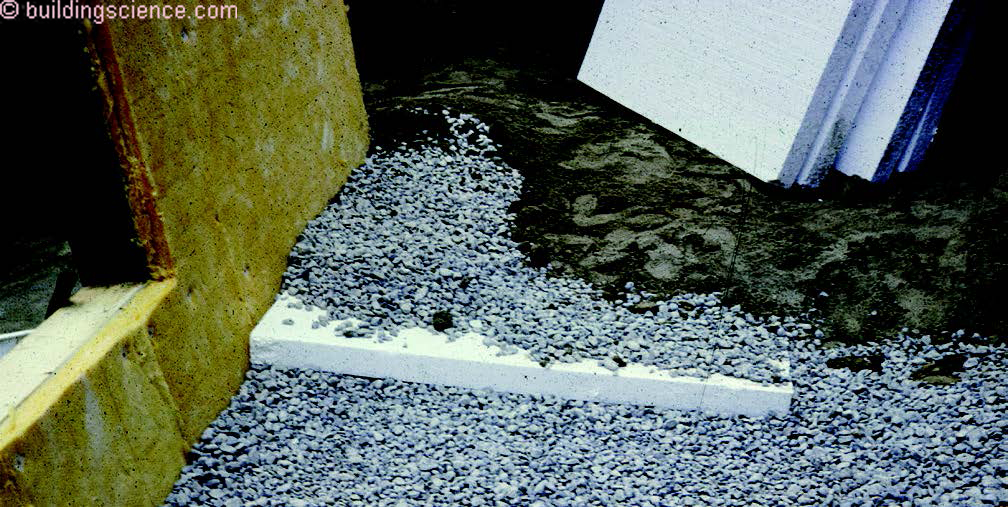
The first real draining insulation available for use below grade was rigid fiberglass boards intended to be installed against concrete foundation walls (Photograph 1). The oriented and layered nature of the fiberglass board made the system behave much like a thatched roof. It was easier for liquid water to stick to a fiber and run down the fiber with surface tension and gravity running the show rather than have the water jump inward from fiber layer to fiber layer. It was amazing, only the outer ¼ inch of fiberglass would get wet providing the drainage and the remaining fiberglass would stay dry. It would keep the foundation wall “warm and dry”[2]. In Canada I couldn’t get rigid fiberglass stuff that was to be used below grade so I used fiberglass insulation boards typically used in commercial flat roofs (Photograph 2).
Photograph 1: Rigid Fiberglass Boards - The first real draining insulation available for use below grade was rigid fiberglass boards intended to be installed against concrete foundation walls. The oriented and layered nature of the fiberglass board made the system behave much like a thatched roof.
Photograph 2: Fiberglass Roofing Insulation - In Canada I couldn’t get rigid fiberglass stuff that was to be used below grade so I used fiberglass insulation boards typically used in commercial flat roofs. Notice the metal plates on the exterior of the fiberglass – they are “compression” measurement plates. I wanted to know how much the insulation would compress over time. I could read them from the inside using a linear gage…called a nail.
After a couple of years we got grooved rigid expanded polystyrene (EPS) and extruded polystyrene (XPS) insulation that provided below grade drainage[3](Photograph 3 and Photograph 4).
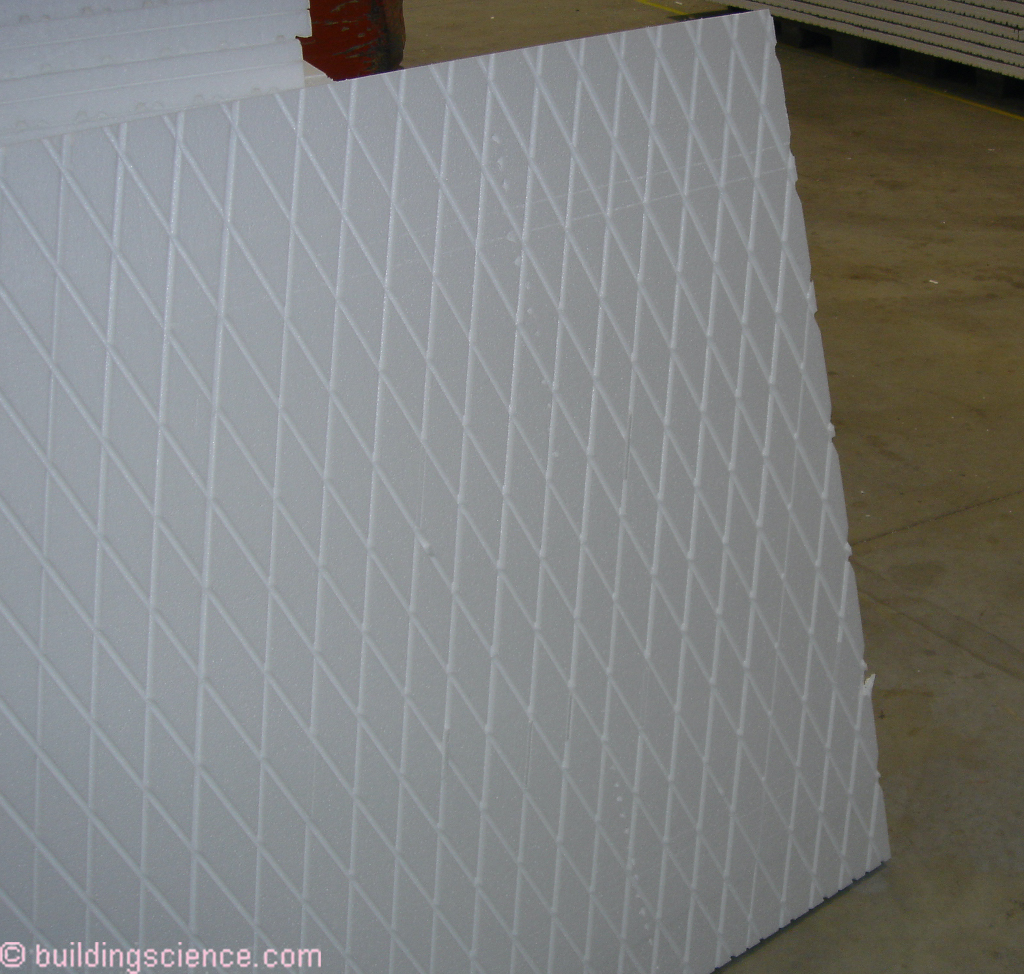
Photograph 3: Expanded Polystyrene Draining Insulation - After a couple of years we got grooved rigid expanded polystyrene (EPS). It was a 60’s thing….it was “groovy”… The “groovy” side would face the waterproofing. The non “groovy” side would face the dirt.
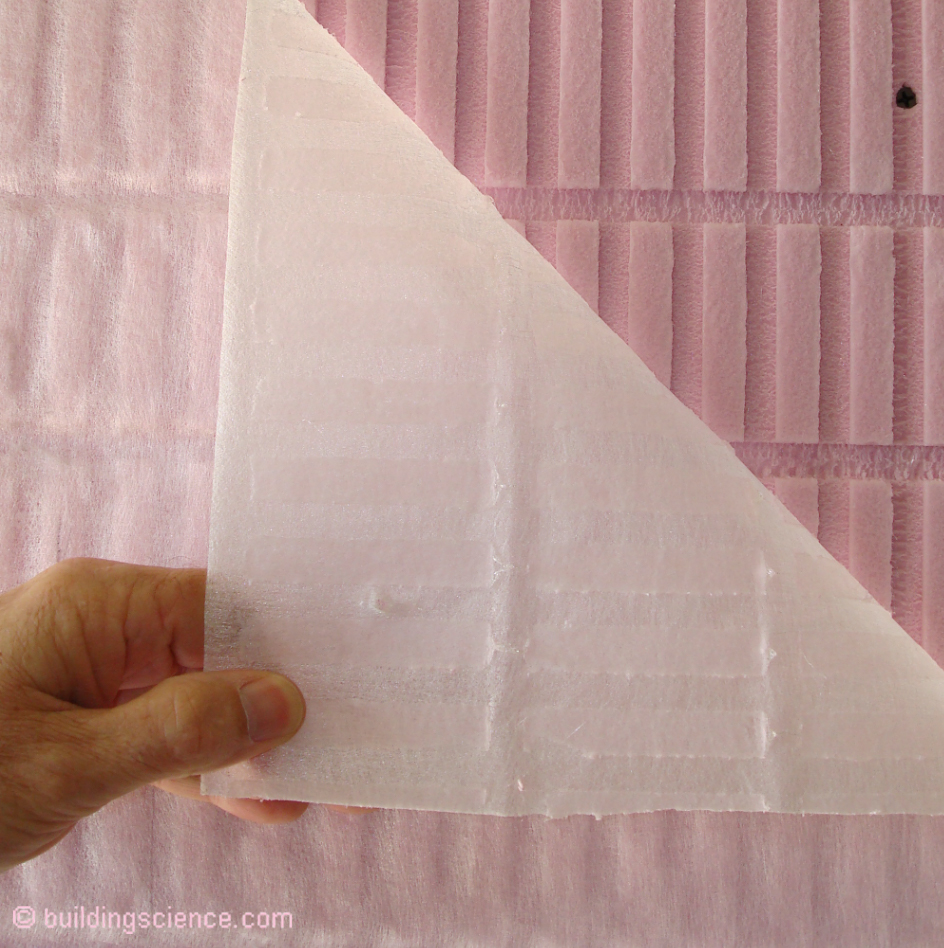
Photograph 4: Extruded Polystyrene Draining Insulation - Horizontal and vertical grooves with a filter fabric to keep the dirt out of the grooves….so groove side “out”.
Over time I used a combination of draining fiberglass and draining XPS on the exterior of the basement wall wood framing and sheathing – over a layer of sheet polyethylene acting as a water control layer. The sheet polyethylene evolved into a fully adhered membrane water proofing. At the time I was using fully adhered membrane ice-dam protection – a roofing product as there was nothing available at the time for below grade applications over wood sheathing.
I played around with panelizing the wood basement foundations…including panelized basement wood floor slabs (Photograph 5, Photograph 6 and Photograph 7. Let me tell you about this panelization thing…great for the structure…terrible for the water proofing and air control. I tried everything, two-stage joints, gaskets….. So my advice for you youngsters today….if you want to panelize the wall framing and the floor slabs…go ahead. But do not incorporate the water proofing, continuous exterior insulation and air control in the panels themselves. Add the water proofing and air control with fully adhered membranes over the exterior of the panels and go over everything with the continuous exterior draining insulation.
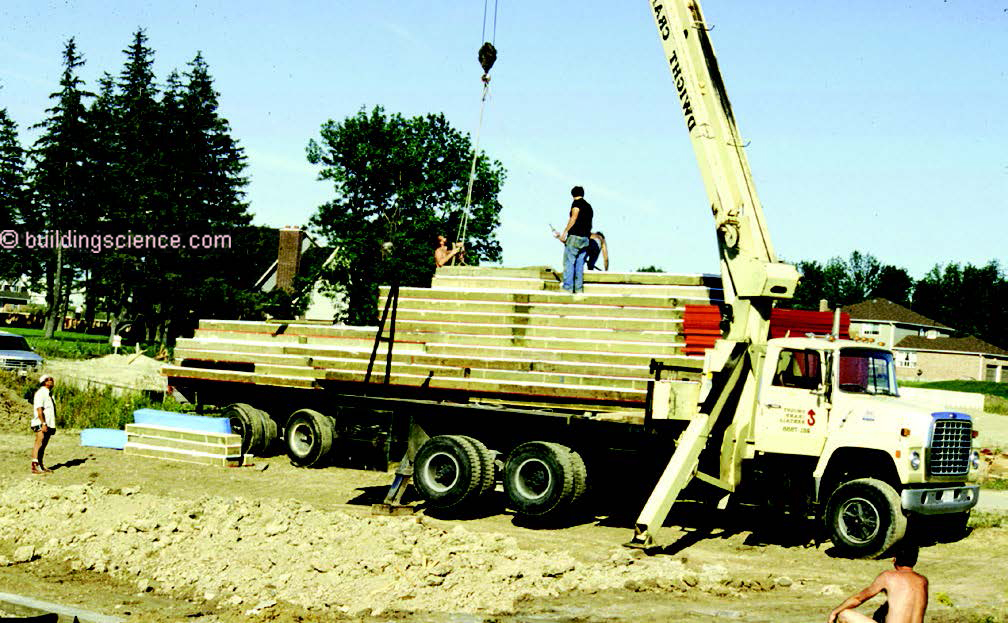
Photograph 5: Panelized Wood Basement Foundations - I played around with panelizing the wood basement foundations…yes I started my own panel business…lost a lot of money….have strong opinions on panelization.

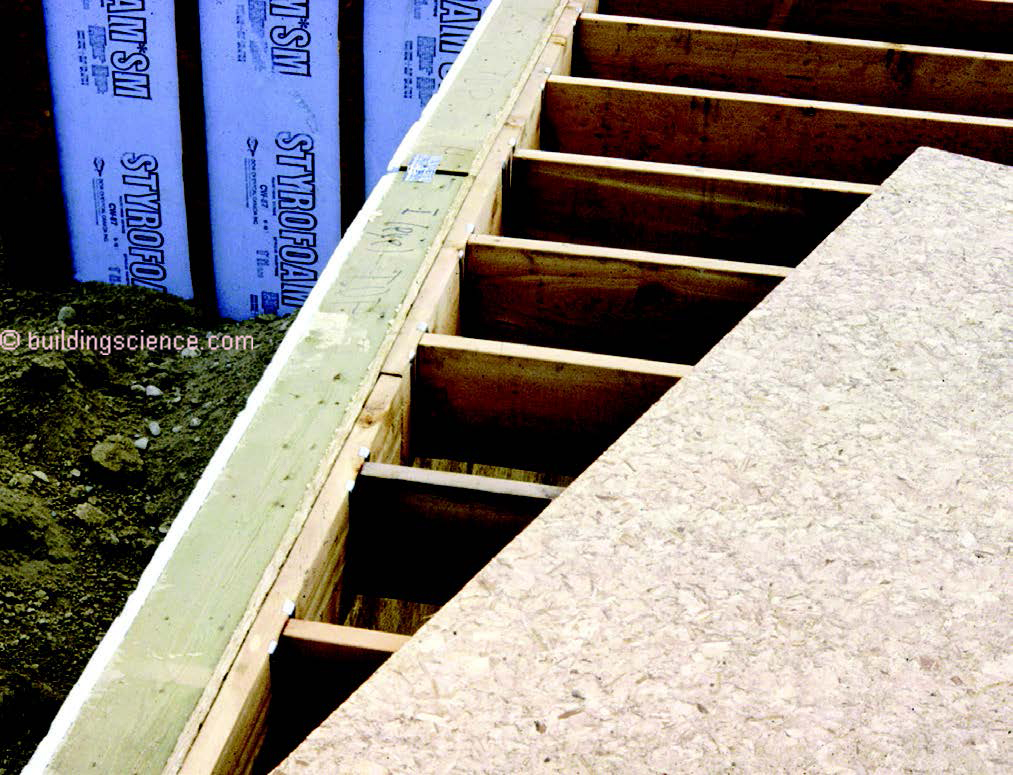
Photograph 6: Panelized Wood Basement Floor Slab – Panels supported on concrete footings. Note the extruded polystyrene rigid insulation on the bottom side of the panels. It was tough to get the gaskets to air seal the panel joints.
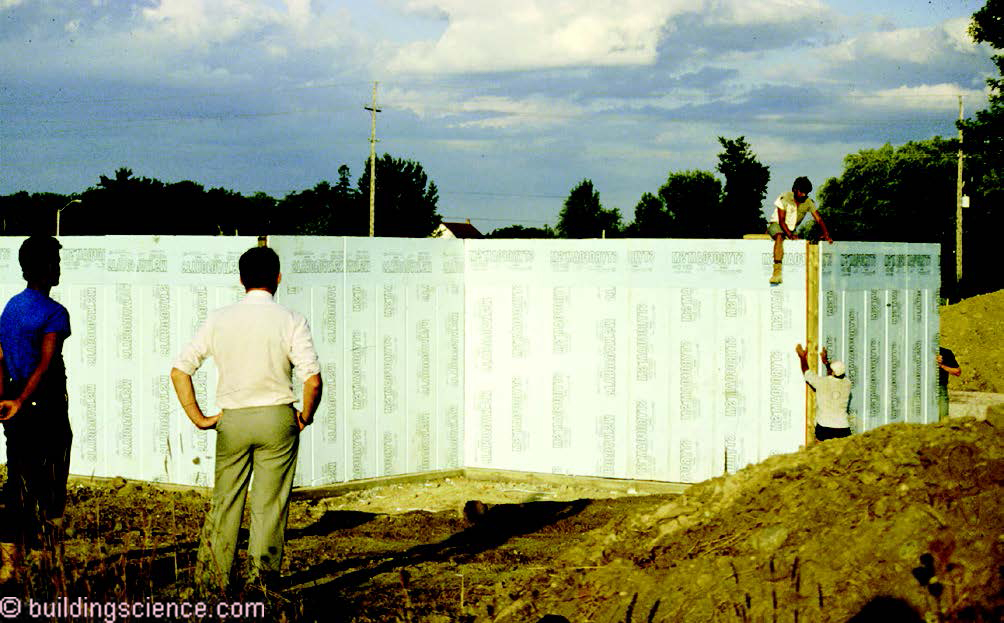
Photograph 7: Panelized Wood Basement Foundation Walls – It was tough to get sealants or gaskets to function as reliable 2-stage joints to control water leakage and air leakage at panel joints.
My best current recommendation is to use concrete footings, lay down the rigid insulation under the wood basement floor slab, run a fully adhered membrane over the top of everything including out over the perimeter footings. Then frame the wood basement floor – or use panels. Then frame the exterior walls – or use panels. Then install the fully adhered membrane and continuous exterior draining insulation on the exterior (Figure 1).
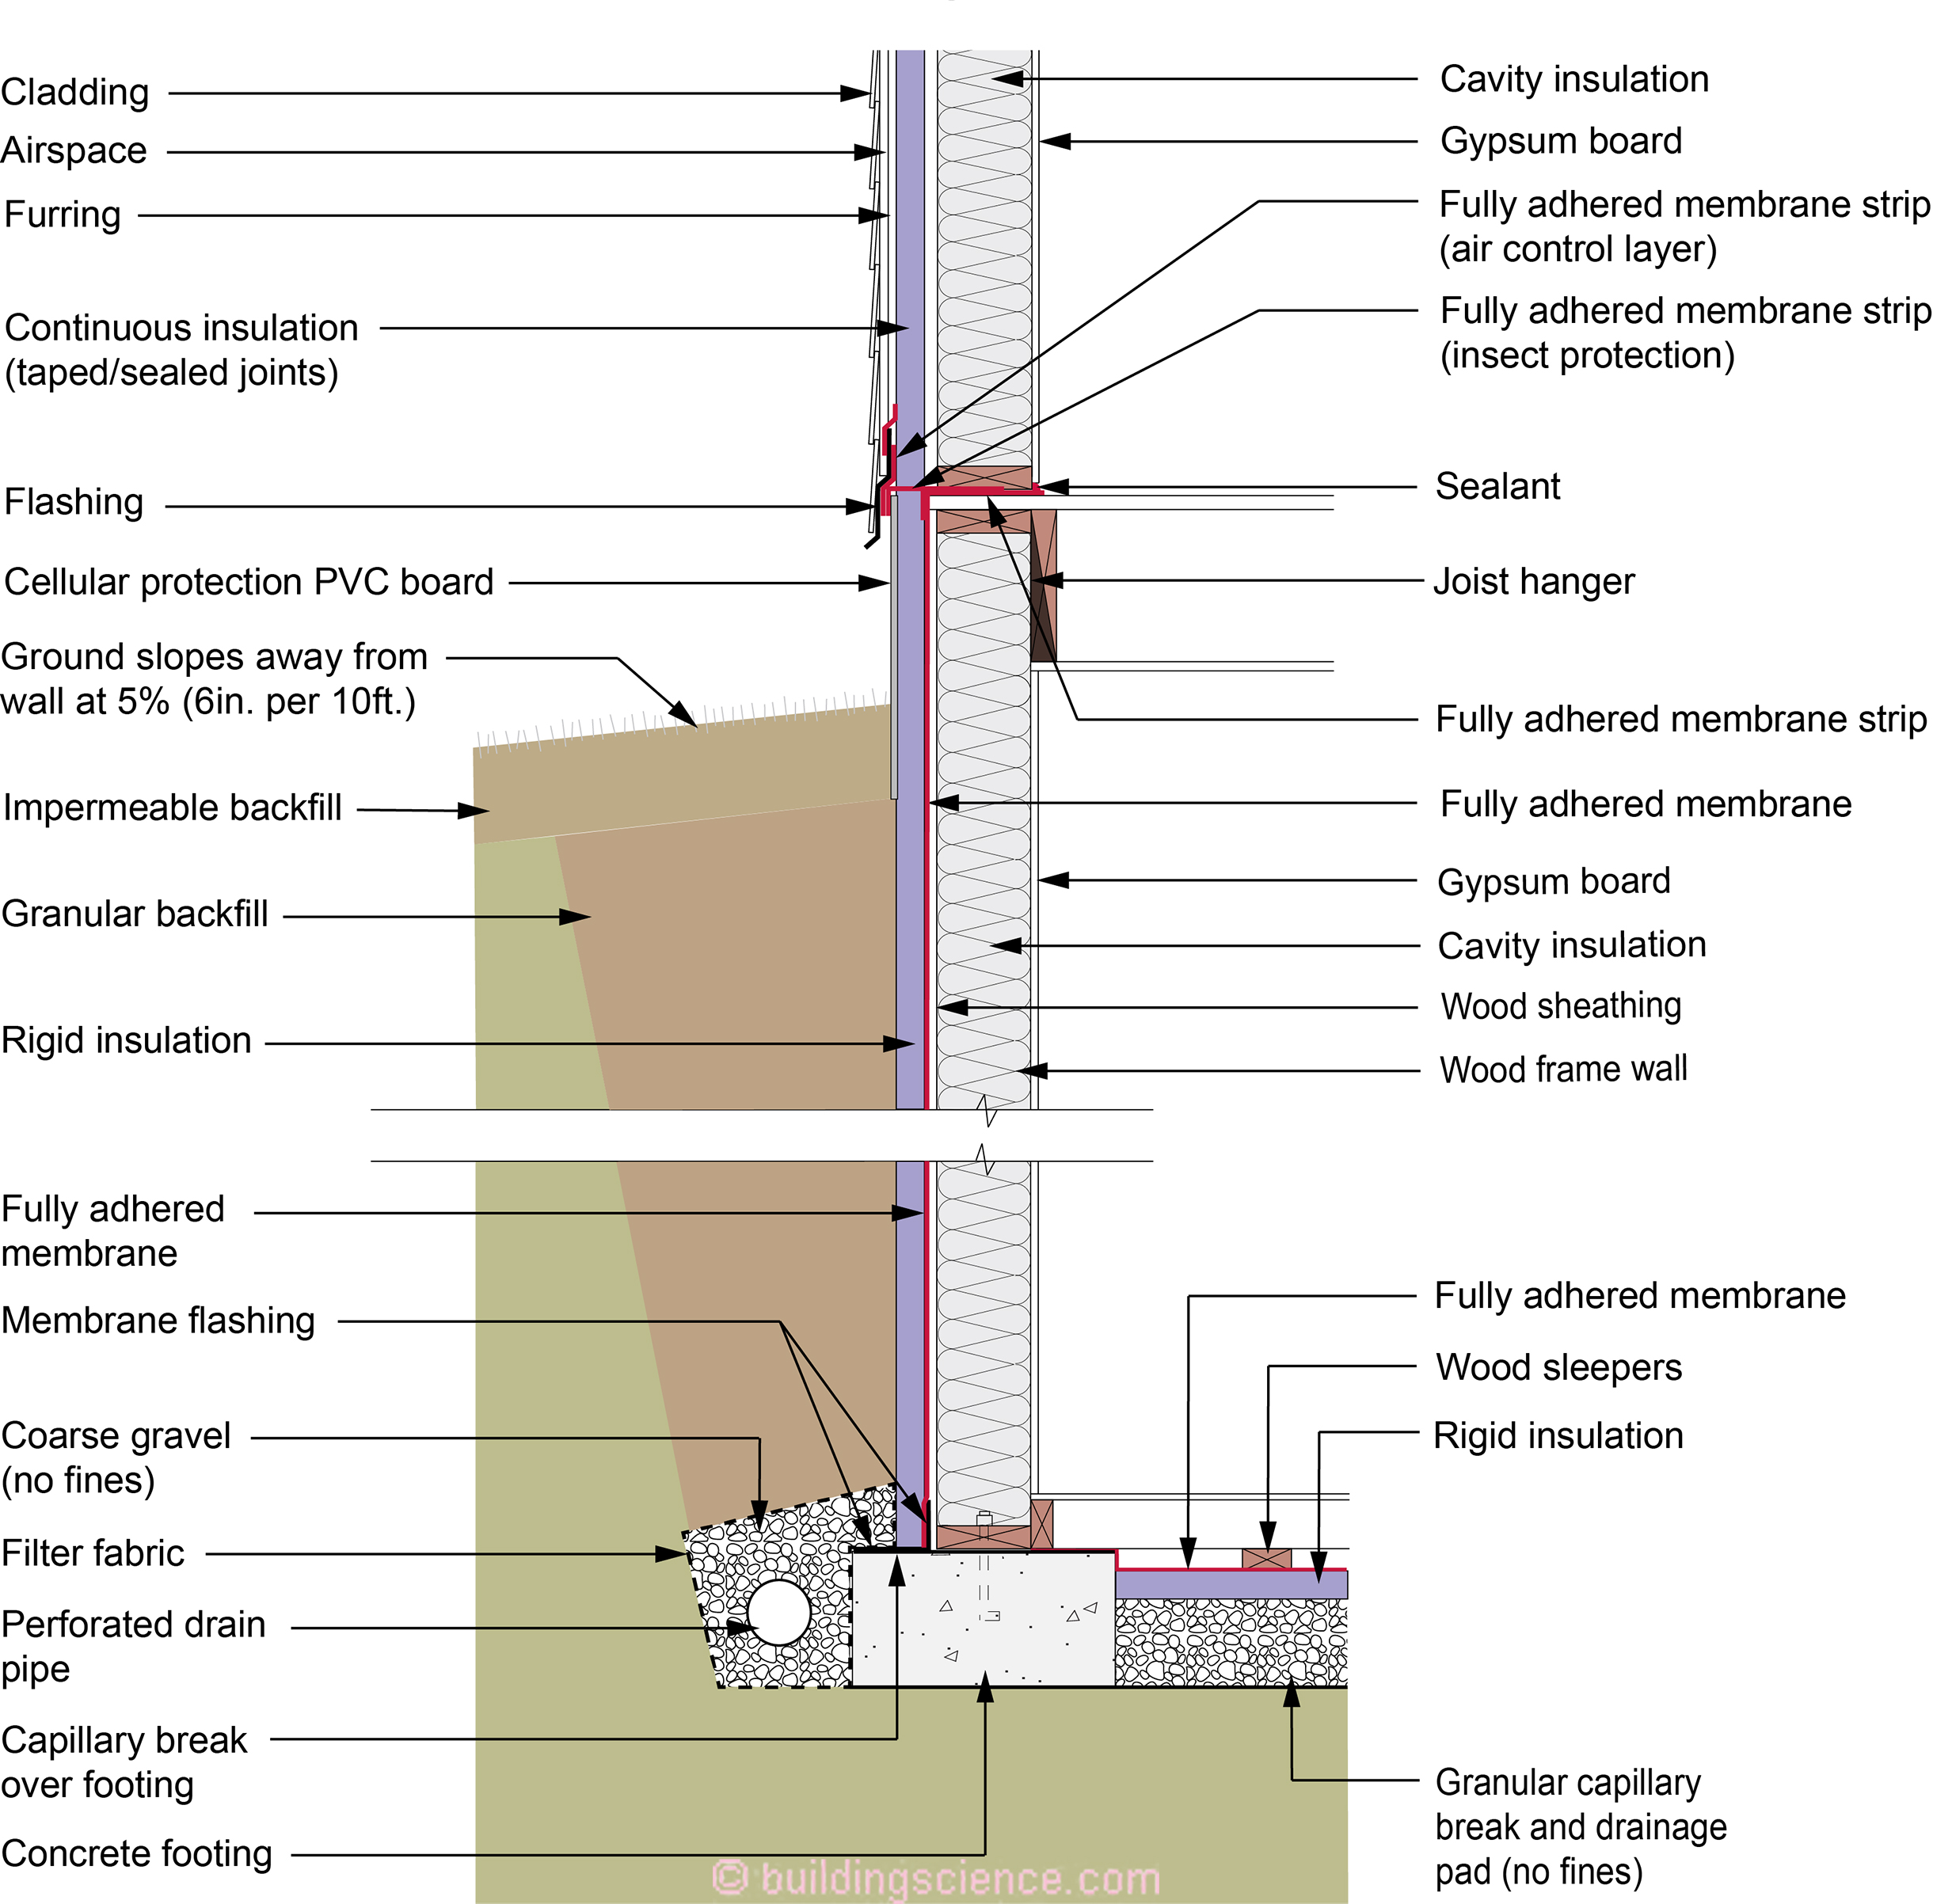
Figure 1: Wood Basement Foundation - Use concrete footings, lay down the rigid insulation under the wood basement floor slab, run a fully adhered membrane over the top of everything including out over the perimeter footings. Then frame the wood basement floor – or use panels. Then frame the exterior walls – or use panels. Then install the fully adhered membrane and continuous exterior draining insulation on the exterior.
Note how the main floor is framed below the top of the perimeter wall to handle the “back-fill” load (Photograph 8). Similar approach with the wood basement floor. Back in the day we did not have cellular PVC boards available to act as protection for the above grade portion of the continuous exterior draining insulation. Today….yeah!
Photograph 8: “Balloon Framed Foundation” - Note how the main floor is framed below the top of the perimeter wall to handle the “back-fill” load.
You need to assume that you will have insects wanting to invade. You do not want the continuous exterior draining insulation to act as an “insect interstate”. Note the fully adhered membrane layers acting as insect protection. Also, do not forget about air control layer continuity.
On to crawlspaces. Much easier. Especially if the interior grade of the crawlspace is higher than the exterior grade. Note that I am a conditioned crawlspace kind of guy. If you go that approach all it is…is a “mini-basement. All the details are pretty much the same as with the wood basement foundation details. But if you want to do away with the concrete footing…I think you can (Figure 2a & b). Just remember “point loads”. Wherever we had a point load I would put a concrete pad under it and run the load to the concrete pad with a steel column. Yup, conservative.
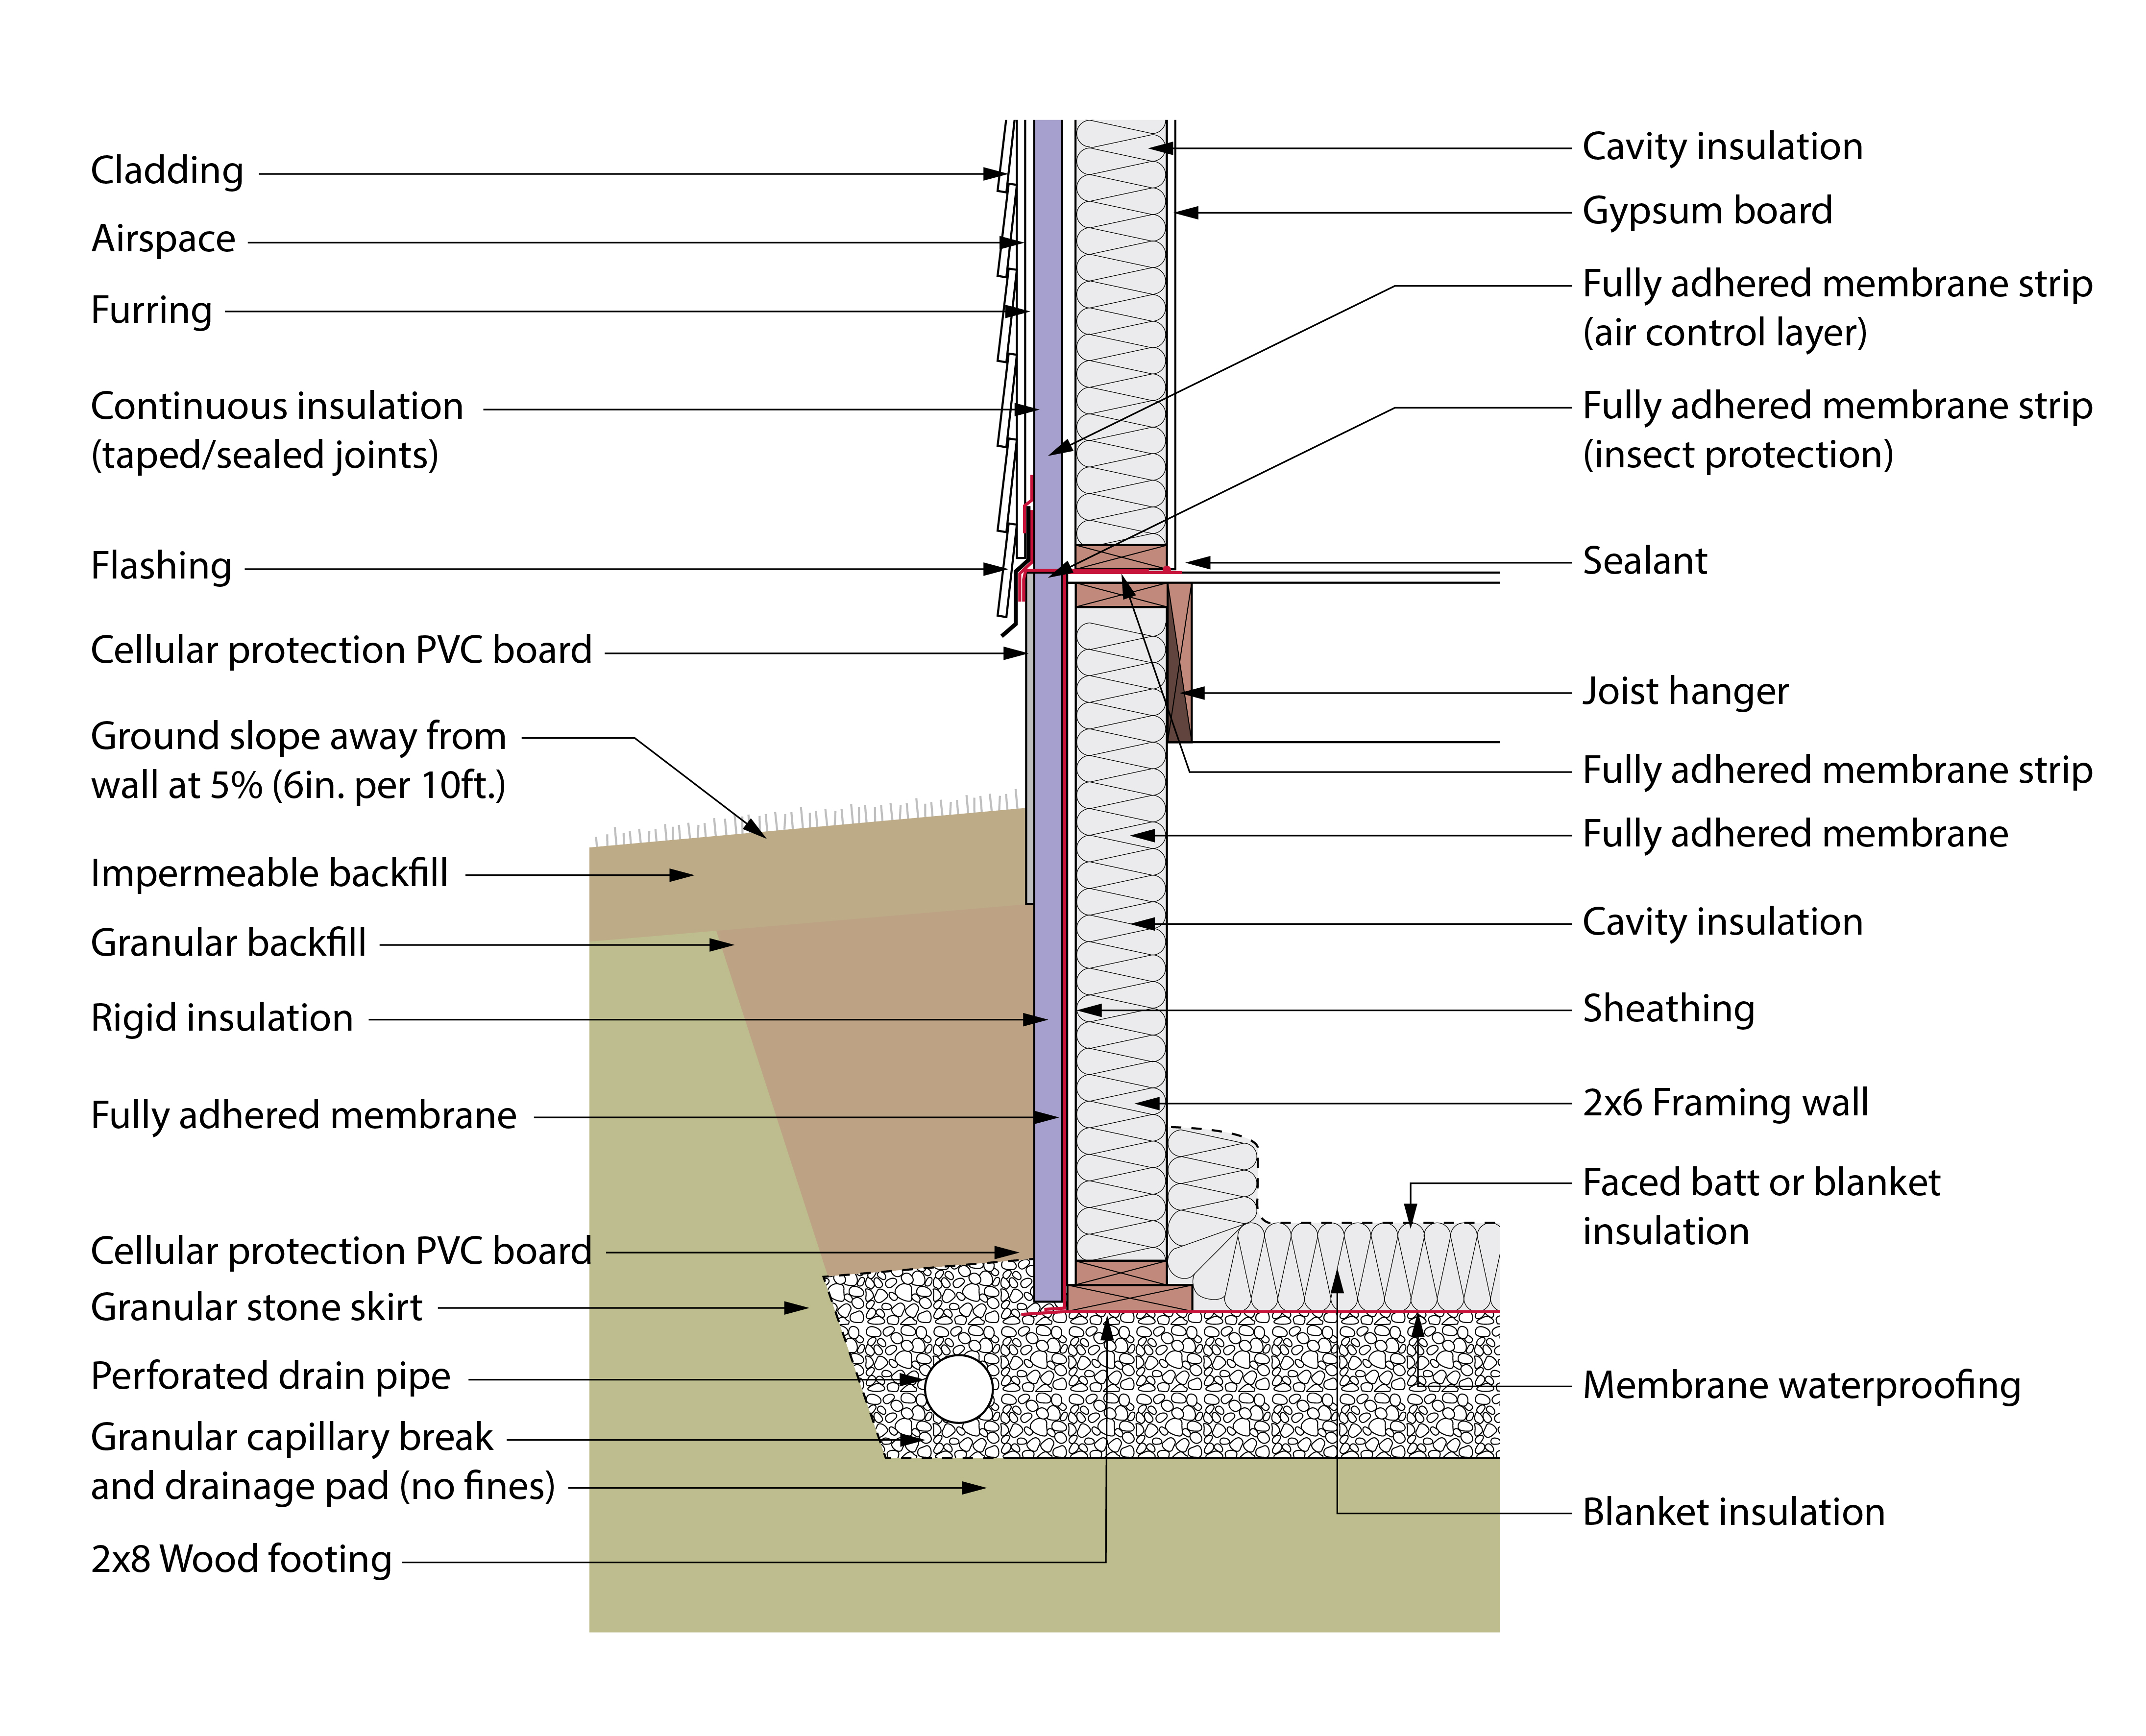
Figure 2a: Wood Crawlspace Foundation - All the details are pretty much the same as with the wood basement foundation details. But if you want to do away with the concrete footing…I think you can. Just remember “point loads”.
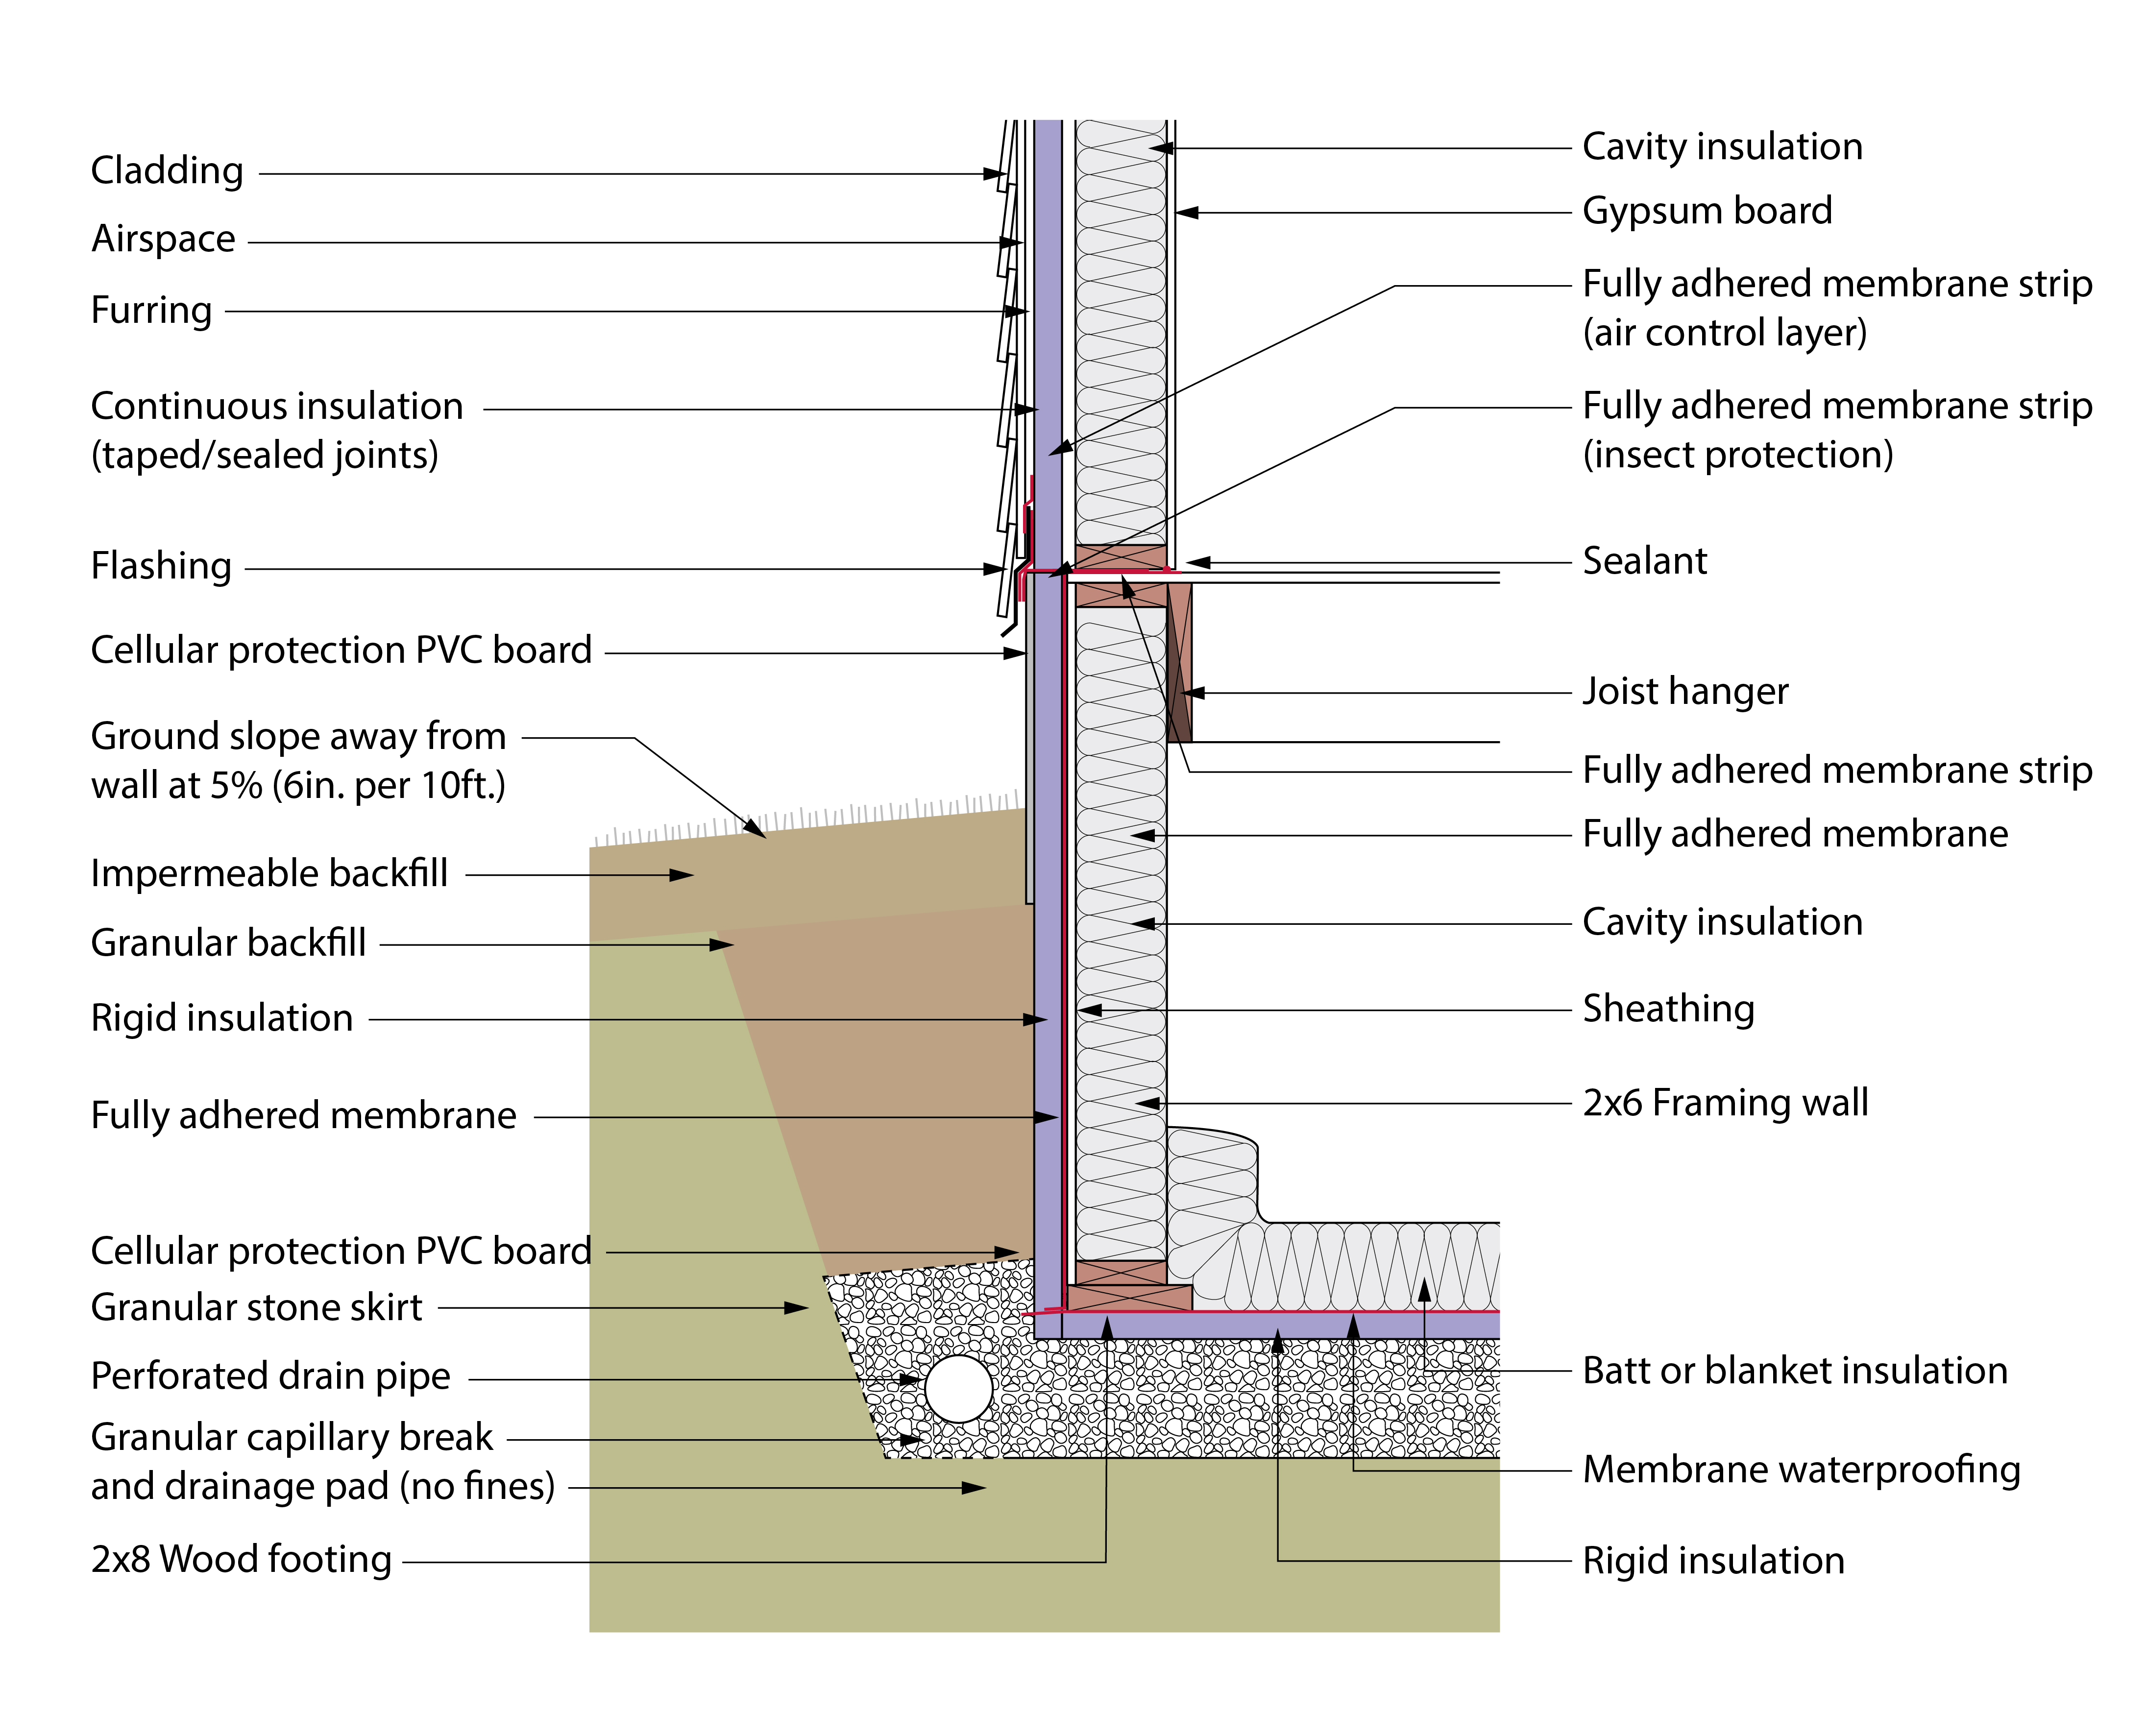
Figure 2b: Wood Crawlspace Foundation - All the details are pretty much the same as with the wood basement foundation details.
Now for wood-slab-on-grade foundations. Least risky….in my opinion….but almost never see them…. Start with a gravel pad, lay out your membrane water control layer, air control layer and vapor control layer, lay out your perimeter wood footing and lay down your continuous rigid insulation (Photograph 9). Then you do the framing and subfloor sheathing (Photograph 10). Now there are two ways of doing them….wood footing wise. The first is to install the wood footing directly on the gravel pad (over the top of the membrane…) (Figure 3). The second is to install the wood footing over XPS rigid insulation (Figure 4).[4]
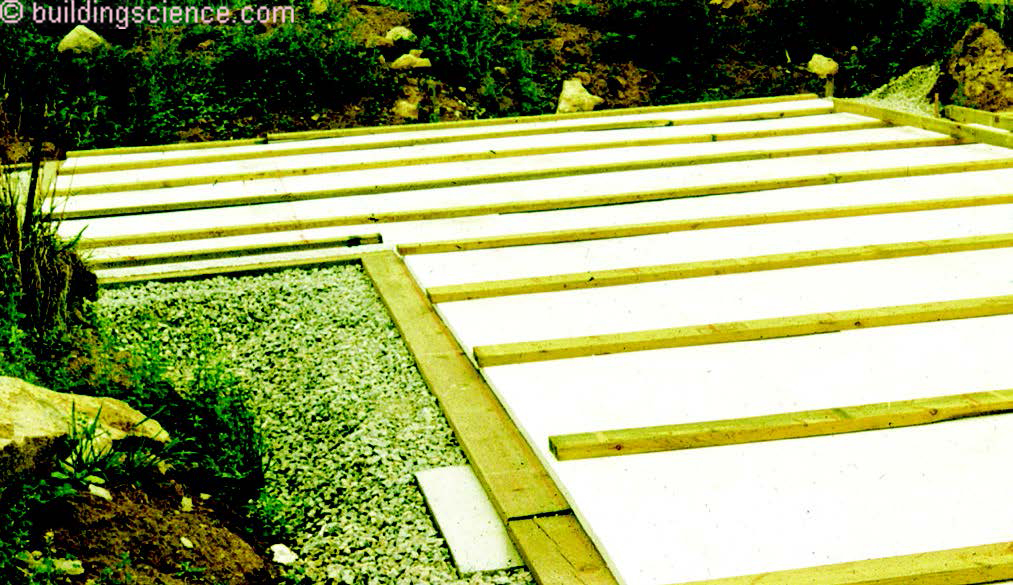
Photograph 9: Wood-Slab-On-Grade Foundation - Start with a gravel pad, lay out your membrane water control layer, air control layer and vapor control layer, lay out your perimeter wood footing and lay down you continuous rigid insulation. Note the concrete “pad” that provides support for a “point” load.
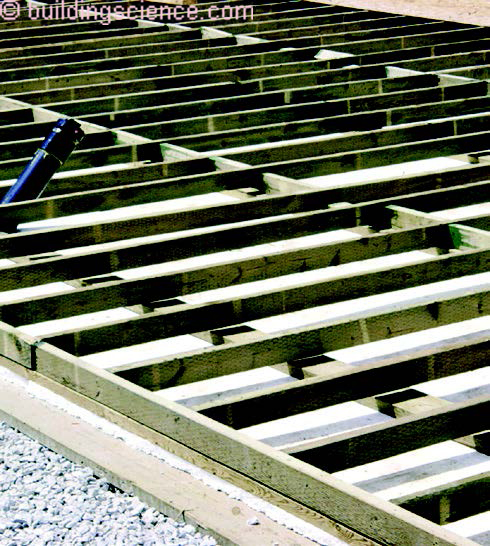
Photograph 10: Wood-Slab-On-Grade Foundation - The framing and subfloor sheathing over the continuous rigid insulation.
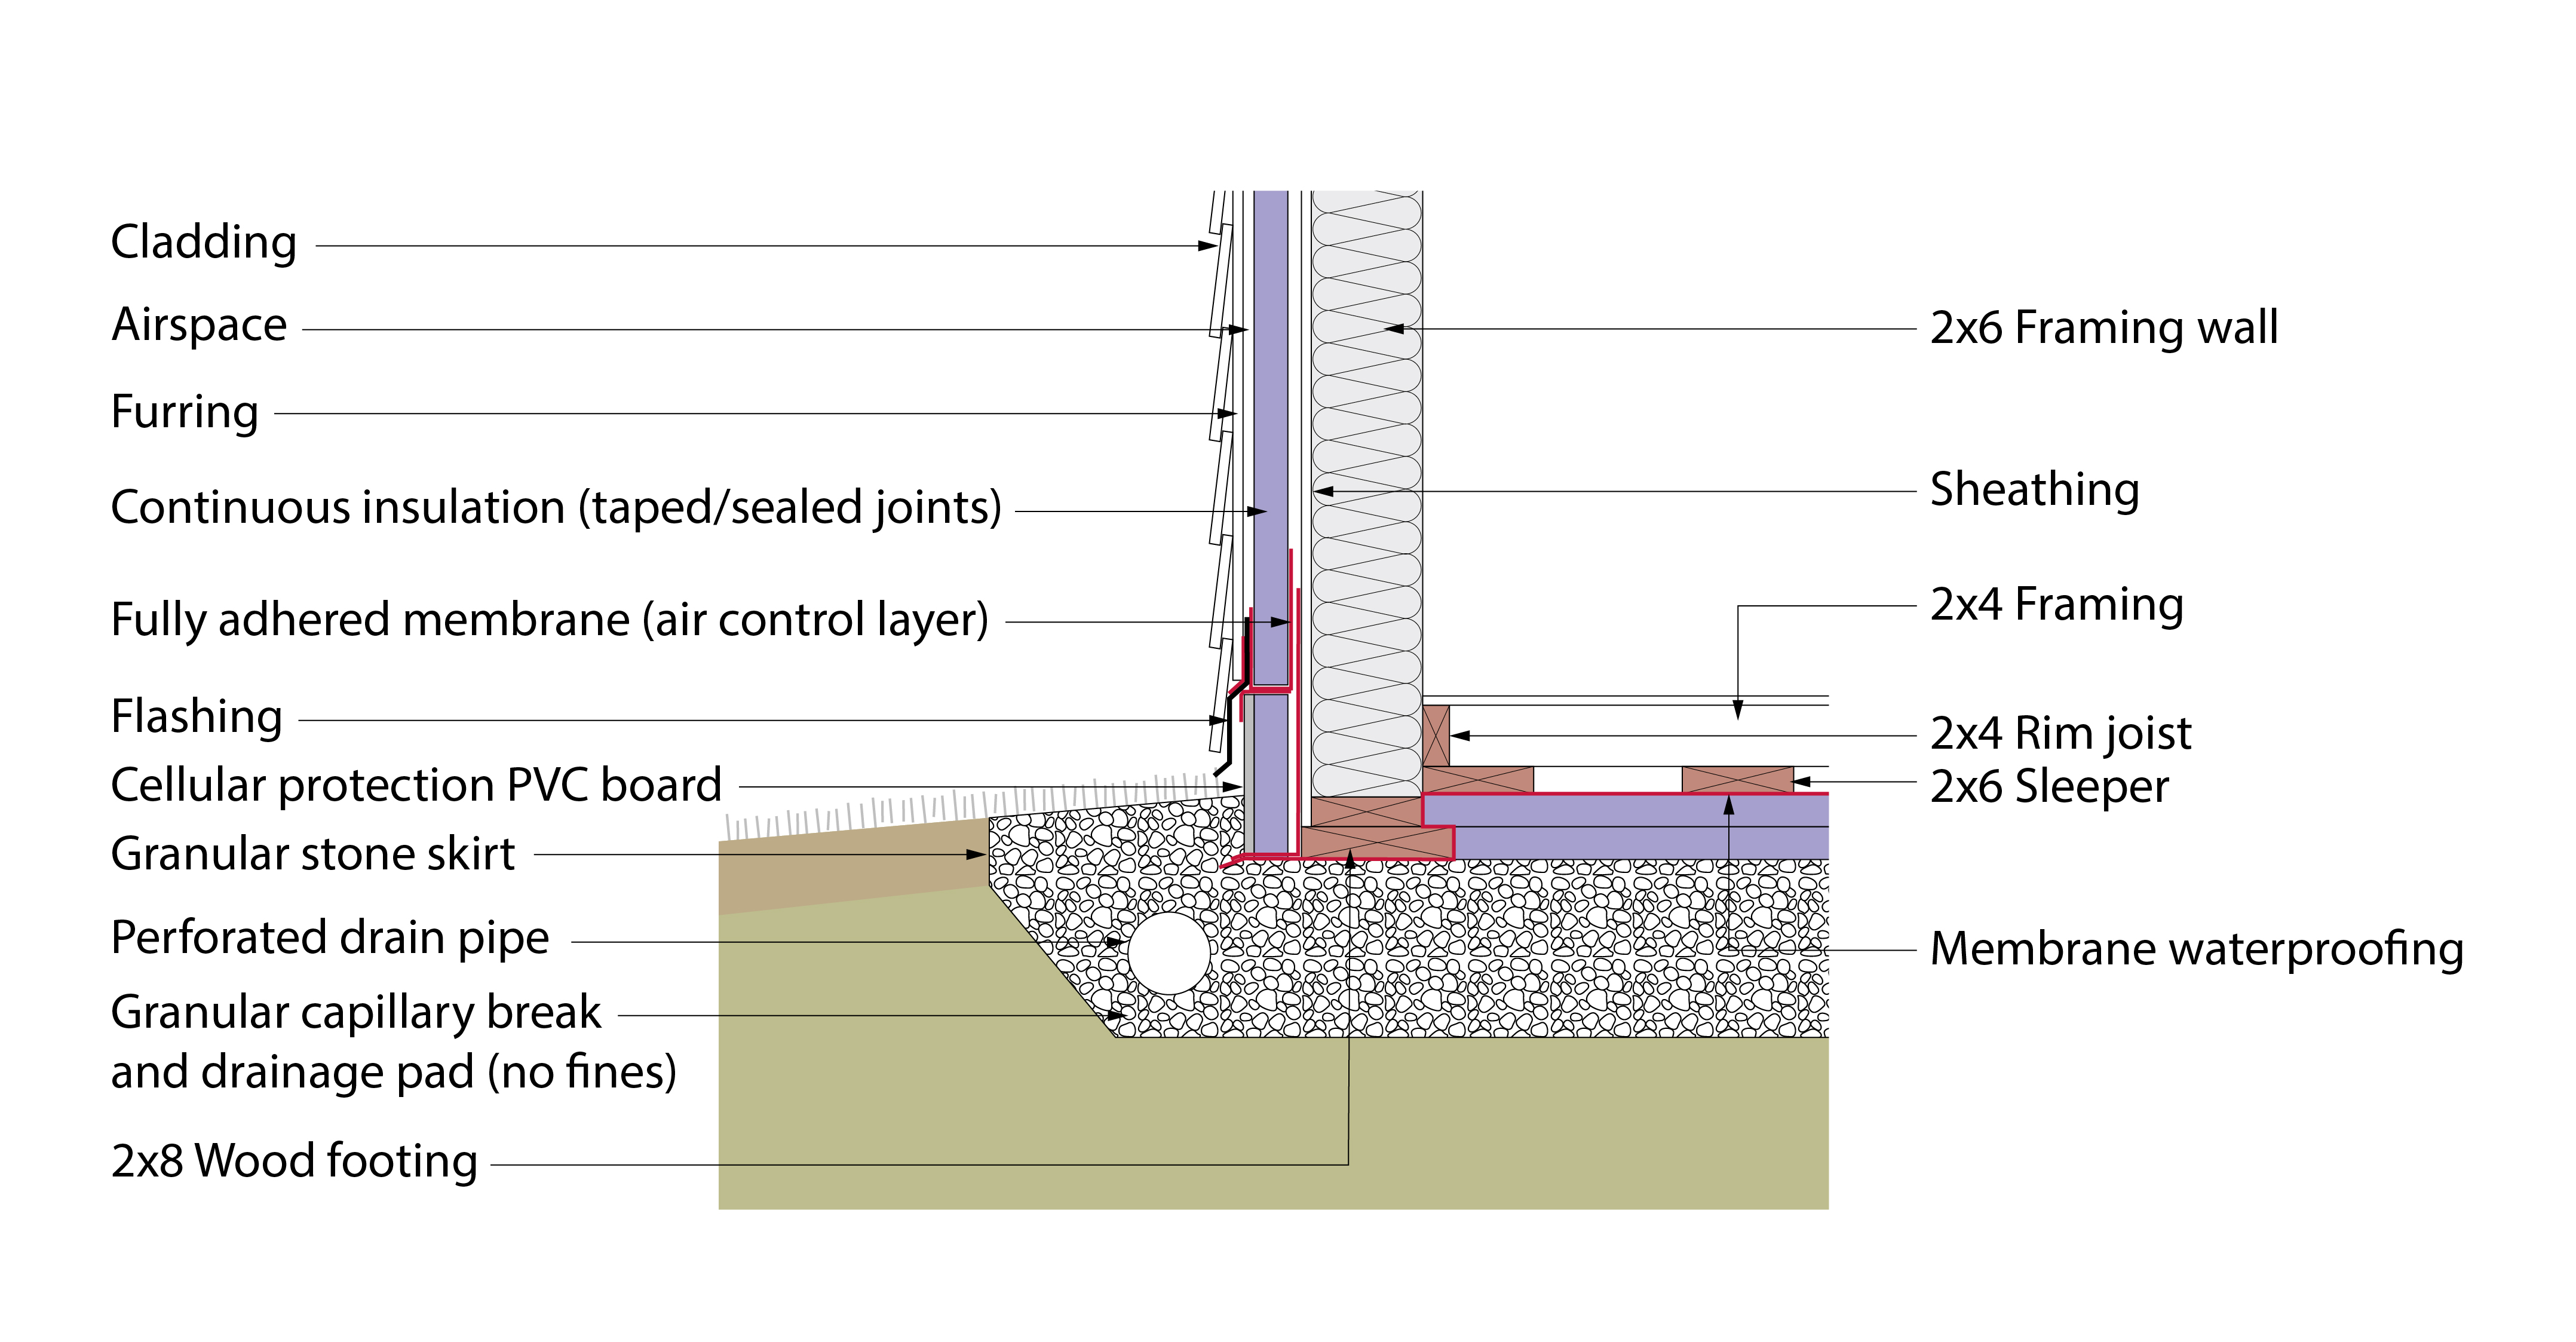
Figure 3: Wood-Slab-On-Grade Foundation - Installing the wood footing directly on the gravel pad (over the top of the membrane).
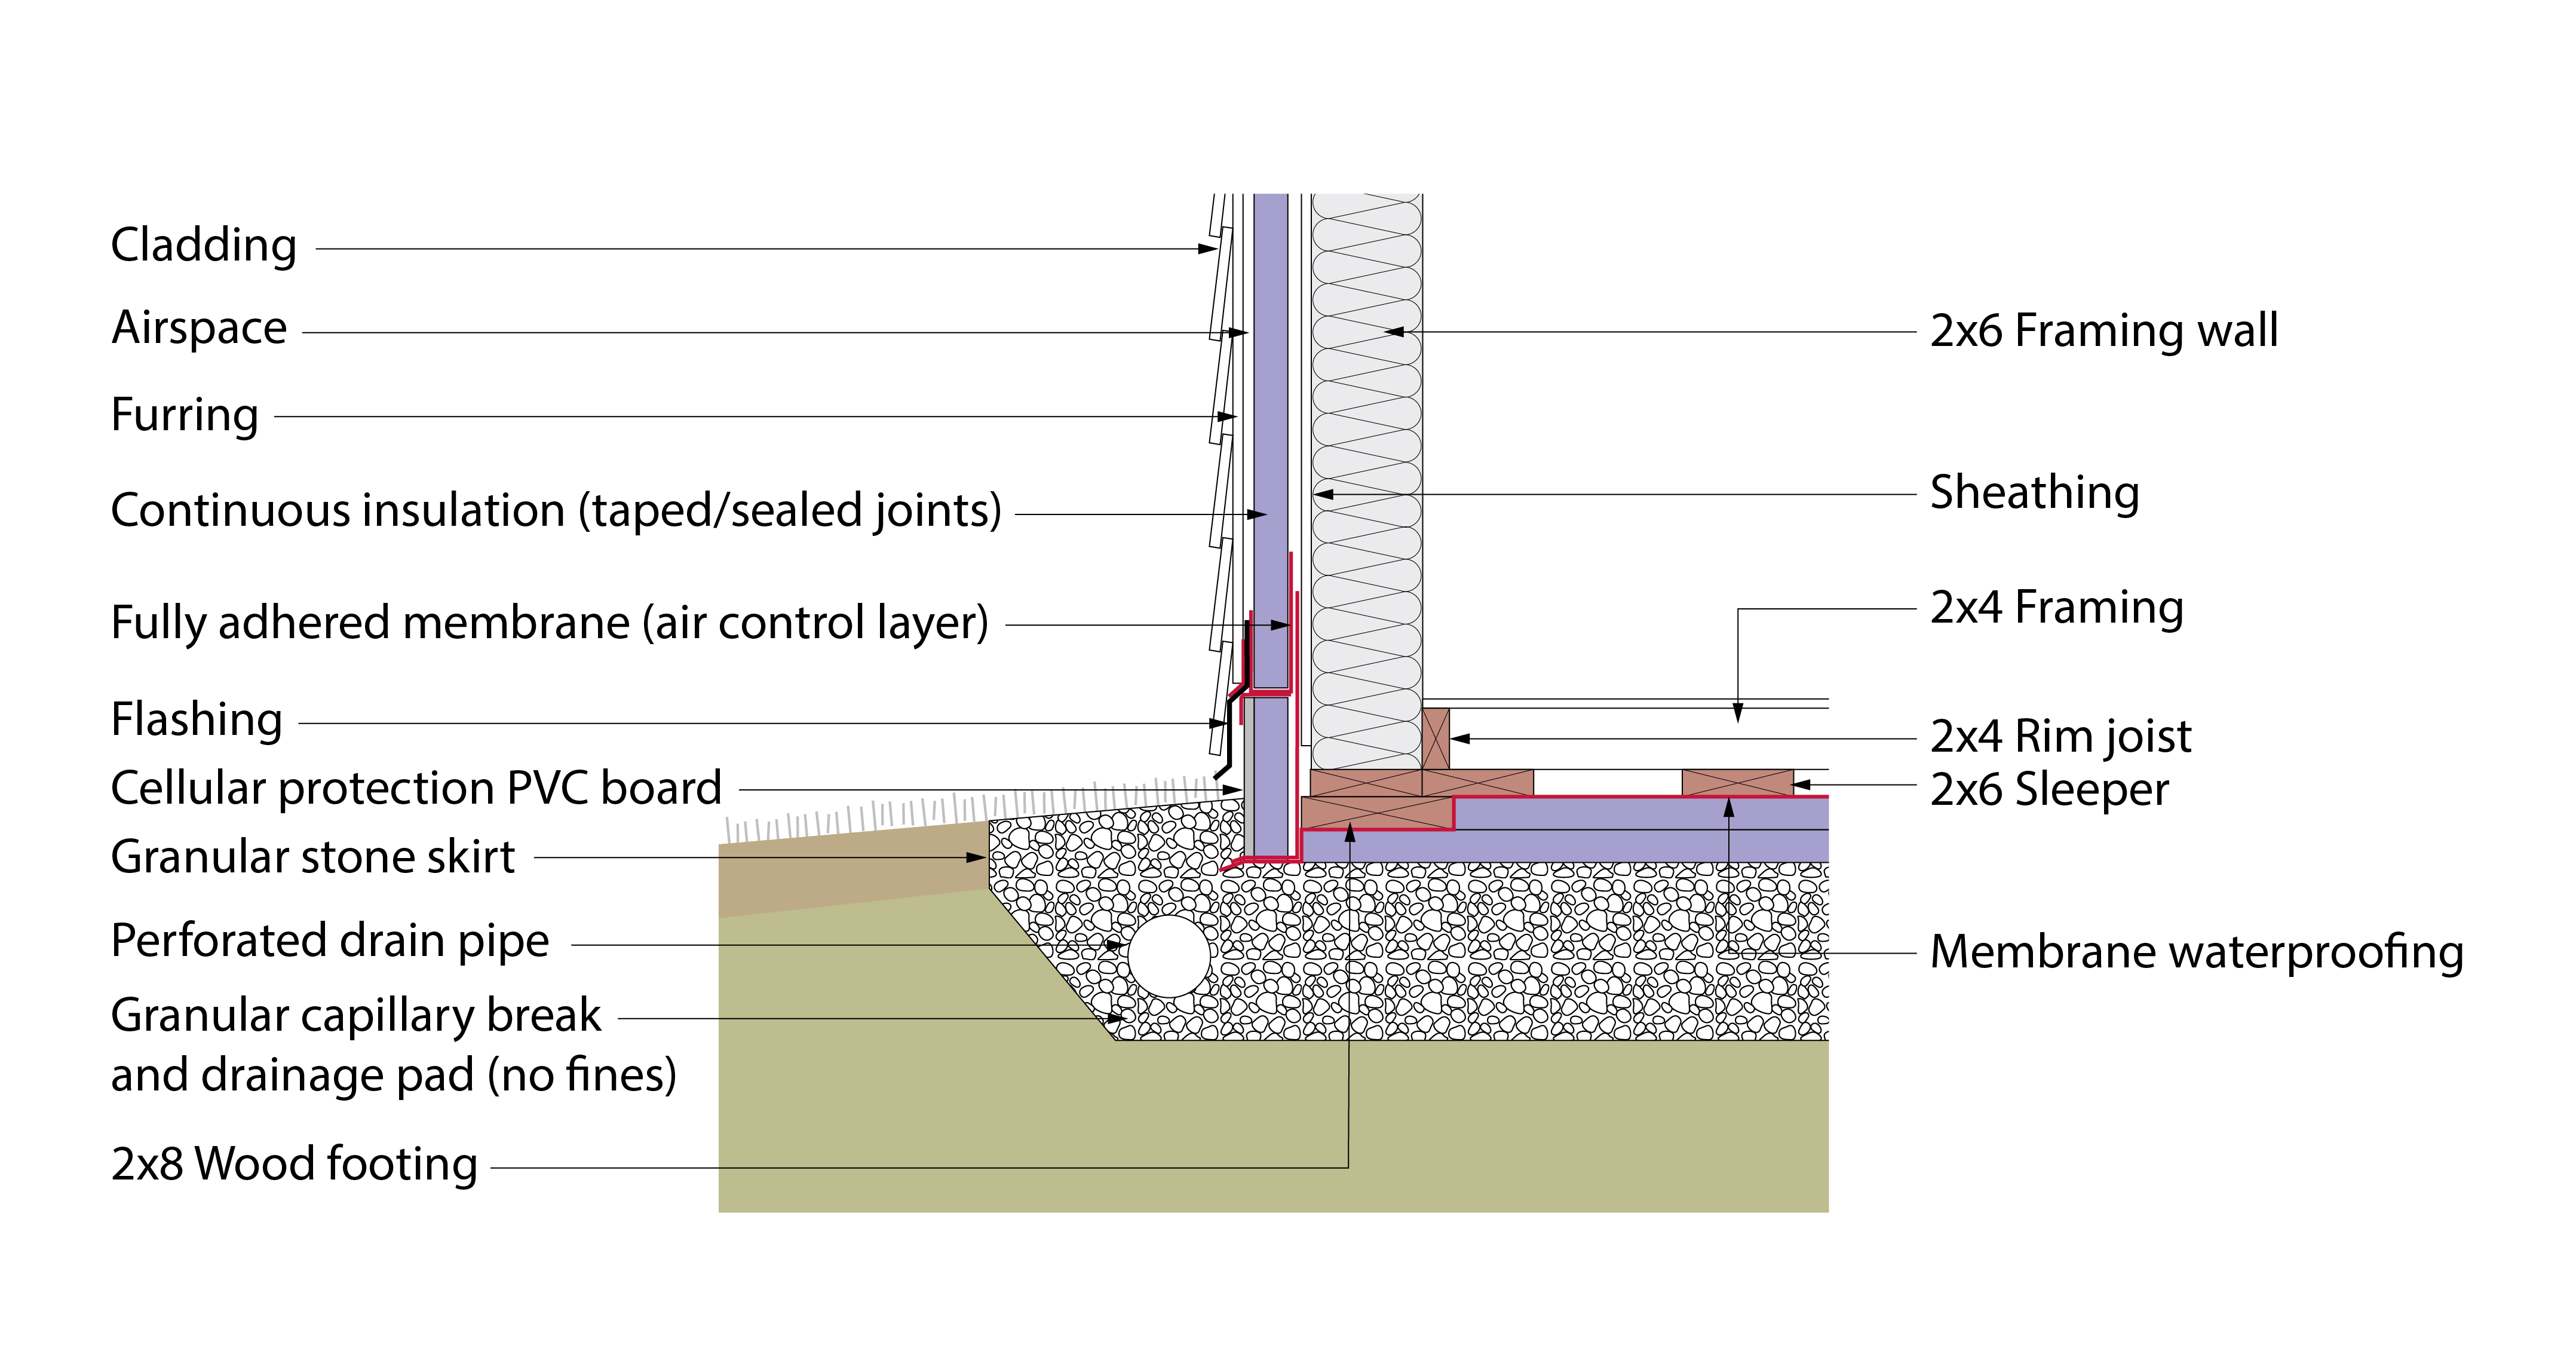
Figure 4: Wood-Slab-On-Grade Foundation - Installing the wood footing over XPS rigid insulation.
Yeah, but what if I am building up north and have to deal with frost heave? Shallow frost protected foundations. They work for concrete…they work for wood (Photograph 11).
Photograph 11: Shallow Frost Protected Foundations - Notice the horizontal insulation “skirt” providing frost protection at grade. They work for concrete…they work for wood.
Anything else to worry about? Oh yeah. Wind. You don’t want these all wood buildings to “blow away”…”gone with the wind” takes on a very different meaning. You need to anchor these puppies to the ground just like mobile homes….and don’t forget to ground your electrical system.
Yup, wood is good.
[1] We are talking about concrete here…
[2] That phrase eventually became the name of a product – but with deliberate “typos”…yes, marketing folks are interesting… pretty sure it was a trademark thing.
[3] Back then we did not have rock wool or mineral wool. Everything we could do with fiberglass boards, EPS and XPS we can do today with rock wool or mineral wool.
[4] Your structural engineer will have some interesting comments. Remind the structural engineer that we built the Alaska Highway (which by the way is not in Alaska…it is the road in Canada that takes you to Alaska…) on extruded polystyrene handle frost heave issues and perma frost…. If you are lucky you might be able to find one of the really old structural engineering legends who used to do this kind of work.