It is not easy to separate townhouses and row houses from one another (Photograph 1). And from garages. And of course from the outside.
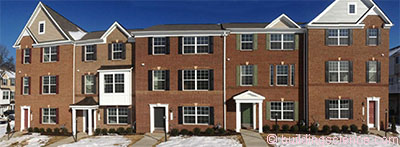
Photograph 1: Row Houses – Beautiful until you try to have them meet building code air leakage requirements.
No one really cared until recently. Ah, we had fire walls, but did we really care? Nope. We didn’t measure the air leakage of the units themselves. The firewalls did separate the units from one another from “a fire perspective” but the air leakage around them, along them and through them was pretty much ignored.[1]
Now we have a building code requirement to air seal townhouses and row houses….and that means we actually measure things. Before we measured things we just said we were doing good things. Nothing like a tested metric to mess things up. Anyone think it is easy to get to 3 ach@50 Pa in a townhouse or a row house? Especially ones with “tuck in” garages with living space over them (Photograph 2)? Or with walls that off-set from one unit to another (Photograph 3)?
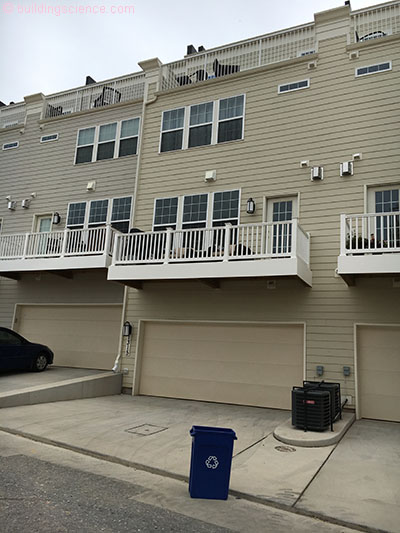
Photograph 2: Tuck In Garage – Living space over a “tuck-in” garage is a nightmare to seal around a fire wall in a townhouse or row house.
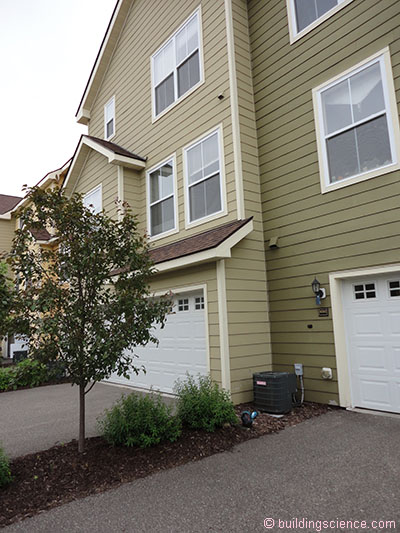
Photograph 3: Off-Set Walls - This makes the fire wall air sealing more than a little interesting.
I want to make things easy for all of you. Ready? The two most important decisions to make are where to locate the air handler and where to locate the ductwork. Make these two decisions correctly and you are likely to meet the code – if you also do the other stuff that I am going to address. Don’t make them correctly and the rest of the stuff I am going to address will not save you.
Number one - put the air handler inside the townhouse or row house – do not put it into a closet in the garage – especially not in a closet that is trapezoidal in shape because it is under a set of stairs going up to the next floor. If you don’t get this right you may as well give up.
Number two – put the ductwork inside the townhouse or row house – do not put the ductwork into a vented attic. If it must go into the attic space make the attic a conditioned attic so the ductwork is “inside”.
OK, let’s work on the other stuff.
The most common fire wall is two (2) one inch (1”) layers of gypsum board in an “H-Stud” channel and runner system with aluminum breakaway clips (Photograph 4). Regular wood frame walls get constructed on each side with a ¾ inch continuous air gap between them and the gypsum boards. This is a beautiful thing. Fast to construct. Practical. Works. All good so far. But air leaks along the gaps – upwards and sideways and inwards and outwards and every which way. Ugh! Got to stop that airflow.
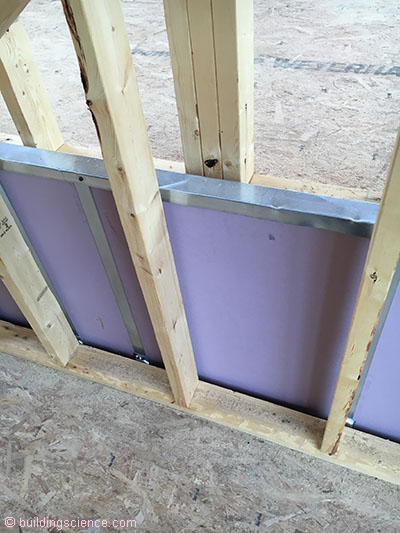
Photograph 4: Fire Wall - The most common fire wall is two (2) one inch (1”) layers of gypsum board in an “H-Stud” channel and runner system with aluminum breakaway clips. Regular wood frame walls get constructed on each side with a ¾ inch continuous air gap between them and the gypsum boards. This is a beautiful thing. Fast to construct. Practical. Works. All good so far. But air leaks along the gaps – upwards and sideways and inwards and outwards and every which way. Ugh! Got to stop that airflow.
And the only way that seems to work go get at this airflow is to compartmentalize the air gaps vertically at every floor and at attics and roofs. And to isolate the air gaps where the firewalls penetrate exterior walls at the front and the back of adjacent units. We will leave the garages to last – they are a particular form of hell on earth…
Let’s start with the easy stuff first. The gypsum fire wall needs to be sealed at the bottom to the foundation. A gasket under the bottom or base track works well (Figure 1). Note the capillary break under the framing. A fluid applied waterproofing does the trick.
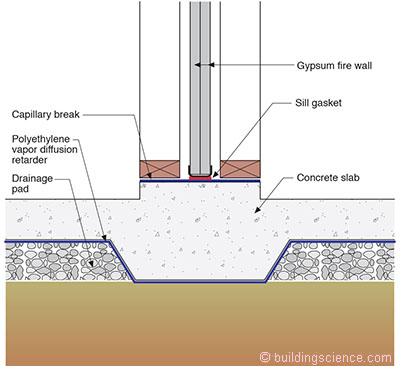
Figure 1: Bottom of Fire Wall - The gypsum fire wall needs to be sealed at the bottom to the foundation. A gasket under the bottom or base track works well. Note the capillary break under the framing. A fluid applied waterproofing does the trick.
Now we go upwards. At every floor we need an air seal. The easiest way to get an air seal is “during” the framing – not “after” the framing. The framer[2] installs a membrane strip sealing the subfloor to the gypsum fire wall (Figure 2). Flashing tape works well. No fire load with flashing tape.
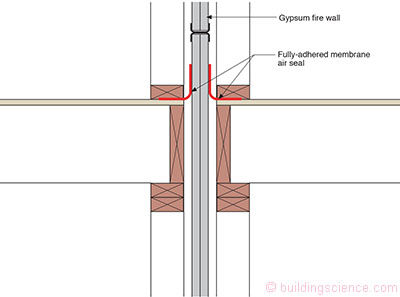
Figure 2: Intermediate Floors - Now we go upwards. At every floor we need an air seal. The easiest way to get an air seal is “during” the framing – not “after” the framing. The framer installs a membrane strip sealing the subfloor to the gypsum fire wall. Flashing tape works well. No fire load with flashing tape.
There is an alternative way of sealing at every floor. You can use expanding spray foam (Photograph 5). Tough to make it continuous and there is a fire load with some foams.
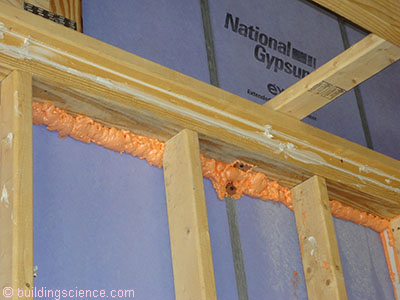
Photograph 5: Expanding Foam - Alternative way of sealing at every floor. You can use expanding spray foam. Tough to make it continuous and there is a fire load with some foams.
When you get to the roof we do what we do at intermediate floors – use a membrane strip (Figure 3). Don’t like the membrane strip?[3] Use expanding spray foam (Figure 4).
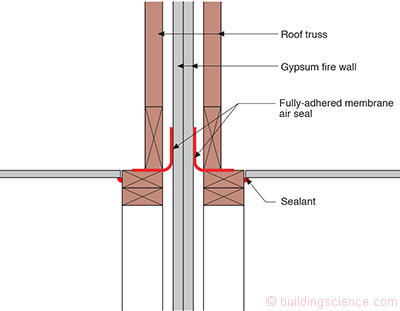
Figure 3: Top of Fire Wall - When you get to the roof we do what we do at intermediate floors – use a membrane strip.
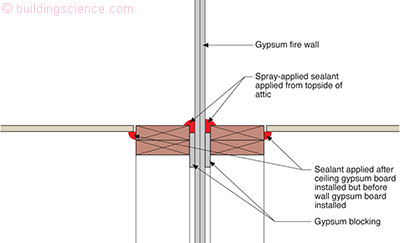
Figure 4: Expanding Spray Foam - Don’t like the membrane strip? Use expanding spray foam.
But we need to do more at the roof-ceiling. We need the “lid” to be airtight as well. This involves the gypsum board ceiling. The boarders install the gypsum “lid” first – before they install the wall gypsum board and then a “filet” bead of sealant is installed at the perimeter of every room at the ceiling line providing an airtight seal between the ceiling gypsum board and the top plates of the wall framing on both interior and exterior walls and the fire wall framing (Photograph 6).
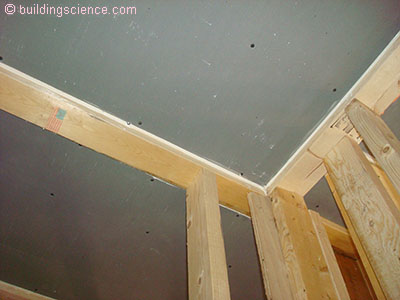
Photograph 6: Sealing The Lid - We need the “lid” at the roof-ceiling interface to be airtight as well. This involves the gypsum board ceiling. The boarders install the gypsum “lid” first – and before they install the wall gypsum board and then a “filet” bead of sealant is installed at the perimeter of every room at the ceiling line providing an airtight seal between the ceil gypsum board and the top plates of the wall framing on both interior and exterior walls and the fire wall framing.
Now it gets interesting. First it gets interesting. Then it will get ugly.
We have handled the upward and downward air flow in the air gaps on both sides of the gypsum fire wall. Sealing the gypsum fire wall to the exterior sheathing where the firewall penetrates is a little tricky. The fire wall needs to butt against the sheathing while separating the two intersecting walls. And the exterior sheathing needs to span the gap to provide some shear. This is where the framers earn their stripes. Two strips of membrane and two beads of sealant do the trick (Figure 5). You might be able to get away with a thick gasket running vertically up the metal C-Channel where it butts into the backside of the exterior sheathing – but I have been uneasy with this approach. With the membrane strips I have multiple redundancy as I am sealing the gypsum fire wall to both interior frame walls separately from the frame walls being sealed to the exterior sheathing.
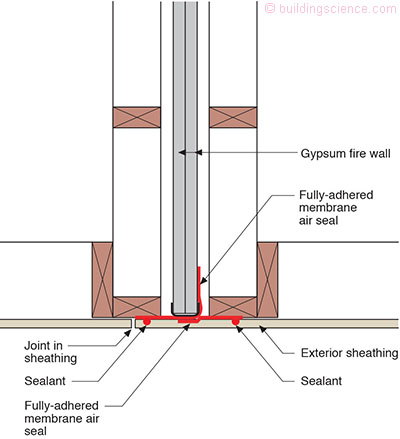
Figure 5: Fire Wall to Exterior Sheathing - Sealing the gypsum fire wall to the exterior sheathing where the firewall penetrates is a little tricky. The fire wall needs to butt against the sheathing while separating the two intersecting walls. And the exterior sheathing needs to span the gap to provide some shear. This is where the framers earn their stripes. Two strips of membrane and two beads of sealant do the trick. You might be able to get away with a thick gasket running vertically up the metal C-Channel where it butts into the backside of the exterior sheathing – but I have been uneasy with this approach. With the membrane strips I have multiple redundancy as I am sealing the gypsum fire wall to both interior frame walls separately from the frame walls being sealed to the exterior sheathing.
Now let’s get ugly…..off-set the adjacent units (Photograph 7, Photograph 8 and Photograph 9). Ah, membrane strips to the rescue (Photograph 10 and Figure 6). Not so ugly after all.
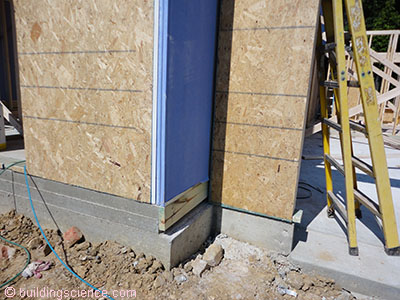
Photograph 7: Off-Set Adjacent Units – Note the protruding gypsum fire wall.
Photograph 8: More Off-Set Adjacent Units – Why do architects do this to us?
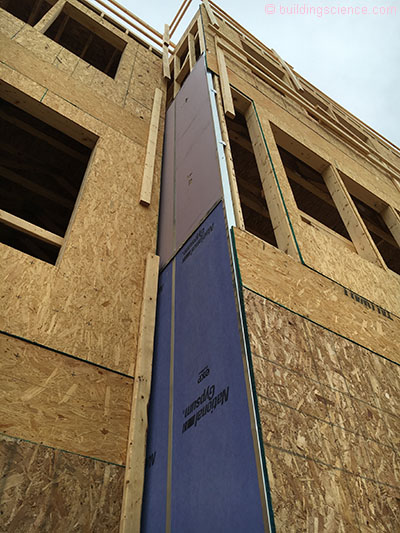
Photograph 9: And Still More Off-Set Adjacent Units – Sure, lets go all the way up as far as we can so it can be so easy….
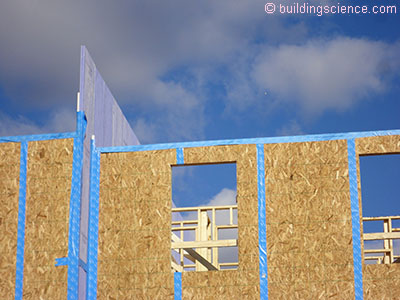
Photograph 10: Membrane Strips – No so ugly after all. Note the membrane strip over the top of the front of the wall – check out Figure 7 for the rationale.
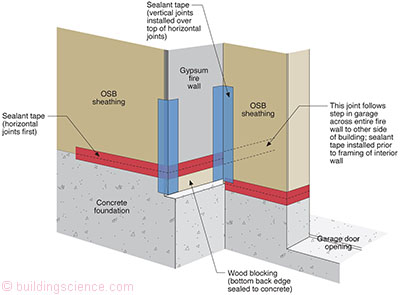
Figure 6: Off-Set Adjacent Units - Membrane strips to the rescue. Not so ugly after all.
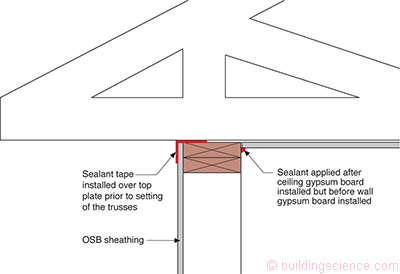
Figure 7: Air Sealing Top of Exterior Wall – Note the membrane strip sealing the exterior sheathing to the top plate and the bead of sealant sealing the gypsum board ceiling “lid” to the exterior top plate.
You want ugly? OK, now I give you ugly. Photograph 11 shows an interior wall intersecting the gypsum fire wall at a right angle. This intersecting wall is also the wall that separates the garage from the interior conditioned space of the town house or row house. And look above – look at the floor framing. Open web floor trusses. And look at the horizontal blocking of the fire wall frame wall where the garage demising wall intersects. What a mess.
Where to start?
Photograph 11: Garage to House Intersection – This image shows an interior wall intersecting the gypsum fire wall at a right angle. This intersecting wall is also the wall that separates the garage from the interior conditioned space of the townhouse or row house. And look above – look at the floor framing. Open web floor trusses. And look at the horizontal blocking of the fire wall frame wall where the garage demising wall intersects. What a mess.
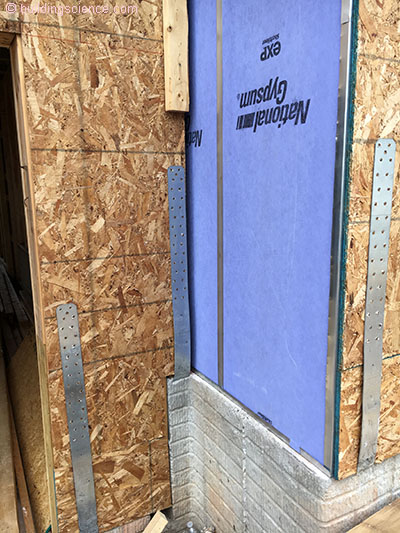
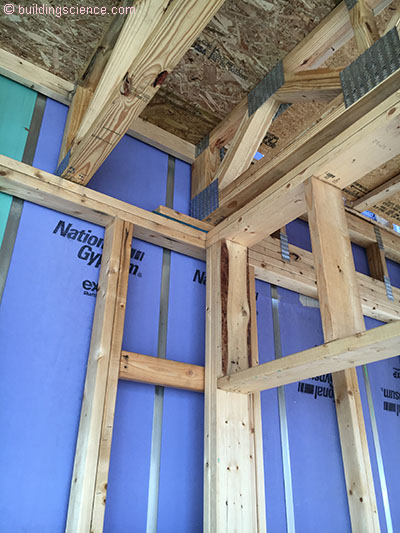
Check out Photograph 12 and Photograph 13. Notice the OSB sheathing on the garage demising wall? This gives us the clue to make this all work. The OSB on the garage demising wall needs to extend into the fire wall framing as well as upward to the underside of the floor sheathing above.

Photograph 12: Air Sealing the Garage – Top of wall. Notice the OSB sheathing on the garage demising wall? This gives us the clue to make this all work. The OSB on the garage demising wall needs to extend into the fire wall framing as well as upward to the underside of the floor sheathing above. The floor truss needs to line up flush with the outside face of the garage demising wall framing to support the OSB. Now seal the top edge of the OSB to the underside of the floor sheathing.

Photograph 13: Air Sealing the Garage – Bottom of wall. Get rid of the horizontal blocking and extend the OSB horizontally into the fire wall framing and seal the vertical edge of the OSB sheathing to the face of the gypsum fire wall.
For that to work we need to do two things. First, the floor truss needs to line up flush with the outside face of the garage demising wall framing to support the OSB. Now seal the top edge of the OSB to the underside of the floor sheathing. Second, get rid of the horizontal blocking and extend the OSB horizontally into the fire wall framing and seal the vertical edge of the OSB sheathing to the face of the gypsum fire wall (Figure 8).
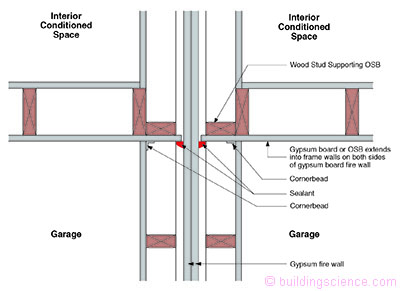
Figure 8: Garage to Fire Wall Air Sealing - The OSB on the garage demising wall needs to extend into the fire wall framing as well as upward to the underside of the floor sheathing above. The floor truss needs to line up flush with the outside face of the garage demising wall framing to support the OSB and seal the top edge of the OSB to the underside of the floor sheathing. Get rid of the horizontal blocking and extend the OSB horizontally into the fire wall framing and seal the vertical edge of the OSB sheathing to the face of the gypsum fire wall. Note in there is a vertical wood stud in the fire wall framing intersecting the garage demising wall framing at a right angle. This vertical wood stud supports the OSB that is extended into the cavity. Also note the “cornerbead” installed “backward to support the gypsum board sheathing on the interior of the fire wall framing. This detail can be done with gypsum board rather than OSB. So why the OSB? Ah, the garage demising wall is also typically is one of the primary shear walls.
Note in Figure 8 there is a vertical wood stud in the fire wall framing intersecting the garage demising wall framing at a right angle. This vertical wood stud supports the OSB that is extended into the cavity. Also note the “cornerbead” installed “backward” [4]to support the gypsum board sheathing on the interior of the fire wall framing.
Note that this detail can be done with gypsum board rather than OSB. So why the OSB? Ah, the garage demising wall is also typically one of the primary shear walls.
Footnotes:
[1] The fire folks are more than a bit sensitive about this but testing them by burning them does not tell us much about how air leaks around them and an air leakage test under a given pressure difference is not part of getting a fire rating. Two layers of gypsum board held together with 2 inch H-Studs are not airtight. Having said this, the air leakage through them is not as much as a big deal as the air flow along them sideways and upwards and outwards and then inwards.
[2] In residential townhouse and row house construction framers are “the brains” of the operation. In commercial mid-rise and high-rise it’s the gypsum board installers that are “the brains”– the “rockers” do “rock” in mid-rise and high-rise….but not so much in residential low-rise. Go figure. You want something important to be done in low-rise get the framer to do it.
[3] I feel sorry for you. The membrane strip is the way to go. Go ahead and be stubborn.
[4] Old trick from an old boarder…..