Sheathing does more than deal with wind. Sometimes it doesn’t even deal with that. It wasn’t always that way. We didn’t even used to have sheathing. We had a timber structural frame (or not, sometimes we just had rocks, or bricks, but you get the idea) and a cladding. The cladding kept the outside out – kind of – and the structure kept the building from falling down and blowing over – kind of. A century or two ago we began to get boards as a sheathing whose function was more to provide intermediate support for a cladding than anything else, and then less than a century ago we got building papers that kept the wind out. The board sheathing evolved into plywood and we got the modern residential wall – a wood structural frame sheathed with plywood sheets, wrapped with building paper covered with a cladding.
This configuration took us through almost half a century – the last half of the 20th for those that don’t quite know how to count them.
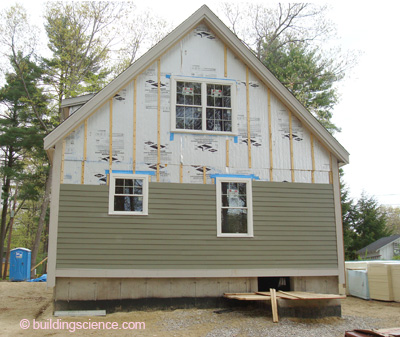
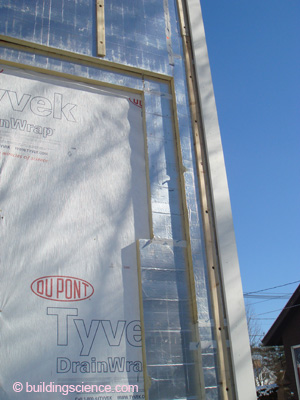
The key to the modern residential wall was the magic of the plywood (see the Sidebar). Plywood was and still is an amazing product, we continue to build furniture, houses, boats1 and planes out of it. We no longer build as many of these things out of plywood as we used to because plywood is being replaced by alternatives. This is most evident in housing where plywood is pretty much gone. In housing we see two alternatives2 - oriented strand board (OSB) (Photograph 1) and foam boards (Photograph 2).
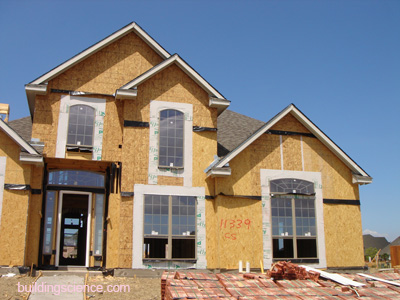
Photograph 1: Ubiquitous Sheathing—A pretty familiar sight – a home completely sheathed with oriented strand board (OSB); “ruling the range…”
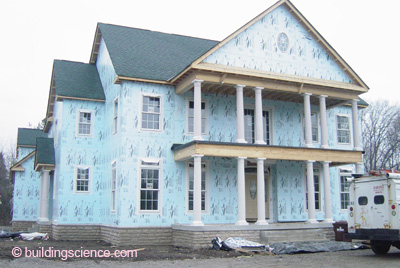
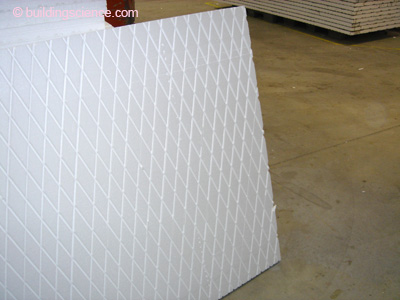
Photograph 2: Upstart?—Fifty years as a sheathing but still considered an upstart. Extruded polystyrene (XPS) completely sheathing the structure – continuous thermal break. “Beginning show up on the range…confusing the cowboy builder and architect…”
One of these two alternatives is structural (the OSB) and the other (the foam board) is most definitely not. One of these two alternatives is insulating (the foam board) and the other (the OSB) is most definitely not. One of these two alternatives rots (the OSB) and the other (the foam board) most definitely does not. One of these two alternatives “breathes” somewhat (the OSB) and the other (the foam board) sometimes somewhat does and sometimes does not. What is a builder or designer to do? Use both. Really. Pick your spots and use both. Both are great alternatives that can be complementary.
OSB Sheathing
It took us about 20 years to get OSB right. The early stuff was unbelievably water sensitive. The edges swelled and the only thing you could do was to invest in a belt sander. Some of the cheap stuff today is still pretty bad. But if you shop well you can now get OSB with nail-holding characteristics as good as plywood’s and OSB shear strength that just rocks (actually it doesn’t rock… which is the point…). And it can rain on it and not swell. And we don’t need big trees and it is much less expensive than plywood. Pretty awesome all things considered.
So what’s the catch? There always is a catch. It does not breathe3 as well as plywood or redistribute water as well as plywood (Figures 1a, 1b and 1c and see the Sidebar again). With lots of insulation in wall cavities we discovered that when walls get wet they don’t dry very easily because there is not much energy available to move the water vapor and that turns out to be a big problem. It gets worse if we have a barrier to the water vapor flow such as OSB.
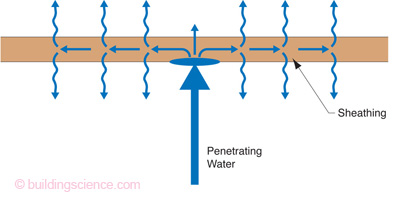
Figure 1a: Hygric Redistribution Within a Material—Penetrating rainwater hits the sheathing, is absorbed, and redistributed laterally and inward and outward. Think plywood. Think plywood with vapor open exterior cladding.
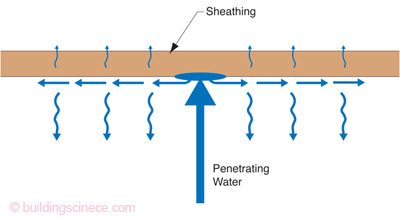
Figure 1b: Hygric Redistribution Adjacent the Surface of a Material—Penetrating rainwater hits the sheathing, and is not easily absorbed and is not able to be redistributed within the material or passed inward or outward easily. Think OSB. But if redistribution happens within an air film adjacent the surface of the material performance can approximate that of a material with characteristics similar to those of Figure 1a. Think OSB with a small air gap. Think OSB with a vapor open exterior cladding. How small a gap? Ah, that’s the rub, eh? Pretty small, so small that “crinkled housewrap has a significant effect, as do small “bumps” or even ribbons of adhesive (think commercial water managed EIFS).
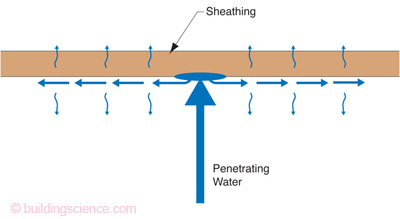
Figure 1c: Hygric Redistribution Adjacent the Surface of a Material with Limited Inward and Outward Drying—Penetrating rainwater hits the sheathing, laterally redistributed along the surface. Inward drying is limited as is outward drying. Even with limited inward and outward drying lateral redistribution significantly reduces risk of moisture damage.
We have to help out the drying part of the equation. Turns out that to help out with the drying thing we need an air-gap between the cladding and housewrap/OSB interface. Especially with airtight claddings like stucco and manufactured stone veneer; and especially where the cavities are insulated with those new fancy spray insulations (like cellulose, or spray foam, or blown-in-batt). The air-gap is simple, elegant and unbelievably effective in helping out drying. Back-vent your cladding and be happy. How much of an air-gap? We know from experience that 3/8 of an inch is a pretty safe dimension4 with stucco, manufactured stone veneers, wood claddings or other claddings like fiber-cement that lie flat against the housewrap and OSB (Photograph 3 and Photograph 4). Typical vinyl and aluminum siding have plenty of air-gaps behind them without having to do anything.
Photograph 3: “High-tech air?”—Polypropylene mesh providing an air gap between OSB covered with housewrap and cladding.
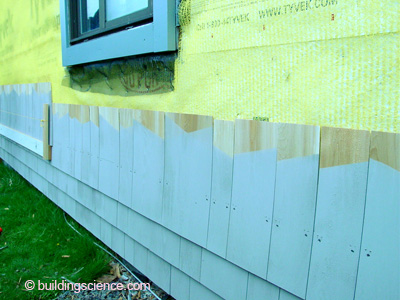
Photograph 4: Cedar Shingles—Back ventilation and drainage of wood shingle cladding installed over OSB covered housewrap – it does not get better than this from a durability perspective.
We learned through trial and error (mostly error) that if you use OSB and really good cavity insulation and a housewrap make sure you have an air-gap between the cladding and housewrap/OSB interface. These types of assemblies with gaps work almost as well as those uninsulated assemblies sheathed with plywood we used to build decades ago. Except now we have insulation. Lots of insulation. This is a good thing.
There is another factor at play that is often overlooked – and it turns out to be a real wall killer. Remember I mentioned stucco earlier? Stucco absolutely positively needs an air-gap between it and whatever it is on (except when it is applied directly on block). The air-gap’s primary function with stucco is to prevent the build up of hydrostatic pressure across the water control layer by draining the water that penetrates the stucco downwards and outwards. This is the big, big problem with stucco – the lack of drainage and the build up of hydrostatic pressure. With hydrostatic pressure water is squirted through nail holes and staple holes in building papers or even nails penetrating “self-sealing” membranes. The effect is like a junkie mainlining heroin. In the good old days plywood could tolerate a little bit of this abuse if the plywood wall saw enough energy exchange and didn’t have an additional interior vapor barrier. But the real problem was always the hydrostatic pressure because of the stucco cladding configuration - the lack of a drainage gap that would have relieved the hydrostatic pressure. So how big should this air-gap be? Easy, 3/8 of an inch. Can it be smaller? Yes, 3/8 of an inch is once again very, very conservative.5
Let us go back to the cavity insulation thing. Things get very risky if you use a high-density spray foam on the inside of OSB sheathing (Photograph 5). There is no way that any appreciable moisture in the OSB can dry inwards. The only drying possible is outwards. We need the gap. Same thing with structural insulated panels (SIPs). These are foam panels lined on both sides with OSB. There is no way that an exterior OSB skin that gets wet on a SIP can dry inwards. We really need the gap with a SIP. How much of a gap? Oh, how about 3/8 of an inch? Remember the discussion about being conservative. It can be smaller with small loads.
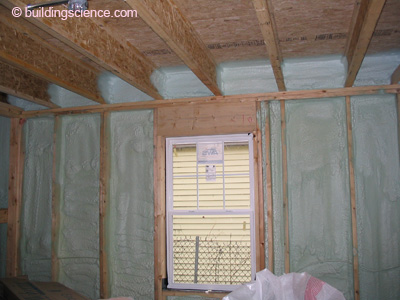
Photograph 5: High-Density Spray Foam Cavity Insulation—High tech and low perm. Great air sealing, great thermal performance, great structural strength. Does not allow for any appreciable inward drying of the exterior sheathing.
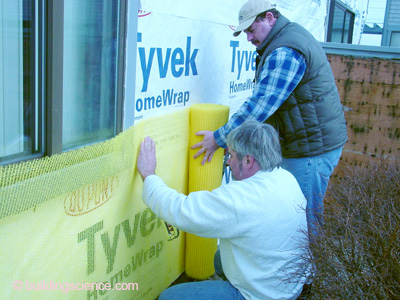
We’re not done yet. The housewrap actually has to work. It can’t be perforated and it can’t lose its water repellency due to surfactants like tannins, wood sugars and other water-soluble extractives found in OSB and wood based sidings, or dispersion agents found in paints and workability additives in stuccos and mortars. Most housewraps don’t work – that will be a discussion for another day. And then they actually have to be installed so they don’t blow off and they have to be lapped properly and taped or sealed to be effective water control layers and air control layers.
So, can we make OSB work? Yes, get a good water resistant OSB, a non-perforated surfactant resistant housewrap and make sure you have a gap between the cladding and the housewrap/OSB interface. You now have 1950’s durability coupled with awesome energy efficiency. And a whole bunch of structural strength that you may or may not need. But is it real nice to know that if you need the structural strength the wall won’t rot because you have that gap on the outside of the OSB. Knock yourself out with whatever cavity insulation you want. The gap makes them all work – including SIPs. Nuff said.
Foam Sheathing
Foam sheathings are definitely not plywood. They are also not OSB. The foam sheathings come in various flavors – extruded polystyrene (XPS) and foil-faced isocyanurate are the most common. For purposes of this discussion they will all be treated pretty much the same way – as impermeable6 and without any shear or racking structural resistance. It will be assumed that none of them store nor absorb any significant water and that none of them rot.
If you tape or seal the joints of foam sheathings they can also act as water control layers. Let me translate – if you tape or seal the joints, foam sheathings do not need to be covered with a housewrap or building paper. Foam sheathing with joint treatment can replace OSB and a housewrap and you get all of that insulating value from the foam sheathing to boot – and nothing to rot. Easy, we are done. Well, not quite.
Three details need to be addressed – foam sheathing provides no structural strength, foam sheathing does not breathe and we have to control hydrostatic pressure. These are not so minor problems.
First, the structural problems. When you use foam sheathing some means of shear resistance must be provided and the necessary shear resistance will depend on where you are. The more wind, the more shear needed. The greater the seismic risk, the more shear needed. The greater the snow load, the more shear needed. You can get all the shear you need without OSB sheathing. There are alternatives to the shear properties provided by OSB sheathing (Photograph 6).

Photograph 6: Shear Resistance—Pre-manufactured metal inset shear panels are quite common in high seismic risk zones.
What about attaching cladding? What about it? You do not attach the cladding to foam sheathing. You attach the cladding through the foam sheathing to the structure under the foam sheathing. It is pretty straightforward. You can attach vinyl and wood siding and hardcoat stucco lath and manufactured stone veneer directly through all flavors of foam sheathing up to 2 inches thick. With fiber-cement siding this is limited to 1-1/2 inches of foil-faced polyisocyanurate. For thicker foam sheathings, 1x4 wood furring is necessary. The 1x4 wood furring is installed over the foam sheathing (up to 6 inches – really, up to 6 inches) and then the cladding is attached to the 1x4 wood furring (Photograph 7).
Photograph 7: Furring—When foam sheathings exceed 2 inches in thickness 1x4 furring becomes necessary. This wall has 4 inches of foil-faced polyisocyanurate insulating sheathing installed over a 2x6 wood frame wall. The wood furring acts as the nail base for the fiber-cement cladding.
Second, the water vapor impermeability of the foam sheathing has to be dealt with. Condensation from interior moisture laden air on the interior (cavity side) surface of exterior impermeable insulating sheathing must be controlled. The only way to do this is to increase the thermal resistance of the foam sheathing high enough to limit condensation. This of course depends on where you are (i.e. climate location), what is going on inside (i.e. the interior moisture load), and how much insulation is already in the cavity you are insulating on the exterior with insulating sheathing. The good news is that we have figured all of this out. It is already memorialized in the codes. Most homes in cold climates will need between 1 and 2 inches of insulating sheathing on the outside to control this condensation risk.
With foam sheathing (of the appropriate thickness – R-value based on condensation control as noted above) the type of cavity insulation becomes irrelevant. Fiberglass batts, cellulose, low density foam, high density foam, ground up “blue jeans,” whatever, it no longer matters, they all work. Just don’t install an interior side plastic or foil or vinyl vapor barrier. A wall assembly has to dry in at least one direction and with that foam on the exterior the only practical drying direction is typically inwards. Remember that the assumption here is that the foam on the exterior is impermeable, which is not always the case – but once again we are being conservative.
Third, we have to control hydrostatic pressure. Remember the stucco discussion earlier with the OSB?
Same problem here and the same solution applies. The exterior face of the foam sheathing is typically the water control layer for the assembly and we need an air-gap between it and the stucco cladding to drain the rainwater penetrating the stucco downwards and outwards preventing the build up of hydrostatic pressure. How much of an air-gap do you need? Same as with OSB – 3/8-inch.
But we are not done with the water risk stuff. The foam sheathings do not absorb or store any water – and that is both a good thing and a bad thing. The bad thing is if you have wood or wood based siding. The wood rots and the paint falls off because the wood or wood based siding cannot dry into the foam sheathing. Guess, what fixes this? Yes, you guessed it, a small air-gap between the wood cladding and the face of the foam sheathing. How much of a gap? Yes, right again, about 3/8 of an inch.
Foam Sheathing Used With OSB Sheathing
I don’t think that I am going out on a limb when I say that most builders are going to construct houses with wood framing and OSB sheathing at corners for shear strength. Everything will then be covered with foam sheathing – including the OSB sheathing at the building corners. Foam sheathing will be used with OSB not in place of OSB.
Wow, cows and sheep sharing the pasture. Who would have ever believed that it could happen? Well, it is. Not everywhere, and not in huge numbers. But in numbers that are getting to be pretty impressive. It has not been easy, and like the range wars of the 19th Century most of the problems have been due to misunderstanding and entrenched interests.
The foam sheathing will be thinner where it is installed over the OSB at building corners so that the exterior face of the foam sheathing at the corners lines up “flush” with the exterior face of the foam sheathing in the “field” of the wall. The exterior face of the foam sheathing will be the water control layer and there will be a gap – there must be a gap – between the cladding and the exterior face of the foam sheathing. Yes, a 3/8-inch gap, is a pretty good gap to start with.
There will be a few houses where entire walls will be sheathed with OSB – not just at the corners – and again these OSB sheathed walls will be covered with foam sheathing. And finally, there will be a few houses where the entire building will be sheathed with OSB, and in turn this OSB completely over-sheathed with foam sheathing.
This installation of foam sheathing over OSB sheathing leads to some interesting questions - some with very easy answers, some with not so easy answers.
First, the easy stuff. Let’s look at stucco cladding over foam sheathing over OSB sheathing. Providing an air-gap between the stucco cladding and the exterior face of the foam sheathing prevents the debacle we got with “face-sealed” exterior-insulated finish systems (a.k.a. “EIFS,” a.k.a. “synthetic stucco” (Photograph 8).
With the air-gap we get drainage and the control of hydrostatic pressure. The gap can go behind the foam sheathing as well (Photograph 9). If water does get into the OSB from the outside it will be minor in nature and the OSB can dry to the interior – as long as we have cavity insulation that is vapor open and no interior vapor barrier. This works for all claddings, not just hardcoat stucco. But, you do need the gap.
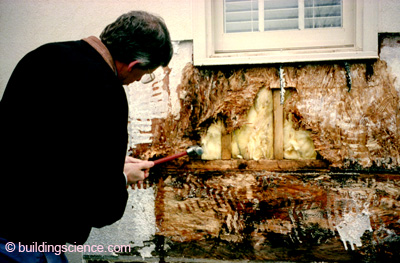
Photograph 8: Nightmare—Exterior Insulated Finish System (EIFS) directly adhered to water sensitive OSB sheathing. Water passes through and around stucco cladding and is trapped between the foam sheathing and the OSB. Water-managed EIFS does not have this problem and is an awesome system.
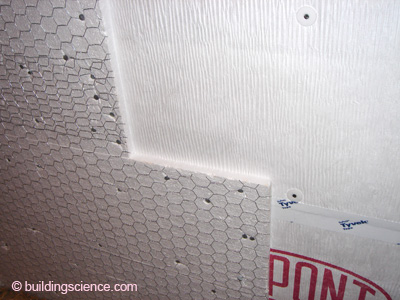
Photograph 9: Water-Managed Claddings—Note the “crinkled” housewrap providing relief of hydrostatic pressure, providing lateral “hygric redistribution” and protection of the OSB (i.e. the de facto “water control layer”). Stucco can be applied directly to the foam, or any other cladding.
What if I use a vapor closed cavity insulation? Well, we now have a problem. Ah-hah – a problem! Yes, closed cell high-density foam cavity insulation applied to the inside of OSB sheathings that are in turn covered on the exterior with impermeable foam sheathings is risky. Unless you provide a small gap between the exterior face of the OSB and the back surface of the foam sheathing to provide for some hygric redistribution. Or if you are “perfect” with your rainwater control such as when you use a fully adhered membrane – think roof membrane standing up applied to a wall. Otherwise, go with a gap. What works? Grooved foam, “bumpy” OSB, “crinkled” building wrap, 1/8-inch polypropylene mesh, dimpled polypropylene sheets. Lots of stuff (Photograph 9 and Photograph 10). But won’t the tiny gap cause a loss of thermal performance of the foam sheathing? Yes. How much? About 5 percent of the thermal performance of the foam sheathing (not the entire wall assembly) with the 1/8-inch gap, less with a smaller gap. With “crinkly” stuff you loose next to nothing.7 Is it worth it? Yes, in my opinion, the loss in thermal performance is trivial compared to the reduced risk and improved durability. The 5 percent thermal loss is also easily offset by the improved thermal performance of the closed cell high-density foam cavity insulation. Even if you think you are perfect with a water control membrane, go with a gap for at least the relief of hydrostatic pressure. Most of think we are perfect when we really are not. Remember EIFS. Perfection is hard (Photograph 11).
Photograph 10: Groovy—Cross-cut grooves in the back of foam sheathing to provide relief of hydrostatic pressure and lateral hygric redistribution.
Photograph 11: Perfect Wall Redux—The almost perfect wall has “crinkled” housewrap providing hygric redistribution, 4 inches of foil-faced polyisocyanurate insulating sheathing providing the ultimate thermal break, wood furring providing cladding attachment, relief of hydrostatic pressure and back-ventilation of cladding. OSB under the housewrap provides shear and high-density spray foam cavity insulation (obviously hidden from view) provides air sealing and even more thermal performance. Who says that all these products can’t get along?
Anything else to worry about? Actually, yes. That OSB sheathing under the foam sheathing is there for a really important reason – it keeps the building from falling down or blowing over. It provides the shear resistance for the building. Some folks, like me and most building officials, think this is important. How the OSB is nailed to the wood frame structure determines how well the OSB actually does its job. Inspecting the nailing pattern of the OSB is one of the fundamental inspections many building officials make. If the OSB is covered with foam sheathing it is pretty tough to do a nailing inspection. Co-ordination between the builder and the building official has just gotten more complicated. There is no easy answer to this. Some builders leave the OSB exposed to allow for a nailing inspection. Some building officials allow builders to take photos of the nailing pattern used with the OSB sheathing and allow the OSB to be covered with the foam sheathing prior to the framing inspection thereby reducing the number of site visits the building official makes. A few jurisdictions just ignore the entire issue. Fun, eh?
So Now What?
Relax and be happy. The range wars are coming to an end. Codes are getting fixed and assemblies are actually working. OSB and foam sheathings are learning to co-exist with each other and more importantly learning to co-exist with all of the various permutations and combinations of claddings and cavity insulations. The key seems to be an air gap between claddings and sheathings and an ability to redistribute moisture – typically facilitated by – yes, you guessed it – a gap.
There are three reasons for the gaps:
drainage to bleed away hydrostatic pressure
ventilation to aid drying of either the sheathing or the cladding or both
diffusion to facilitate redistribution of moisture
The size of the gaps can vary – 3/8-inch is very conservative for drainage, ventilation and diffusion. Even smaller, less than 1/16-inch, works for drainage and diffusion redistribution.
So mind the gap, eh?
The Magic of Plywood and the Modern Residential Wall
The plywood on a wood frame wall did a few important things very well. It kept the wall from falling over – it provided shear strength – and it did this very, very well. It also provided support to the cladding even though some claddings didn’t need it, whereas others did. Cladding is a fancy name for wood siding, aluminum siding, vinyl siding, fiber cement siding, stucco, manufactured stone veneer and brick. The plywood also contributed to the air tightness of the wall. It wasn’t an air barrier, but it sure helped, and it was much better than the wood board sheathing it replaced in the 1950’s.
Plywood “breathes” as its moisture content increases (Figure A). So does the “kraft paper facing” traditionally found attached to the interior side of fiberglass batt cavity insulation (Figure B). This means that a wood frame wall with plywood on the exterior and with a cavity insulated with a kraft-faced batt was able to dry outwards in the winter and inwards in the summer and in both directions if a window leaked rainwater of if a cavity got wet because of a missing flashing.
Think of the plywood sheathing as a valve that opens and closes based on relative humidity or moisture content. Same for the kraft facing on the fiberglass batt cavity insulation. We now have a wall with two valves – one on the outside and one on the inside. In the winter, interior relative humidity is low so the inside valve is “closed.” On the same wall, the plywood on the exterior, sees a high relative humidity and its “valve” is open. Beautiful. The wall is semi-vapor closed on the interior and vapor open on the exterior. In the summer the conditions reverse. The interior valve opens and the exterior valve closes. And if we get cavity wetting both valves open. It meant that the same wall could work in Baton Rouge, LA and International Falls, MN and everywhere in between. Not only could it work, but it actually did, for over a half century.
But all good things and times come to an end. The Beatles broke up (you should be ashamed Yoko) and we began to run out of big trees to make plywood. We also got the Arab oil embargo and our first energy scare. All of that got us OSB, plastic housewraps, a huge focus on air tightness and so much innovation in cavity insulation that we are still somewhat confused. And even worse, we sometimes got walls with no valves at all – or valves that were permanently closed on both sides. Think interior plastic vapor barriers or vinyl wall coverings and exterior OSB sheathings or foil faced foam sheathings. Heck, all we now needed was a leaking window. What are the odds of that?
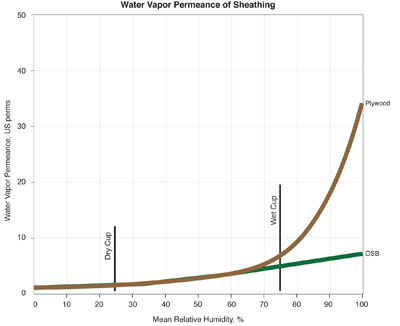
Figure A: Notice the difference between the wet cup and dry cup tests. And the huge difference at the end of the scale when things are really wet. Plywood passes moisture better than OSB, redistributes moisture better than OSB and dries much faster when it gets wet. This graph helps explain why. But, with an air gap we can compensate for this difference and make OSB the future standard for structural sheathings.
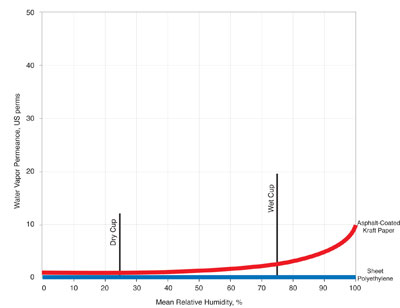
Figure B: What a difference a material makes. Plastic vapor barriers really are vapor barriers when things get wet. Not so asphalt saturated kraft paper. And most walls with asphalt saturated kraft paper thank the building science gods for the difference.
Footnotes:
Arguably the best high performance aircraft of the Second World War – next to the Messerschmitt 262 twin-engine jet - was the De Havilland Mosquito fighter-bomber. The Mosquito was nicknamed the “Plywood Wonder.” Its fuselage and wings were a plywood monocoque. It was such an impressive aircraft that wreaked so much havoc and destruction that the Germans awarded two victories to any one shooting a Mosquito down. “The Mosquito famously annoyed the Commander in Chief of the Luftwaffe, Reichmarschall Herman Goring, when on 20 January 1943, the tenth anniversary since the Nazis seizure of power, a Mosquito attack knocked out the main Berlin broadcasting station putting his speech off air” (http://en.wikipedia.org/wiki/De_Havilland_Mosquito). It gets better. Being built out of wood instead of metal it had a much lower radar signature. It was an early use of “RAM” or “radar-absorbing material.” It was the original stealth fighter. I grew up with the legend of the Mosquito. Over a thousand were built in Downsview, Ontario by De Havilland Canada. My dad started as a tool and die maker working for De Havilland at the Downsview plant and left as a controls engineer. I went to Downsview Secondary School and we could see the De Havilland runway from our classroom. The Mosquito had long since left service by the time we youngsters saw them, but a few were still around. My dad would get misted up whenever he saw one. Me too.
In commercial wall assemblies we typically see a third alternative - gypsum sheathing. The most common gypsum sheathing used is glass-fiber faced and is semi-moisture tolerant with a very high vapor permeance. Think of it as a more vapor permeable plywood sheathing with minimal structural properties that does not burn. Most of the discussion that follows is relevant to this wall as well. The gaps are as important to this wall as to all the residential walls in that the performance is significantly enhanced. Having said that, if the gaps are missing, this commercial wall does not have as many of the moisture problems associated with “gapless” OSB sheathing – or even “gapless” plywood. Why? It does not rot and stores and redistributes moisture better.
“… to permit passage of water vapor by vapor diffusion” not “to draw air into and expel if from the building enclosure or assembly” – we are not dealing with human physiology “to draw air into and expel it from the lungs.”
This 3/8-inch gap is very, very conservative. It can be smaller. Just how much smaller most of us are not sure about. But with a 3/8-inch gap I have never, ever, anywhere, known of anyone to have a problem related to drying if nothing else fundamentally stupid was not also happening. How do I define fundamentally stupid? How about a missing flashing?
There are “draining housewraps” and “draining building papers” that are about 1/16 of an inch and even smaller that work very well. Even two layers of building paper work pretty darn well. So why not just specify 1/16 of an inch or two layers of building paper? Ah, it depends on the “load” – a fancy word that means sometimes we get lots and lots of rain and when things get very ugly 1/16 of an inch or two layers of building paper does not always cut it. Low-rise houses without much of an exposure easily work with 1/16 of an inch gap or two layers of building paper. But taller buildings with big exposures and no overhangs and lots of rain and wind the 3/8-inch makes me sleep at night. Sometimes someone somewhere has to throw some judgment at the problem.
OK, everyone take a Valium. I know that this is absolutely not true. All kinds of foam sheathings do breathe to varying degrees. Yes, I know about expanded polystyrene (EPS) – 3 perms per inch. Yes, I know about fiber-faced isocyanurate – also 3 perms per inch. Yes, I even know that most 1-inch unskinned extruded polystyrene (XPS) is more than 1.5 perms. But much of the stuff used for sheathings is faced with foil or polypropylene skins and so the limiting case is a vapor impermeable foam sheathing. If things work when they are completely vapor closed, they will also work when they are semi-vapor permeable. And in many assemblies they work much better when they are more vapor permeable. But that is a discussion for another time.
What is this based this on? My judgment and experience. I am a pretty savvy not-so-young anymore engineer who is good at guessing at stuff like this. We will eventually get around to measuring this kind of stuff, but we first have to finish measuring the more important stuff. In the meanwhile go with me on this one folks.