How hard can it be to insulate a flat sheet of concrete? I mean you only have three choices – on the top, on the bottom, or on the edge. OK, you might have some combination of the three as well.
Ah, never underestimate the complexity of the real world. The structural engineer typically rules this world – sooner or later you will have to deal with the “commissar of concrete.” Sometimes this sheet of concrete is supported by good dirt, sometimes by bad dirt and sometimes it is hung in the middle of air. And sometimes you get asked to do this many years after the fact. The good dirt does not require the “commissar” – but bad dirt does and so does hanging it in the middle of the “space-time continuum” or what the rest of refer to as “architects being architects.”
The easiest is a slab supported by good dirt – and a new one at that. You make the assembly out of three pieces – a footing, a stem wall and the “flat plate” slab part. Then you insulate it under it and on the inside of the perimeter making sure you uncouple the plate from the stem wall at its edge (Figure 1). This edge thing is a big deal – the thermal bridging that occurs if you don’t do it costs you more than half the thermal resistance of the whole deal.
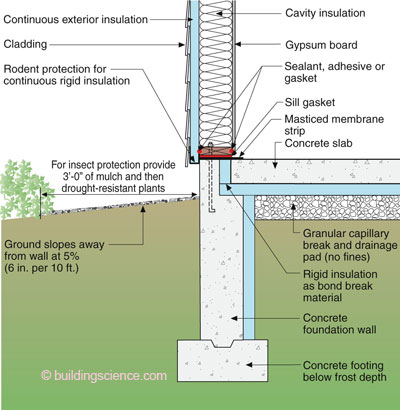
Figure 1: Insulated Stem Wall—With good soil conditions construct the foundation assembly out of three pieces – a footing, a stem wall and the “flat plate” slab part. Insulate it under it and on the inside of the perimeter making sure you uncouple the plate from the stem wall at its edge. This edge thing is a big deal – the thermal bridging that occurs if you don’t do it costs you more than half the thermal resistance of the whole deal.
Do you really need to insulate the stem wall if you insulate the edge of the slab and insulate under the slab at the perimeter? Yes and no. Yes in climate zones 4 and higher, no in climate zones 3 and lower. Is this based on a hygrothermal analysis? No. Is this based on an energy payback analysis? No. Is this based on minimizing your carbon “footprint”? No. Get serious. It is based on something that is real. We found that in climate zones 4 and higher if you didn’t do it people felt uncomfortable. It is not a good idea to annoy your clients. Especially if they are old – remember you will get old too – sooner than you expect.
Check out a project of about 1,000 houses near Chicago constructed about 10 years ago. Photograph 1 shows rigid insulation full height on the inside of the stem wall. Note the deep “seat” cast into the inside of the top of the stem wall. This “seat” will receive the perimeter edge insulation and the perimeter slab insulation as well as the concrete. Photograph 2 shows the perimeter slab edge insulation and the perimeter slab insulation. We have found that 2 inches of rigid insulation is about the maximum practical thickness possible. That yields about R-10 if you are using extruded polystyrene (XPS) – which is the most common product - which provides comfort – based on our first hand experience up to Minneapolis.1 Notice that the sheet polyethylene “vapor barrier” is located on the top of the rigid insulation between the rigid insulation and the bottom surface of the concrete – in direct contact with the concrete. Do not, and I repeat, do not locate the polyethylene under the insulation as it will keep the insulation wet. Trust me on this – or go back and read “BSI-003: Concrete Floor Problems.”
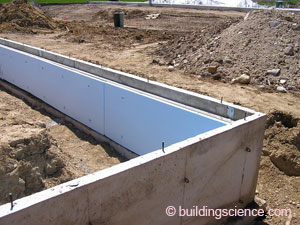
Photograph 1: Insulated Stem Wall—Rigid insulation full height on the inside of the stem wall. Note the deep “seat” cast into the inside of the top of the stem wall. This “seat” will receive the perimeter edge insulation and the perimeter slab insulation as well as the concrete.
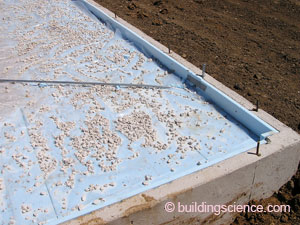
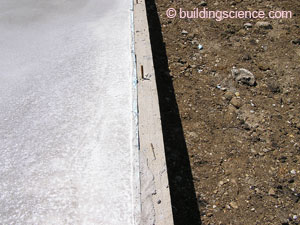
Photograph 2: Perimeter Slab Edge Insulation and Perimeter Slab Insulation—Two inches of rigid insulation is about the maximum practical thickness possible. Notice that the sheet polyethylene “vapor barrier” is located on the top of the rigid insulation between the rigid insulation and the bottom surface of the concrete – in direct contact with the concrete. Do not, and I repeat, do not locate the polyethylene under the insulation as it will keep the insulation wet.
How far inboard should you insulate horizontally? We pick 4 feet. Yup, that is the width of the typical rigid insulation sheet and we go with it. Everywhere? Pretty much. Is there ever any reason to insulate the entire slab besides the perimeter? Yes, Grasshopper, whenever you have in slab heating or whenever you have hot-humid summers like you have in Maine, Massachusetts, and Michigan. Those “M” states are a pain. The ground under a slab is still often cold in the summer when it finally gets nice outside in the “M” states and the top of the slab can fall below the dew temperature of the outside air-vapor mixture when folks are finally brave enough to open the windows and doors.
Photograph 3 the concrete being placed on the top of the sheet polyethylene and a layer of XPS insulation. Notice that there is no welded-wire mesh. No one ever puts it on chairs so that it is actually in the concrete instead of on the plastic. Why bother? It ends up just being expensive “ballast” to hold the plastic down. We use stones to hold the plastic in place. What about cracking? Use fibers and a water-to-cement ratio of less than 0.5 and control joints.
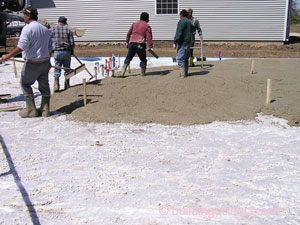
Photograph 3: Concrete Placement—Shows concrete being placed on the top of the sheet polyethylene and a layer of XPS insulation. Notice that there is no welded-wire mesh. Stones – gravel keep the plastic from blowing away.
Photograph 4 is a thing of beauty. A thermal break worthy of great artisans. Now install a strip of waterproofing set in mastic that spans the rigid edge insulation and acts as both a capillary break and an insect barrier. Do not underestimate insects – especially termites. Always treat the ground with a fipronil-based ground treatment. The most common goes under the name Termidor®. And install a barrier. Let me remind you again about that “barrier” strip of waterproofing set in mastic.
Photograph 4: Thermal Break—A thermal break worthy of great artisans. Install a strip of waterproofing set in mastic that spans the rigid edge insulation that acts as both a capillary break and an insect barrier.
Photograph 5 is one of my all time favorite images. Look at the snow melt pattern outlining the under slab insulation. I call this a “poor persons infrared thermograph.”
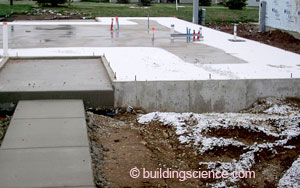
Photograph 5: Poor Persons Infrared—Look at the snow melt pattern outlining the under slab insulation.
So do stem walls whenever you can and insulate this way and be done. Easy. But this only works with good dirt. Unfortunately we don’t always have good dirt. Bad dirt can move a lot especially when it gets dry after it is wet when it gets wet after it is dry or just because it feels like it. Structural engineers, as boring as they are2, have pretty much figured out how to deal with bad dirt. The first best option is a monolithic slab that can only be insulated on the exterior (Figure 2). This is not an easy thing to do. That exterior insulation needs to be protected during construction – not an easy thing to do – and then it has to be protected during its useful service life – think “weed-whacker” proof. And don’t forget about the capillary break and insects. So we have another option that works – the monolithic slab insulated on the exterior. Well, sort of. This works only for moderately bad dirt. The really bad stuff needs another option. And, worse, this detail does not deal with the thermal bridges associated with brick veneers. This detail only works for slabs that are not post tensioned since the insulation needs to be installed in the form work prior to placing the concrete. Good luck with trying this in a post tensioned system.
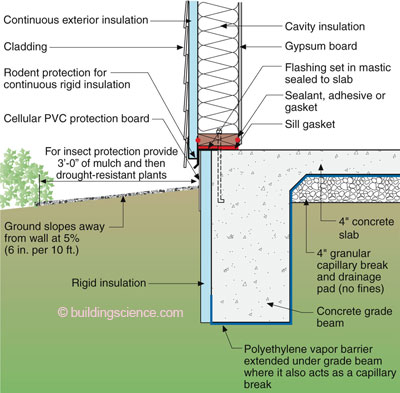
Figure 2: Monolithic Slab—The exterior insulation needs to be protected during construction and it has to be protected during its useful service life. And don’t forget about the capillary break and insects. This works only for moderately bad dirt.
Really bad dirt? It’s what post-tensioned monolithic slabs are made for. Gotta love those structural engineers. They make things work. But with the post tensioned approach the only place for the insulation is on the top of the slab (Figure 3). This is both elegant and ugly. Elegant because it works. Ugly because you can’t let it get too wet during construction which is a problem because we build outside. And when it gets wet during construction you need to let it dry before you cover it. It’s why contractors loose sleep and why they do deserve the big bucks.
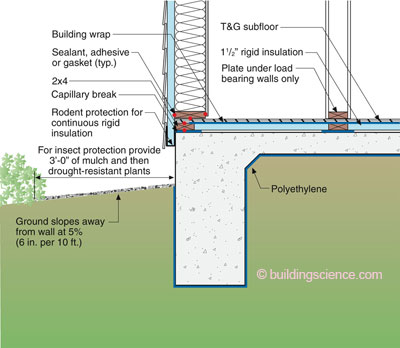
Figure 3: Post-Tensioned Monolithic Slab—Elegant and ugly. Elegant because it works. Ugly because you can’t let it get too wet during construction which is a problem because we build outside. And when it gets wet during construction you need to let it dry before you cover it.
The real neat thing with top-side insulation of a slab is that you get to deal with the thermal bridge problem of brick veneers (Figure 4). You also handle the insects termite thing as well.
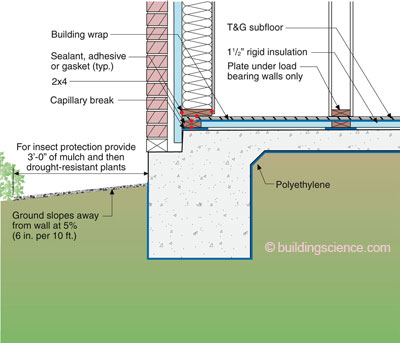
Figure 4: Post-Tensioned Monolithic Slab Brick Veneer—Thermal bridge problem solved. Termite problem solved. Note the plastic building wrap under the wood based subfloor. This type of building wrap is “liquid water closed” and “vapor water open.” If you spill stuff of a liquid nature on the floor you want to keep the liquid out of the lower parts of the assembly – but you still want things to dry upwards if stuff happens.
So how do you build one of these top-side insulated slabs? Two ways – you either install the insulation and deck the entire layer first and build everything on top – or – you build everything on top first and dry in the structure and then “fill in” the insulation layer and deck. Residentially, I prefer the first. Commercially, I prefer the second. More about the second later.
If you do either approach you might want to install a plastic building wrap under the wood based subfloor. This type of building wrap is “liquid water closed” and “vapor water open.” If you spill stuff of a liquid nature on the floor you want to keep the liquid out of the lower parts of the assembly – but you still want things to dry upwards if stuff happens. What are the odds that someone will spill something sometime?
So what do you do if your slab is in the middle of the air and unconditioned underneath and sticking out all over? That, my friends, is Figure 5 – a very, very common way of building apartments and condos today. Think parking garage underneath that’s the unconditioned part. The red marks the spot. Well you can only insulate these things on the top or on the bottom. None are fun if you are serious about the thermal bridge caused by the slab sticking out horizontally “all over.”
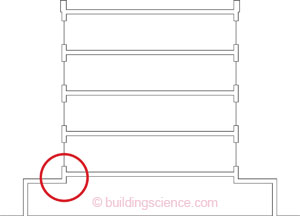
Figure 5: Elevated Slab—Common way of building apartments and condos with a parking garage underneath that is unconditioned. The red marks the spot. You can only insulate on the top or on the bottom. None are fun if you are serious about the thermal bridge caused by the slab sticking out horizontally “all over.”
There are two top-side approaches. One involves rigid insulation and a sub-floor right on the deck (Figure 6 and Figure 7). The other involves constructing a “conditioned crawlspace” (Figure 8). The conditioned crawlspace is the easiest to construct which is why architects hate it. It complicates their life with respect to “access.” The finished floor is way above the podium slab. And it irritates the mechanical engineer because the crawlspace has to be conditioned and compartmentalized. But, hey, stuff is never easy. Now, if the mechanical engineer is on the ball the crawlspace is a good place for the ducts – and the plumber loves it for obvious reasons.

Figure 6: Top Side Perimeter—The “fill in” approach. It allows the slab to be open during much of the construction process and sequences the insulation and subfloor installation such that it occurs after “dry in”.
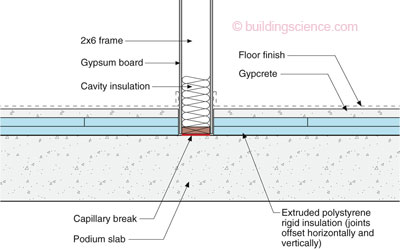
Figure 7: Top Side Interior— Note the liquid gypsum floor leveling system that provides fabulous fire protection and acoustical properties (a.k.a. “Gypcrete”). It does something else for us that reduces risk – it makes the floor pretty much “spill proof”. Nothing gets through it.
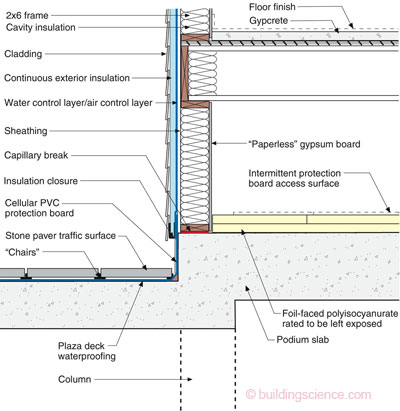
Figure 8: Conditioned Crawlspace—Easiest to construct but complicates life with respect to “access” due to the finished floor being located above the podium slab. The crawlspace has to be conditioned and compartmentalized. The crawlspace is a good place for ducts and plumbing.
Figure 6 and Figure 7 use the “fill in” approach mentioned earlier. It allows the slab to be open during much of the construction process and sequences the insulation and subfloor installation such that it occurs after “dry in.”
One of the “tricks” you see commercially is the use of a liquid gypsum floor leveling system that provides fabulous fire protection and acoustical properties (a.k.a. “Gypcrete”). It does something else for us that reduces risk – it makes the floor pretty much “spill proof.” Nothing gets through it. You are not going to see this much with residential single-family detached construction but in commercial construction and multi-family wood frame it “rocks” (a.k.a. “liquid sheet rock”).
There is only one “bottom-side” approach and it involves separating the podium slab from the plaza deck slab (Figure 9). Note that with this approach the columns are still thermal bridges that could be a real problem for you in very cold climates like climate zone 8 and climate zone 9 – in which case small heaters are added to this space or the columns wrapped with “heat tape” - no kidding. This approach is the least risky from a long-term performance issue – but it sure irritates the structural engineer. Which could be a good thing as now they have some excitement in their life. And excitement is good – sometimes. Some of them even become slab happy.
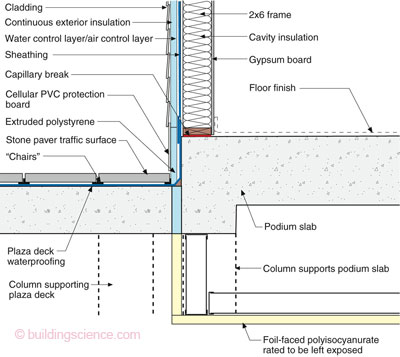
Figure 9: Bottom Side Approach—Columns are still thermal bridges that can be a real problem in very cold climates like climate zone 8 and climate zone 9 – in which case small heaters are added to this space or the columns wrapped with “heat tape.”
Footnotes:
I am not going to get into an argument about “optimum” insulation R-values because most of the time the parameters (“boundary conditions”) are arbitrary and capricious and pretty much picked or based on getting the “right answer” depending on who wants to prove their point. Oh, all right, I am arguing here, and I am probably in the minority. The comfort thing is a big deal to me – if you want to argue the energy thing why not make one of your windows smaller – or buy a really, really good sliding door and don’t complicate my slab construction. We have made it work with 3 inches of rigid insulation but it was irritating – to us – and I struggle to see its worth if I ask myself where else I could have spent the money better.
The reason they are so boring is that nothing ever much bad happens in structural engineering – buildings and other things we build don’t fall down anymore – not much excitement - anymore. Structural engineering used to be very exciting. The profession’s application of Limit States is a model for the rest of us – more than a hundred years old and still going strong – Queen Victoria would be proud. I am leaving this thread in this footnote cryptic – let’s see if someone other than a structural engineer makes the connections. There will be a prize.