Seventeen years ago we bought an old house—a fixer upper—over a hundred years old—in Westford, MA. I was going to make sure it would end up energy efficient. Did the rubble foundation thing well—very well—so well that I wouldn’t change a thing if I did it again today. Wrote about it already (BSI-041: Rubble Foundations).
Did the attached barn—not particularly well—and ended up redoing it. Wrote about it (BSI-056: Leiningen vs. The Ants Redux). Took the heat (pun intended) from the folks in the peanut gallery after I wrote about it—deservedly so—but you have to talk about the good and the bad—and worse than the bad, the embarrassing. I beat the ants but it took a long time.
Did the roof thing—unvented with spray foam. The roof thing was passable, but not great. Knew it when I did it that it was not great but that I would eventually get around to it in a couple of years and change it from passable to great. Actually, it wasn’t even passable. I had to do a quick fix. Read on.
Well one thing led to another and another and a couple of years turned into a decade. And still nothing. The quick fix was tolerable and the pressure was off. Finally, when the shingles gave out, seventeen years later, it was time. It was time to over-roof and do what I planned originally before I ran out of money and time and thought I could get away with doing only half the job.
What was the original roof construction? It was a completely uninsulated and unvented roof. The attic had windows at the gable ends but the attic was unfinished.
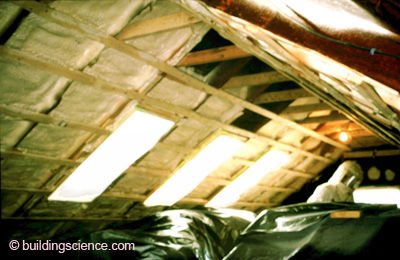
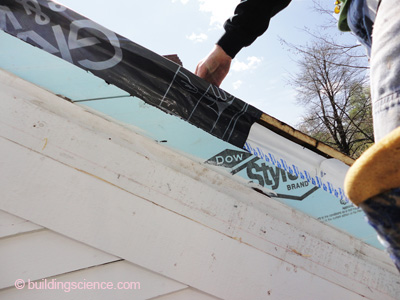
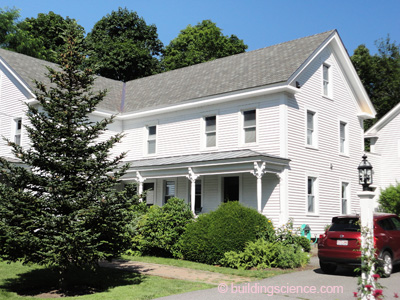
In went some skylights on the back-side (Photograph 1) and the rafters got sprayed full of 2 lb/ft3 density spray polyurethane foam (SPF) (Photograph 2). The attic was turned into living space. Got two bedrooms and a bathroom, a place to store old ASHRAE Journals and a place for mechanicals. Got ourselves a kinda R-35 roof assembly when you factor in the thermal bridging. In 1995 that seemed pretty good. Installed new shingles over a fully adhered membrane and the house looked pretty darn good (Photograph 3). I felt pretty clever. Life was good.
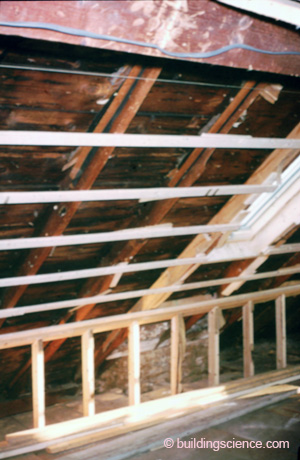
Photograph 1 (above left): Original Roof – Uninsulated rafter framing with board roof deck. Furring straightens out rafter plane for smooth plaster finish. Yes, skylights went in. Yes, they are big thermal holes. But a space needs to be a space or what is the point. It took us many millennia to get out of caves. Kind of dumb to build one on the top of your house. Let the light shine in. Dormers were considered but we didn’t want to change the appearance that drastically.
Photograph 2 (above right): Rafter Cavity Insulation – high-density spray polyurethane foam fills rafter cavity (2 lb/ft3 density).
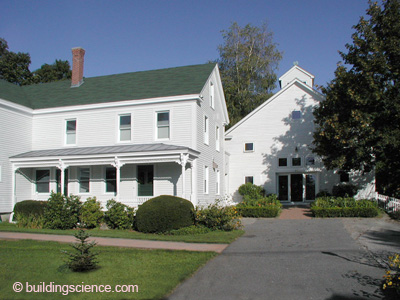
Photograph 3: Finished Roof Back Then – Looked pretty good seventeen years ago. New shingles were installed over a fully adhered membrane applied directly to the original roof decking.
Then the first winter came (Photograph 4). Ouch. What to do? Easy. Just don’t tell anyone and don’t invite anyone who knows anything about this stuff over during the day during the winter. That didn’t work. I was a marked man. Folks knew where I lived and wondered what kinda house the self proclaimed building guru lived in. Double ouch. It got worse.
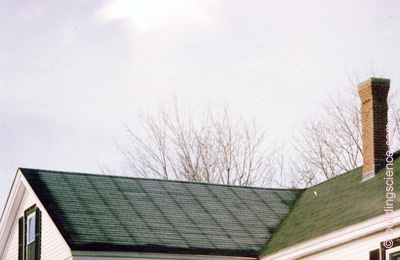
Photograph 4: Thermal Bridging – Don’t need no stinkin infra-red
camera. Ouch. Only invited friends over at night so I wouldn’t be embarrassed.
The attic was cold in the winter. Then the summer came. The attic was hot in the summer. That was not a surprise after the attic being cold in the winter.
I am real good at fixing stuff—especially stuff that I break. Air conditioning went into the attic for the summer and portable heaters went into the attic for the winter and I was done. Throw some energy at it - that will fix it. And it did. I am after all, first and foremost a mechanical engineer. We mechanical engineers can heat and cool anything. And we are good at blaming the architect for the lousy building enclosure that we are stuck dealing with. Except this time the enclosure was my fault. Not enough insulation. One day I was going to come clean and get it done right. When the shingles needed replacing it was time (Photograph 5).
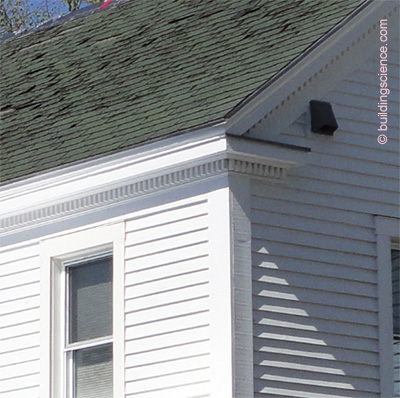
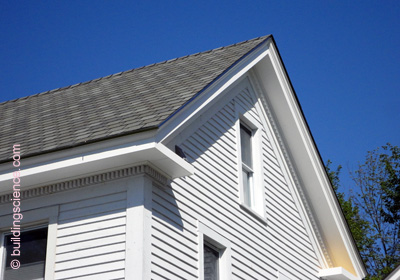
Photograph 5: Time To Replace Shingles—Note the condition of the shingles. Yes, it was time to replace them. Now check out the original roof trim details. Note the dentil molding, the fascia, the crown molding and the depth of the overhangs.
What was the strategy? Actually, it was the original strategy, just fully executed. I did the first part right. The spray foam in the cavities 17 years ago and the fully adhered membrane over the top. I just didn’t get around to doing the second part - rigid insulation over the top of the existing roof deck.1 Strip the shingles, expose the deck, install a fully adhered membrane and go to town with rigid insulation. How much rigid insulation? By this time I had it figured out. Nothing like two more decades of experience to draw on. I needed at least R-50 just to control the ice damming in my climate zone. Oh, yeah, forgot to tell you about ice damming. Wrote about the ice damming thing already as well (BSI-046: Dam Ice Dam). We didn’t actually get ice dams, but I think it was more due to luck than skill. Simple roofs don’t collect and hold snow. We had a simple roof. Anyway, to do it all, ice damming, comfort, noise and energy2—I figured at least R-60.
If I already had R-35 I would need another R-25 which is about 4 inches of polyisocyanurate. So I added 6 inches. You all knew that is where this was going. I added another R-36 getting around R-70.3 Plus, I needed to prove something. Not what you think. Aesthetics. Huh? Read on. Besides, the cost of adding the extra 2 inches was nothing compared to the cost of the trim details and framing necessary to over-roof.
So the journey started—again. Stripped the old trashed shingles, stripped the old fully adhered membrane exposing the original boards once again. Guess what? The old board sheathing was in great shape. I had all that closed-cell spray polyurethane foam underneath the deck for 17 years and nothing rotted. No surprise there. No roof leaks, no problems. No air leaks from underneath, no problems. Installed a new fully adhered membrane to the top of the old board sheathing prior to adding all that rigid insulation.4
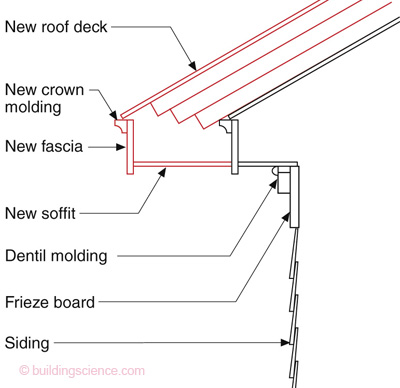
Figure 1: Roof Edge Detail—Overhang extended to hide the thickness of the over-roofing rigid insulation.
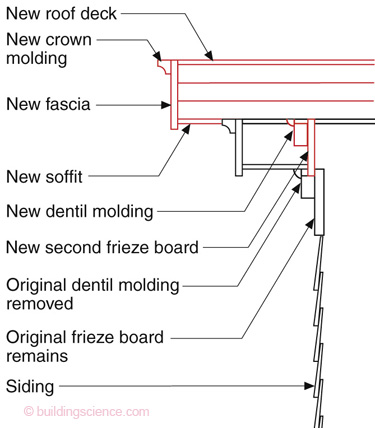
Figure 2: Gable End Detail—Overhang cut and then rebuilt to hide the thickness of the over-roofing rigid insulation.
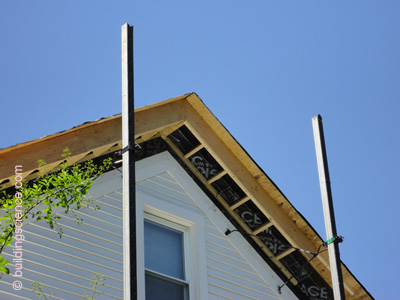
Now comes the really, really big point. The 6 inches of rigid insulation added to the top of the existing roof deck needed to be done in a manner that was “invisible”. The trim, the frieze boards, the fascia and the overhangs all had to look like they “belonged”. They had to look “original”. Don’t believe me? Ask an architect. Trust me on this. I didn’t get it at first. I get it now. If it does not look “right” it is not “right”. Don’t do ugly things. Figure 1 and Figure 2 show the general approach. The overhangs on the gable ends were cut off, rigid insulation added to the top (Photograph 6) and then the overhangs rebuilt as box beams (Photograph 7). Then the box beams were trimmed out (Photograph 8) and a double frieze board installed to hide the increase in roof thickness without requiring redoing the gable end siding (Photograph 9).
Photograph 6: Over-Roof Insulation—The gable overhang has been cut flush with the wall sheathing. Also note that a new fully adhered membrane is installed on the original roof deck replacing the one installed 17 years ago is folded down to catch the top edge of the wall water control layer. Further note that the 3 layers of 2-inch rigid insulation are cantilevered over the wall to take into account the likely possibility of retrofitting exterior continuous insulation on exterior wall framing in the future. The exposed edges of the 3 layers of rigid insulation are to be sealed with another layer of membrane.
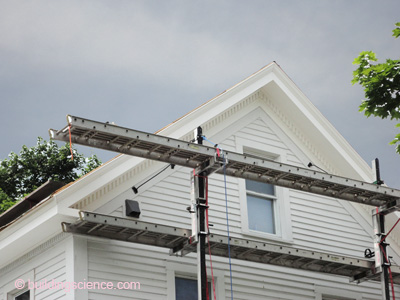
Photograph 7: Box Beam Gable Framing—New gable overhang is framed in the form of a box beam hanging off of a new layer of roof plywood roof sheathing cantilevered over the top of the 3 layers of rigid insulation. The exposed edges of the 3 layers of rigid insulation are no longer exposed.
Photograph 8: Cellular PVC Trim—Trim fascia and soffit installed. Dentil molding and crown molding and frieze board to come.
Photograph 9: Trim Installed—Dentil molding, crown molding and double frieze board done. Note that a second frieze board is installed catching the top edge of the original frieze board. Double frieze boards are not uncommon in New England so that the second frieze board does not look out of place. This approach allows us to leave the original frieze boards in place along with not having to remove and reconstruct the gable siding. Next step stainless steel drip edges and shingles.
On the front of the roof edges of the roofs, the overhangs were extended to hide the thickness of the roof insulation (Photograph 10). The original rafters are extended—but original roof deck sheathing cut back to be flush with the original wall sheathing. This allows the new roof membrane installed on the original roof deck to run down and catch the wall water control and air control layer. Why not just cut the original rafters flush with the wall as well and do the box beam thing on the front similar to what was done on the gable ends? Good question. I felt the overhang would have been a bit too large for that treatment on the front. Had I added a bunch of insulation to the walls as well at the same time making the wall much thicker thereby reducing the overhang I would have done the box beam approach like I did when I fought the ants (see BSI-056: Leiningen vs. The Ants Redux). Since I intended to phase the work—do the over-roof first—and then the walls later—maybe a lot later—the rafter extension approach was the one I went with.
Photograph 10: Roof Edge Framing and Trim—Original rafters are extended – but original roof deck sheathing cut back to be flush with the original wall sheathing. This allows the new roof membrane installed on the original roof deck to run down and catch the wall water control and air control layer. Original dentil molding and frieze board are left in place. New cellular PVC fascia, crown molding and soffit installed. Note the 2 lb/ft3 spray polyurethane foam enhancing the air seal around the extended rafters. This foam is applied over the top of the membrane that came down from the roof deck catching the wall control layers.
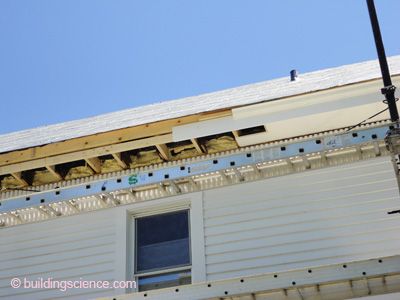
One of the keys to over-roofing is to tie the air control layer of the roof assembly to the air control layer of the wall assembly. On the gable ends this was pretty easy. The fully adhered membrane wrapped down over the cut back roof deck to tie into the wall water control layer and air control layer (Photograph 11). On the front of the roof edges the original roof deck sheathing was cut back flush with the wall and the fully adhered membrane folded down around the rafter tails to catch the wall water control layer and air control layer. This was then “foamed” to complete the air seal. Go back and check out Photograph 10.
Photograph 11: Roof to Wall Air Seal—Note the connection of the new roof deck membrane overlapping the trimmed back original gable overhang and catching the “white” housewrap water control layer and air control layer behind the wall exterior insulation (the “blue” layer of foam). The three layers of rigid insulation have yet to be installed over the top of the roof decking at this point. This air seal is pretty darn good. Note that there was no air seal at this location originally. Dumb. I have to come clean here as well. I resided 17 years ago over one layer of continuous rigid insulation. Not enough. Dumb. Should have installed much more. I will get around to fixing this eventually as well. Yes, I will share the experience. I can point out just how dumb I was on the walls as well 17 years ago. But the real mistake was not making the air seal at the top of the walls 17 years ago. No excuse, I knew better then. Got sloppy, careless. It happens, even to self proclaimed gurus.
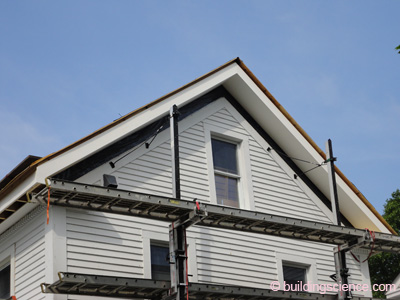
The finished roof hides the insulation over-roofing (Photograph 12 and Photograph 13). Compare the trim details of Photograph 13 with the original trim details of Photograph 5. Not bad eh? This stuff needs to be “invisible” or it will not happen. Find yourself an architect who gets it and helps make it invisible.
Photograph 12: New Shingles Installed—Neighbors were pretty nervous until the shingles got installed. What is the crazy guy up to this year? I sure hope it does not end up looking dumb. I heard he had ants. Sheesh. Talk, talk, talk. Neighbors are such a pain.
Photograph 13: Finished Trim Details—Hah! Can’t tell this roof is a super insulated over-roof – which was the whole point. This stuff needs to be “invisible” or it will not happen. Find yourself an architect who gets it and helps make it invisible.
Notice the increase in overhang dimension on the gable ends. This is not just to match the overhang on the front. Apparently, I did not add enough insulation to the walls 17 years ago either. The increased overhang sets the stage for my next project, over cladding the walls.5 Later. Maybe much later. Just remember, whatever you do, don’t do ugly things.
Footnotes:
Because I phased the work, I had to use spray polyurethane foam—the 2 lb/ft3 density stuff—in the cavities during the original renovation. If I had done the over-roofing at the same time I probably would have used cellulose in the rafter cavities. The rigid insulation over-roof would have controlled the temperature of the condensing surface—the underside of the roof deck—so that I would not have had to use the spray foam except at the perimeter to provide the air seal to the tops of the walls.
The energy argument is argumentative. Payback is not the way to do it, at least not in my opinion. Net zero cash flow is much better. And trade offs with other often overlooked factors such as downsizing or eliminating mechanicals is better still. But at the end the comfort and quiet thing won the day for me.
Had to look respectable to the Passive House folks—they had figured out where I lived. Also, wanted to show them that high levels of insulation do not have to look ugly. OK, chill folks. I am now kidding. You won’t believe the hate mail I got after I mentioned that highly insulated buildings with double walls end up looking like ugly boxes because the walls are so tricky to construct. Big mistake. Call them weird Germans, call them obsessive, but do not call their buildings ugly. Stop with the emails and the photographs, already. There are in fact some beautiful Passive Houses. But double walls are tricky to construct, increase the risk of moisture damage and in my view they don’t make a lot of sense. Give me a single advanced frame 2x6 wall with lots of insulating sheathing any day. I did the double wall thing 30 years ago before there ever was a Passive House. It was dumb then. It is dumb now.
The fully adhered membrane on the original roof deck boards is for air control not for water control. The fully adhered membrane over the top surface of the upper layer of plywood directly under the roof shingles is for water control.
Took the opportunity to get rid of an unnecessary chimney and upgrade the skylights. The skylight thing was more complicated than it should have been. Do you realize there is only one manufacturer of triple glazed gas filled spectrally selective skylights in the United States? Amazing. One day folks will actually think that energy might be important. It wasn’t easy but at the end of the day I got my R-5 skylights with the 0.2 SHGC – kind of filling my thermal holes in my R-70 plus roof. Don’t say it. Don’t go there. Remember the attic cave analogy.