Wood moves. Drywall does not move. Interesting problem. The more you attach drywall to wood, the more cracks you have. Easy, attach the drywall to less wood, and, in a way, that allows the wood to move.
Drywall (gypsum board) has to:
- provide rigidity
- provide aesthetrics
- provide fire protection
- not leak air
Concerns
Wood moves. Drywall does not move. Interesting problem. The more you attach drywall to wood, the more cracks you have. Easy, attach the drywall to less wood, and, in a way, that allows the wood to move.
Nail pops happen because as wood dries, it shrinks. Nails do not shrink. Actually, nails do not pop. The wood shrinks away from the back face of the drywall as it dries. How about getting dry wood? Sure. Next question. Better to use shorter nails. Even better, use glue. With glue, as the wood shrinks, it pulls the drywall inwards with it. But, you can’t only use glue, you’ve got to use something until the glue begins to work. Now, shorter nails don’t hold very well, and we don’t want to use more of them, so use shorter screws and glue.
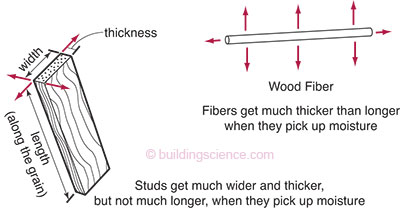
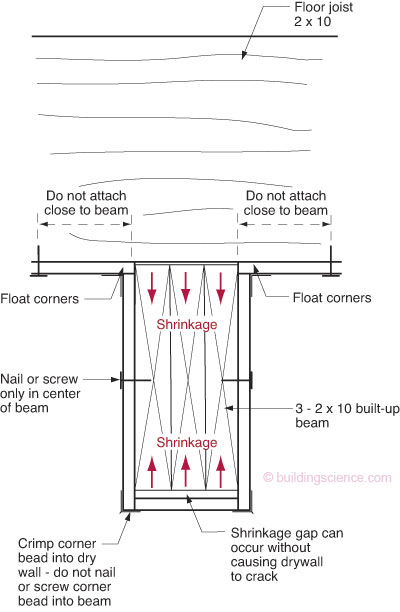
Wood is weird. When it shrinks, it shrinks differently along the grain than perpendicular to the grain. It shrinks much more at right angles to the grain, than along the grain. Studs don’t get shorter, but they get thinner in thickness and in width (Figure 1 and 2). When we attach drywall, we need to keep this in mind especially when we box in built-up beams made out of 2x10s and 2x12s. What’s nice about engineered wood is it doesn’t shrink. Drywall likes engineered wood, especially above windows as header material. Drywall doesn’t like big pieces of real wood.
Figure 1: Wood Shrinkage
Figure 2: Built-up Beam Shrinkage—Float corners and crimp corner bead without nails to allow for beam shrinkage
Stairwells provide an interesting problem. With real wood floor joists (2x10s), you get more shrinkage in the 9-1/4 inches of floor framing (remember this is at right angles to the grain of the floor joists) than in the 8 feet of wall framing (along the grain of the studs) above and below. Old timers used to balloon frame two story spaces for this reason, or provide control joints between the floors in the plaster or drywall. Better to use floor trusses or engineered wood joists, they don’t shrink.
Truss Uplift
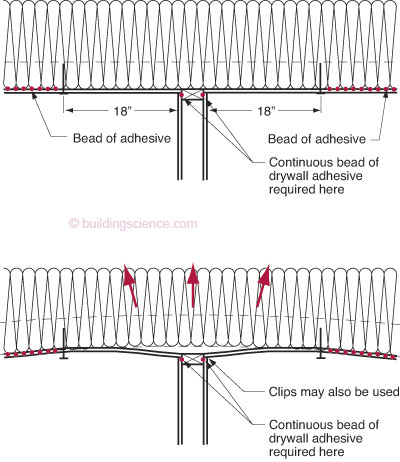
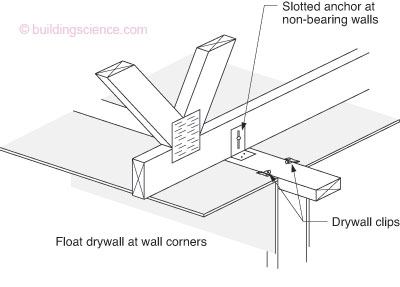
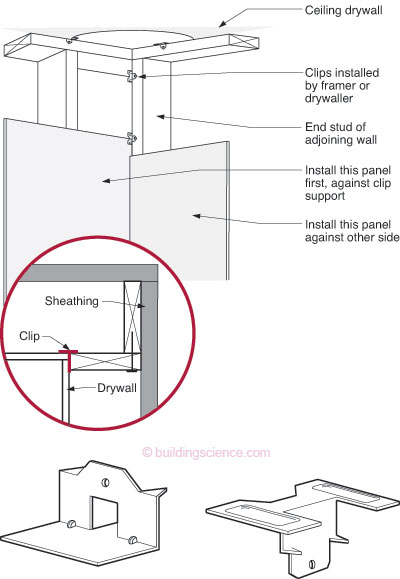
What can we say about truss uplift? You can’t prevent it. Truss uplift occurs because of moisture content differences between the upper and lower chords of wood trusses. Moisture content differences are inevitable if one member is cold and the other member is warm. If you insulate a wood roof truss, the lower chords will be warm and the upper ones will be cold. Remember, truss uplift is not truss uplift if the owner can’t see it. Let the trusses move. Floating corners for drywall attachment is the way to go. The truss moves, the drywall bends, no crack, end of story (Figures 3 and 4). This is also the same principle to use at corners of exterior and interior walls. Why use three stud corners? If we attach the drywall to the wood on both sides of the corner, when the wood shrinks, the drywall cracks. Two stud corners are better. Don’t attach the drywall (Figure 5). Let the wood move. If you are going to use a three stud corner, at least don’t attach the drywall to one of the sides, just support the drywall until it is taped. Let the tape hold the corner together.
Figure 3: Truss Uplift—do not install ceiling drywall adhesive or ceiling drywall screws/nails closer than 18" to interior partition top plates in order to control drywall cracking from truss uplift; "floating corners" of ceiling drywall aloow truss movement without drywall cracking: note that a continouse bead of drywall adhesive is required along both sides of top plates for wall drywall ot provide air flow retarder continuity.
Figure 4: Drywall Clips and Slotted Anchor or Non-Bearing Wall
Figure 5: Typical Clip Support for Gypsum Board—use of clip support for gypsum board results in floating corners and significantly less drywall cracking

