This one-story slab-on-grade enclosure is designed for Albuquerque, NM (Hot-Dry/Mixed-Dry Climate). It features a vented attic with a raised heel truss and cavity insulation at the attic floor, and asphalt shingles. The 2x6 advanced wood frame walls are insulated with cavity insulation and feature a stucco finish. The slab is left uninsulated with the slab edge insulated and finished on the exterior with 1” rigid insulation and fiber cement cover board.
Enclosure Design

Construction Recommendations
- Foundation: Slab-on-grade
- Above Grade Walls: Wood frame
- Cladding: Stucco
- Attic: Unconditioned
- Roof: Asphalt shingles
Building Science Notes
Ducts in conditioned space - This building profile is designed to accommodate HVAC equipment and ducts in the living space, specifically in dropped soffits where design and layout permit. HVAC ducts should not be run in exterior walls or the slab.
Air sealing details at transitions – Air sealing can be particularly difficult, but no less important, at assembly transitions such between attached garages and living spaces.
- Attached garages – The building enclosure surfaces shared between conditioned space and an unconditioned garage must have a continuous air barrier. See Figure 1 and Air Sealing Details for details in terms of using sealants and rigid insulation to create a continuous air barrier between the attached garage and living space.

Figure 1
Drying mechanisms – In any climate, vapor control is based on the relationships among the following: the permeability of wall components, the type of cladding (reservoir or non-reservoir), the presence/lack/nature of an air space, and the magnitude/duration of the vapor drive (based on the relationship between the exterior and interior moisture content and temperature differences). The type of sheathing and housewrap used in any wall assembly must be based on an understanding of these inter-relationships. See “Insulations, Sheathings, and Vapor Diffusion Retarders” for more information. This wall assembly permits drying to both the interior and the exterior (depending on the selection of exterior sheathing - see the Building Materials Property Table.
Drainage plane, air barrier, and vapor control – The drainage plane in this wall assembly is the Dupont StuccoWrap® weatherlapped onto the OSB structural sheathing (the building paper just exterior to the drainage plane is the bond break for the stucco cladding). An annual precipitation of 8 inches (30-year average for Albuquerque) means that a face sealed stucco cladding can work, but this system is designed with a drainage plane as a “belt and suspenders” approach for long-term durability. The air barrier is the interior gypsum board installed using the Airtight Drywall approach (see Air Sealing Details). The wall and roof assemblies in this building are “flow-through” assemblies, with moderate to high relative vapor permeability in all components of the wall and roof. This bi-directional drying is the preferred approach in mixed-dry climates.
Rough opening flashing – Window and door flashing details are wall assembly or cladding specific and depend on whether the windows are installed before or after the drainage plane. Refer to the Water Management Guide for more information.
Advanced framing – This wall assembly employs all of the advanced framing methods except alternative shear resistance; that is, structural sheathing is used. See Advanced Framing Details.
Framing on slabs – Installing a capillary break between the sill plate and a concrete slab on all walls—exterior, interior, partition—is good practice. A closed cell foam sill sealer or gasket works well. Alternatively, a strip of sheet polyethylene can be used. This isolates the framing from any source of moisture that may be either in or on the concrete slab (and using sill sealer on all walls maintains the same wall height).
Soil gas ventilation – The sub-slab to roof vent system handles conditions that are difficult if not impossible to assess prior to completion of the structure—resultant confined concentrations of air-borne radon, soil treatments (termiticides, pesticides) methane, etc. The cost of this “ounce” of prevention is well balanced against the cost of the “pound” of cure.
Sub-slab stone bed - The four-inch deep, 3/4-inch stone bed functions as a granular capillary break, a drainage pad, and a sub-slab air pressure field extender for the soil gas ventilation system. Without it, a soil gas ventilation system is not practically possible and the only capillary break between the slab and ground is the polyethylene vapor barrier.
Thermal barrier – In general, we recommend cavity-warming exterior rigid insulation in climates where the average monthly temperature for the coldest month of the year goes below 45°F. But in this assembly, the excellent drying potential of the “flow-through” wall assembly is achieved in part by the absence of any rigid insulation with relatively low vapor permeability. In dry climates with significant, but not extreme, periods of winter temperatures below 45°F, either approach to thermal performance/vapor control works well. The heat loss through the slab perimeter is significant enough to warrant slab-edge insulation. See Termite Control under Field Experience Notes for the detail.
Vented attic – Soffit and ridge vents provide more effective attic ventilation than gable-end vents. Gable exhaust fans do not provide effective attic ventilation. They are generally temperature-controlled, when relative humidity is often the condition that requires higher ventilation rates. They can also depressurize the house causing loss of conditioned air. Generally, the area of the gable and soffit vents, combined with the leakage of the attic ceiling, is such that the fan pulls air not just from the exterior vent but from the conditioned space below.
Climate Specific Details
- Mechanical systems
- Heating – Our recommendation for the use of combination space/domestic water heating systems (“Combo” units) comes heavily qualified to high performance production home builders. See the BSC technical resource “Combo Space/Water Heating Systems – ‘Duo Diligence." See Figure 2.

Figure 2
Cooling - Evaporative cooling is prevalent in Mixed-Dry Climates. We recommend refrigerant cooling in high performance homes in this climate region for three reasons:
Refrigerant cooling permits year-round controlled ventilation; evaporative cooling does not.
Evaporative cooling can be prone to moisture and indoor air quality problems without frequent and diligent system maintenance; refrigerant cooling is not.
While there can be a slight energy penalty with refrigerant cooling in comparison to evaporative, this penalty must be balanced against the year-round comfort provided by refrigerant cooling (evaporative cooling has difficulty supplying comfort in high humidity situations) and the substantial water savings associated with refrigerant cooling (a growing issue in mixed-dry climates).
Follow appropriate sizing procedures. Click here for more detailed information.
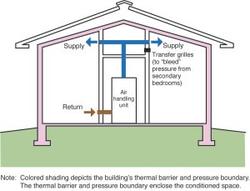
Ducting - Single return requires transfer grilles to provide path and avoid pressurizing bedrooms as shown in accompanying figures. Appropriate sizing for ducts, including these pressure relief methods, can be found in the technical resources listed above. See Figures 3a-d.
Figure 3a-d

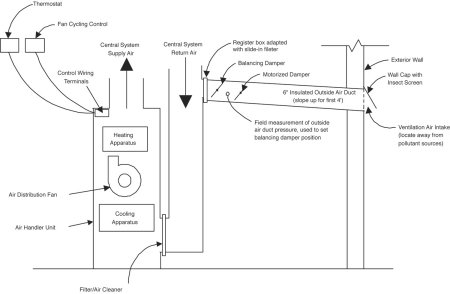
Controlled mechanical ventilation - Intermittent central-fan-integrated supply, designed to ASHRAE 62.2P rate, with fan cycling controls set to operate the central air handler as much as 33% of the time, but not less than 25% of the time, occurring within at least every three hours to provide ventilation air distribution and whole-house averaging of air quality and comfort conditions (installed cost: $125 to $150). Optionally include a normally-closed motorized damper in the outside duct with the AirCycler FRV control (installed cost: $50 to $60). See Figures 4, 5 and 6.
Figure 4
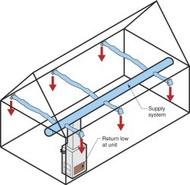
Figure 5Figure 6 - Interior Closet Configuration
Termite management – Termites are best managed with a three-pronged approach that deals with the three things termites need—cover from sunlight, moisture, and food (wood or paper):
Reduced cover – Keep plantings 3 feet away from the building perimeter, thin the ground cover (wood mulch or pea stone) to no more than two inches depth for the first 18 inches around the building, and maintain any termite inspection zone on the exterior of the foundation above grade.
Control moisture – Maintain slope away from building as shown, carry roof load of water at least three feet away from building, and make sure that irrigation is directed away from the building.
Chemical treatment – Use an environmentally-appropriate soil treatment (such as Termidor®) and a building materials treatment (such as Bora-Care®) for termite-prone near-grade wood materials.
Inter-relationship of first three points – Since a builder and a homeowner’s ability to employ or stick to each of the three strategies above will vary, make sure that an inability to fully employ one strategy is compensated for by complete rigor with the others. For example, if for some reason, chemical treatment of soil or building materials is not an option, then complete rigor in moisture control and ground cover is required.
Landscaping for wildfire control – Keeping woody materials of any type, living or otherwise, away from the building is good practice in dry climates where wildfire presents a significant risk.
Field Experience Notes
Termite control – Local codes and interpretations by building inspectors can make details involving slab insulation difficult. We have found that building officials accept the flashing/fiber cement board shown in the building profile and Figure 7.

Figure 7
Termite flashing continuity – In order for the metal flashing to be effective, all joints must be epoxy-sealed (or welded) and the horizontal edge must be epoxy-sealed to the concrete.
HVAC commissioning – The most efficient equipment means little if the system is not set up and started up properly. Follow high performance start-up procedures. In dry climates, it is generally a good idea to set up the air distribution fan to run a little longer at the end of each cycle to bump up the sensible efficiency.
Location of HVAC outdoor unit – It’s tempting to put the condenser right on the roof where evaporative cooling units are typically located, particularly when lot lines are really tight. We do not recommend rooftop location of the condenser for the following reasons: it makes even routine maintenance more difficult; it puts the unit at what is most likely the hottest spot on the entire property; and it introduces more roof penetrations.
Energy trusses – There are a number of different truss configurations that yield greater depth at the heel, but they vary quite a bit in cost. The truss shown in Figure 8 (sometimes called a “slider” truss) has proven to be among the most cost-competitive. And of course, the pitch of the roof affects just how much insulation you can get at this location, regardless of the type of truss.

Figure 8
Advanced framing - For a technical resource that may help with resistance to advanced framing methods from local code officials, see the Building Safety Journal article written by Peter Yost of BSC.
Slabs – In dry climates, it is quite common for builders to use a sand layer in between the polyethylene sheet and the cast concrete to prevent differential drying and cracking problems. This moisture-holding layer should never be placed between the poly and concrete. Differential drying and subsequent cracking should be handled with a low water content concrete and wetted burlap covering. See this technical resource for more information.
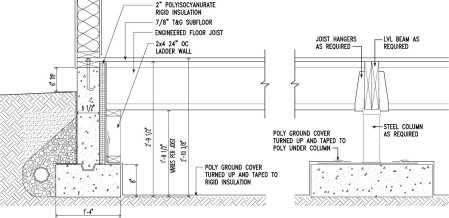
Keeping ducts in conditioned space – Many builders in Mixed-Dry climates build in areas where the prevailing architecture can make locating all ducts and HVAC equipment in conditioned space more than a bit challenging, particularly when moving from smaller, more affordable homes to more architecturally complex upgrade homes. Moving from slab-on-grade to a conditioned crawlspace is one way to maintain the local architectural vernacular and high performance. Figure 9 shows how one Mixed-Dry climate Building America production builder used the conditioned crawlspace to make the change cost-efficiently, in terms of builder construction costs, homeowner operating costs, and maintained energy and comfort. Here are some points to remember when making the change from slab-on-grade to a conditioned crawlspace.
Figure 9
Conditioned crawlspace – Conditioning of the crawlspace means that this space must be constructed much like a living space; it must be supplied by the HVAC system and have a transfer grille to return air back to the HVAC system located in the living space. The supply air should be directed horizontally across the crawlspace with good enough "throw" to provide some mixing, not directed down at the floor. Sizing of the supply air should be about 5% of the conditioned crawlspace floor area (for example: 0.05cfm/ft2*1600ft2=80 cfm for a 1600 ft2 conditioned crawlspace). A single 6" diameter supply duct typically suffices. Transfer air should go back to the central area of the living space above the crawlspace. Two grilles (10 inches by 4 inches) on opposite sides of the crawlspace will usually be sufficient. The transfer area should be calculated in the same manner as for closed bedrooms connecting to hallways, using the 3 Pa pressure difference limit. Some form of mechanical moisture control for the crawlspace is necessary. We recommend one of the following approaches:
Controlled ventilation strategy using the intermittent central fan-integrated supply; it provides both mixing and moisture removal for the crawlspace as well as the house.
A stand-alone dehumidifier installed in the crawlspace.
A continuously-operating crawlspace exhaust fan with make-up air extracted from the house.
In this assembly the rigid insulation is applied to the interior face of the exterior foundation walls. Moisture control is important to proper performance, in particular the vapor barrier ground cover on the floor of the crawlspace. The vapor barrier must be continuous and sealed to the perimeter wall and any supporting piers.
This assembly may require discussion with the local building code official. See the Building Safety Journal article written by Peter Yost of BSC.
Crawlspace access – The preferred location for crawlspace access is through the subfloor; any access through the perimeter wall must be airsealed and insulated.
Air sealing – Most codes can be interpreted to require only protection of foam from “ignition” in crawlspaces (“where entry is made only for service of utilities ”). The same applies to foam at the rim joist (this is an interstitial space protected from ignition by gypsum wall board on one side and floor sheathing on the other). Protection from ignition can be accomplished with 11/2-inch-thick (38 mm) mineral fiber insulation, 1/4-inch-thick (6.4 mm) wood structural panels, 3/8-inch (9.5 mm) particleboard, 1/4-inch (6.4 mm) hardboard, 3/8-inch (9.5 mm) gypsum board, or corrosion-resistant steel having a base metal thickness of 0.016 inch (0.406 mm).
Layout and floor framing – The introduction of floor framing means that floor plans and dimensions that worked well for a slab may not be efficient in terms of wood use in the floor framing package. Be prepared to investigate the relationship between design and efficient wood use. See the following technical resource for more information: “Using Wood Efficiently: From Optimizing Design to Minimizing the Dumpster.”
Material Compatibility and Substitutions
Interior latex paint - The substitution of low permeability interior finishes (vinyl wall paper, oil-based paints) for latex paint is strongly discouraged as drying to the interior is important in mixed climates.
Building papers with stucco – There must always be two components here: the bond break material and the drainage plane. Although StuccoWrap® is advertised as both a drainage plane material and the layer receiving the stucco, these two materials should never be combined or reversed in this assembly.
Exterior sheathing materials – In this assembly, the reservoir cladding means that a moisture sensitive material such as fiberboard should not be used. On the other hand, the lack of cavity-warming exterior insulation means that an impermeable sheathing such as thin-profile structural sheathing (e.g. Thermo-ply®, Energy Brace) should not be used. Plywood is an acceptable substitution for OSB in this wall assembly. For more information, see the Building Materials Property Table or “Insulations, Sheathings, and Vapor Diffusion Retarders.”
Cavity insulation materials – Acceptable cavity insulation includes any that have a relatively high vapor permeability—cellulose, fiberglass, foam (as long as air sealing is accomplished by a separate component or system when cellulose or fiberglass is used). User discretion can be based on properties other than building science.
Flooring - Because curing concrete releases significant moisture for several months after being cast, we recommend that a low w/c concrete ratio (
Gypsum wallboard – Areas of potentially high moisture, such as bathrooms, basements, and kitchens, are excellent candidates for non-paper faced wallboard systems (e.g. James Hardie’s Hardibacker®, GP’s DensArmor®, USG’s Fiberock®). In addition, paper-faced gypsum board should never be used as interior sheathing or backer for tub or shower surrounds where ceramic tile or marble (any material with joints or grout lines) is used as the finish.
XPS vs. EPS exterior foundation foam insulation – There are three rigid insulations appropriate for exterior use on foundations where the insulation will extend below grade and be in contact with soil conditions:
- XPS – This material’s density, impact resistance, and resistance to liquid penetration make it the preferred material.
- EPS – In areas where resistance to insects—termites and carpenter ants—is a desired or required characteristic of the insulation, EPS may be indicated, because it is the only foam insulation that comes with a borate-treatment. However, water penetration and subsequent leaching of the borate treatment require a capillary break between the soil and the insulation, This is best accomplished with a gravel layer or an Enkadrain® mat just exterior to the EPS insulation.
- Rigid fiberglass - A great material for exterior insulation because of its drainability and resistance to insect degradation. However, availability of this material has been and remains the main constraint of its use.