Decks are disarmingly simple. The ones we are going to deal with have conditioned space under them. They are nothing more than roofs that you walk on. But we tend to mess them up royally. Perhaps it is because we forget that they really are roofs and have to follow all the rules that roofs have to follow. We construct roofs that are either vented or unvented. When is the last time you saw a vented deck? That is one of the problems. We build decks or balconies like they should be vented but don’t vent them. I think it is pretty dumb to vent a deck, so that means we have to construct them following the rules of unvented roof assemblies.
When a roof is constructed to be unvented, it must be designed to control condensation. Too bad we don’t think that way when we construct most decks; I think I mentioned that already. So how do we do that? Easy, we insulate on the top of them or underneath them. But there are a bunch of things we need to watch out for when we pick one approach over the other. Before we get there, we need to deal with a few other things that are even more important. More important than condensation? Oh yeah. The rainwater thing for one.
For the rainwater thing we need to go to one of the Old Masters once again (Figure 1). Max Baker.1 Note the approach: drainage below the traffic surface. The traffic surface protects the waterproofing membrane or the “water control layer.” And just as important, there is a drainage gap above the water control layer/waterproofing membrane. You can’t have drainage without a drainage gap. Let me repeat this because it is a really, really big deal. No drainage without a drainage gap. And everything slopes to the drain. Remember old wise Roman engineering saying: “Don’t be a dope, slope.”
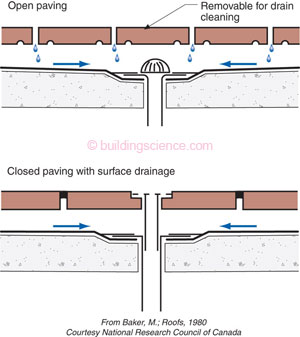
Figure 1: A Max Baker Classic—I just love this figure. It pretty much tells you how things are supposed to work. Rainwater control at its best. All we did was add color. From his book Roofs, 1980.
It gets even better with the lower image in Figure 1. A double-drain. Wow. You drain the traffic surface and you also drain the water control layer. Now some of you folks who are older than Aaron Rodgers2 will recognize double-drains from old plumbing textbooks. It’s how old guys used to do shower pans (Figure 2). Plumbers figured out this stuff before roofers figured out this stuff, and before Max Baker put it down in writing for the rest of us. You drain and then you drain again. Let me repeat this because it is also a really, really big deal. You drain and then you drain again. Trust me you do not ever want to argue with a plumber.
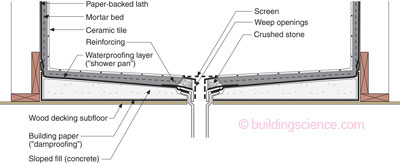
Figure 2: Old Fashioned Shower Pan—Look at that beautiful double drain and the two lines of water control – the top of the tile and the waterproofing layer or “shower pan” (OK, maybe three lines if you count the dampproofing underneath the whole kit and kaboodle). The roofers recognized that not a lot of drainage occurred in the mortar bed (despite the crushed stone around the drain); it was more like seepage and so in roof decks and balconies the roofers introduced a drainage gap. In more recent designs for shower pans we now see plumbers adding a drainage gap above the waterproofing layer and so the technology of plumbers and roofers has gone full circle.
So after we drain and drain again and provide drainage gaps and slopes to the drain what next? Ah, now the condensation part. Now we insulate. Where is, absolutely, the best place to add insulation? We know this answer already from the “Perfect Wall.”3 On the top of the structural deck and over the top of the water control layer, the air control layer and the vapor control layer. Take Max Baker’s Figure 1 and add the insulation in the right place and you get Figure 3.
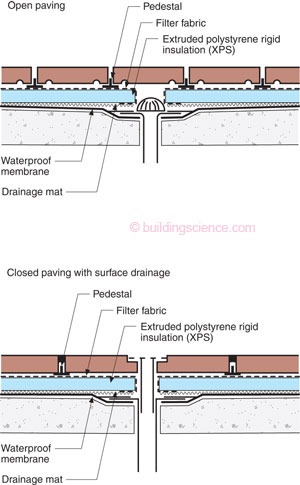
Figure 3: Insulating the Top of Decks—A water resistive insulation must be used. That pretty much means extruded polystyrene (XPS). A filter fabric keeps crud out of the joints of the insulation layer and prevents the lower drainage space (the drainage mat) from getting clogged. The pedestals elevate the traffic surface providing a drainage gap over the top of the insulation. Also note the drainage gap below the insulation. Remember to drain above and below the insulation, and you can’t drain without a gap.
The key to the images in Figure 3 are the provisions for drainage both above the insulation layer and below the insulation layer. You absolutely have to have both. The greenie weenies who do inverted membrane vegetative roofs might argue with me here but never forget that I am always right.4
When insulating the top of decks a water resistive insulation must be used. That pretty much means extruded polystyrene (XPS). A filter fabric keeps crud out of the joints of the insulation layer and prevents the lower drainage space (the drainage mat) from getting clogged. The pedestals elevate the traffic surface providing a drainage gap over the top of the insulation. Also note the drainage gap below the insulation. Remember to drain above and below the insulation; and you can’t drain without a gap.
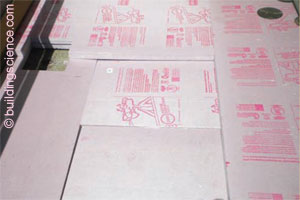
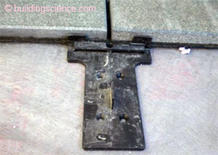
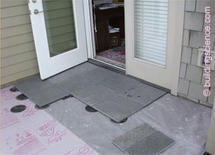
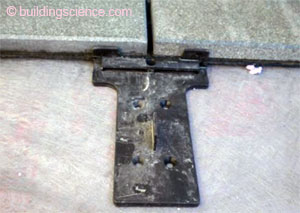
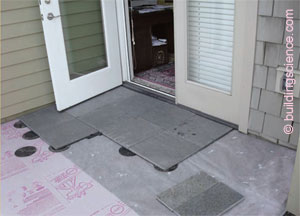
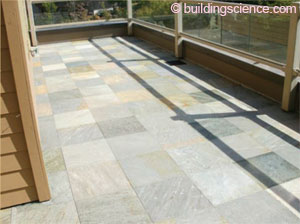
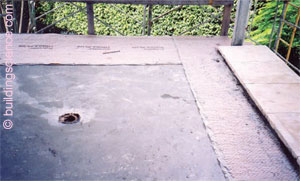
So what does this look like in real life? Check out Photograph 1—a waterproof membrane going down on the top of a structural deck. In “Joe Speak” this is the water control layer. It is also the air control layer and the vapor control layer. Over the top of this goes the rigid insulation—the thermal control layer. This insulation layer is typically extruded polystyrene (XPS) (Photograph 2). In this particular example the lower drainage gap is created by grooves in the underside of the rigid insulation. Neat eh? Over top of the rigid insulation goes a filter fabric and pedestals to hold the traffic layer (Photograph 3). In this particular example, we have stone pavers. Photograph 4 shows the layers working together—the rigid insulation, the filter fabric, the pedestals and the stone pavers. Photograph 5 shows the finished deck assembly. Looks normal. And it works.
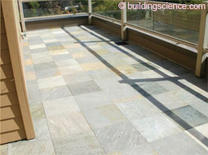
Photograph 1 (top left): Waterproof Membrane—A waterproof membrane going down on the top of a structural deck. In “Joe Speak” this is the water control layer. It is also the air control layer and the vapor control layer. Photograph 2 (top right): Thermal Control Layer—Over the top of the waterproof membrane goes the rigid insulation—the thermal control layer. This insulation layer is typically extruded polystyrene (XPS). In this particular example the lower drainage gap is created by grooves in the underside of the rigid insulation. Neat, eh? Photograph 3 (middle left): Filter Fabric and Pedestals—Over top of the rigid insulation goes a filter fabric and pedestals to hold the traffic layer. In this particular example we have stone pavers. Photograph 4 (middle right): Layers Working Together—The rigid insulation, the filter fabric, the pedestals and the stone pavers. Photograph 5 (bottom): Finished Deck Assembly—Looks normal. And it works.
Let’s go back to the rainwater control stuff for a little bit. Now that everyone thinks all of this is pretty easy it is time for a few curves. Let’s go to Florida because a lot of what I am going to talk about now happens there.
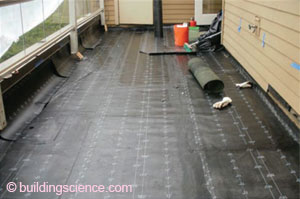
Photograph 6 shows a waterproof membrane installed on a structural deck. This is good. Note how it runs up the wall. This is also good. Also note the drainage mat going down over the top of the waterproof membrane. This is very, very good. Now look at Photograph 7. It shows the deck sloping to an interior located drain. This is awesome, as we shall see. With an interior located drain the water draining over the top of the waterproof membrane does not drain over the outside edge of the deck or balcony; it drains inward. This is a big deal with mud set tile. Photograph 8 shows mud set tile. Note the drainage mat under the mud set tile. OK, this example was done correctly with everything sloping inward away from the edge of the deck or balcony to an interior drain.
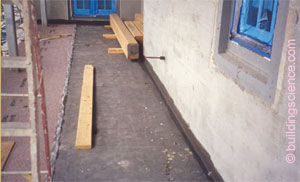
Photograph 6: Waterproof Membrane Installed on a Structural Deck—Note how it runs up the wall. This is good. Also note the drainage mat going down over the top of the waterproof membrane. This is very, very good.
Photograph 7: Interior Drain—Deck slopes to an interior located drain. With an interior located drain the water draining over the top of the waterproof membrane does not drain over the outside edge of the deck or balcony; it drains inward. This is a big deal with mud set tile.
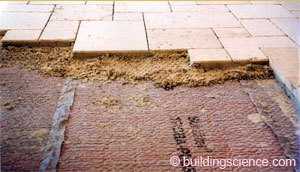
Photograph 8: Mud Set Tile—Note the drainage mat under the mud set tile.
So what happens when you drain over the outside edge? Check out Photograph 9. Amazing. Stalactites. Yes, it is true, there is a lot of “stuff” in mud set mortars that is water soluble that leaches out and stains the edges of balconies and decks. The thought was, in the old days, all you needed was a drip edge that caused the water to drip away from the face of the edge. Nope, not enough with all the crud in mud sets.5 You want a drip edge and you want to drain inwards away from the edge. We learned this with parapets in last month’s column and, we learned it here.
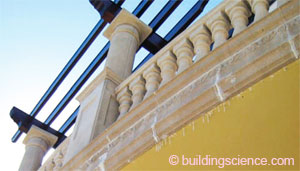
Photograph 9 (bottom right): Stalactites—Drainage of penetrating rainwater over the outside edge of decks and balconies. There is a lot of “stuff” in mud set mortars that is water soluble that leaches out and stains the edges of balconies and decks.
OK, now back to the condensation thing. What if you can’t insulate on the top of the deck and have to insulate underneath the deck? It happens, especially when you do not have space on the top of the deck for the insulation layer. Those darn architects again, not giving the rest of us space to make things work for them.
Let’s look at Figure 4. The water management is awesome. Note the continuity of the water control layer of the wall, connecting to the deck, connecting to the wall again. Also note the drainage gap in the wall behind the brick, the drainage gap on the deck under the tile, and the drainage gap behind the stucco. Note the base of the brick veneer is elevated and drains over the top of the tile. All good so far.6 So what is the problem? Ah, the insulation. It is not on the top of the deck, it is underneath the deck, and it’s the wrong kind. If it is underneath the deck it cannot be air permeable because, if it is, you get Photograph 10. Not good. Condensation is bad. Decay is bad. You cannot use fiberglass or cellulose insulation here. You have to go the air impermeable insulation route. You have to go to spray foam (Photograph 11).

Figure 4: Insulating the Bottom of Decks Wrong—The water management is awesome. Note the continuity of the water control layer of the wall, connecting to the deck, connecting to the wall again. Also note the drainage gap in the wall behind the brick, the drainage gap on the deck under the tile, and the drainage gap behind the stucco. Note the base of the brick veneer is elevated and drains over the top of the tile. So what is the problem? Ah, the insulation. It is not on the top of the deck; it is underneath the deck. And it’s the wrong kind; it is air permeable. If it is underneath the deck it cannot be air permeable.
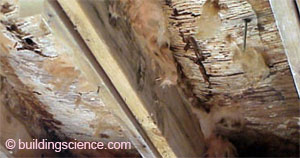
Photograph 10: Condensation and Decay are Bad—Air permeable insulation under deck can lead to condensation and decay. You would never construct an unvented roof this way. So why would you ever construct a deck this way?
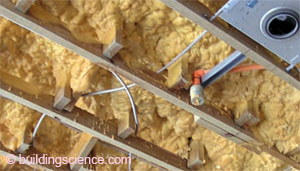
Photograph 11: Air Impermeable Insulation—Spray polyurethane foam is air impermeable. The low density stuff works in the South. The high density stuff works everywhere.
Check out Figure 5. The only thing that changes is the type of insulation used under the deck. With spray polyurethane foam the problem of condensation goes away. But, which type of spray foam? The open cell or the closed cell? The closed cell works pretty much everywhere. The open cell only in the South. So what is the definition of the South? Go to the International Residential Code (IRC) for their definition of South. South means Climate Zones 4 and lower. It has nothing to do with the Civil War. At least I don’t think it does.
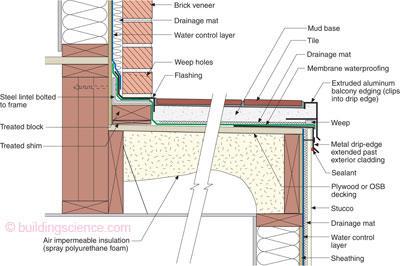
Figure 5: Insulating the Bottom of Decks Right—The only thing that changes from Figure 4 is the type of insulation used under the deck. It is an air impermeable insulation—spray polyurethane foam. With spray polyurethane foam the problem of condensation goes away. But which type of spray foam? The open cell or the closed cell? The closed cell works pretty much everywhere. The open cell only works in the South.
So where are we with decks and balconies at this point? We drain and drain again, provide drainage gaps, slope to drains and add insulation on the top. If we can’t add insulation on the top, we insulate from underneath. When we insulate from underneath, we follow the International Residential Code (IRC) provisions for unvented roofs. Open cell, closed cell, vapor retarders, air impermeable. It is all there. After all, a deck is pretty much an unvented roof that you walk on. I already said that, didn’t I?
Footnotes:
Max Baker’s marvelous book: Roofs, 1980, Montreal: Polyscience Publications. The book, now out of print, was sponsored by the National Research Council of Canada and it brought together information into one document from Canadian Building Science Digests, Research Papers, and Building Science Seminars and Workshops from the Division of Building Research. Much of this information is online and folks should go visit: http://tinyurl.com/2eezyth.
Quarterback for the Super Bowl winning Green Bay Packers. Tom Brady will be back with my beloved Patriots next year.
Check out "BSI-001: The Perfect Wall."
Except when I am wrong. But not here. We are finding, and others as well, that you need to drain both above and below the insulation layer or it will get saturated. No formal peer reviewed studies to cite yet, just anecdotal evidence. But all science first starts with anecdotal stuff. Nope, I am not going to be found wrong here, not at all.
Not all mud sets. Just most mud sets, especially in Florida. There are places where you can get “good mud.” But you have to know how to get “good mud.” So how do you know? Well, if you used the stuff before and you didn’t have a problem you got “good mud.” In other words regional (actually, more local than anything else), experience is the key.
OK, this deck drains over the outside edge. But look at the nice geometry of the drip edge. Of course, with this detail we need “good mud.”